In this article
The shoe you loved on eight-mile day hikes is exactly the one that flattens under thirty pounds. That soft, springy midsole that felt so good with empty hands has a limit, and you don’t find it in the store. You find it somewhere around mile 10 of day one, with two more days of walking still ahead of you. The line between a hiking shoe and a real backpacking shoe isn’t the ankle collar or the brand on the heel, it’s whether the foam under your foot still has anything left to give once you load it. Here’s what actually changes under a pack, seven pairs sorted by the problem each one solves, and the part every buying guide skips: what to do after you own them.
Here’s how the seven picks stack up before we get into why:
| Shoe | Best for | Why it holds under a pack |
|---|---|---|
| La Sportiva Ultra Raptor III | Best overall | Firm platform plus FriXion White grip, stable without boot weight |
| Merrell Moab 3 | Best budget | Proven Vibram TC5+ grip, breathable build, softer ride |
| La Sportiva Spire GTX | Firmest midsole | Stiff midsole and rock plate for genuinely heavy loads |
| HOKA Speedgoat 6 | Most cushioned | Deep stack absorbs impact on long-mileage days |
| Saucony Peregrine 16 | Best traction | Rock plate and PWRTRAC outsole for loose, rocky ground |
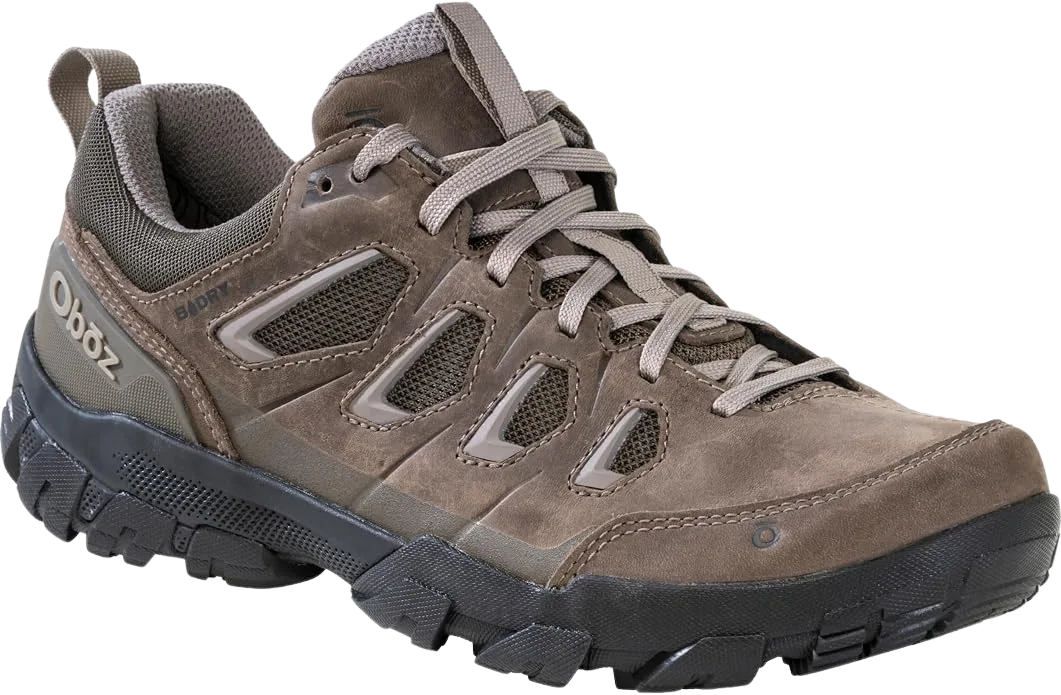
| Oboz Sawtooth X Low B-DRY | Wide feet, wet trails | Roomy last plus B-DRY membrane for swelling feet |
| Altra Lone Peak 9 | Best zero-drop | Natural platform, StoneGuard plate, wide toebox |
What Makes a Backpacking Shoe Different From a Hiking Shoe
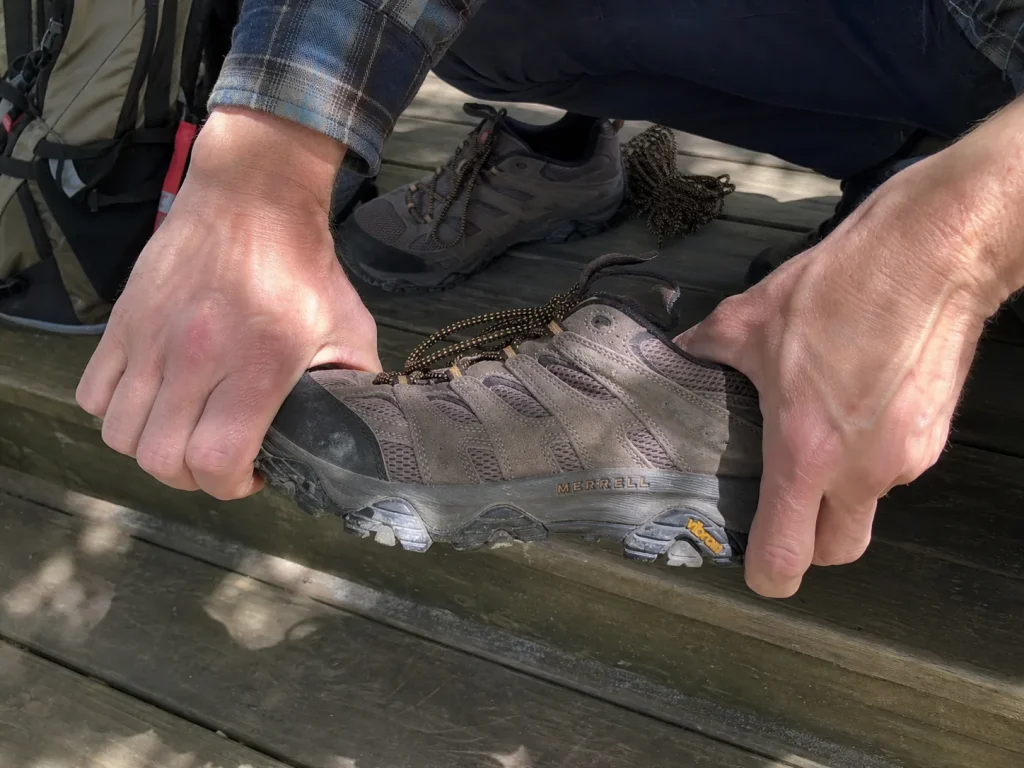
Picture the conversation at the trailhead. Someone shows up for a five-day trip in the trail runners they’ve worn on every Saturday hike for a year, and the veteran in the group doesn’t say “you need boots.” They pick up the shoe, grab it by the toe and the heel, twist it, and hand it back. That twist tells you more about how the shoe will behave under a loaded pack than any spec sheet on the wall.
Why Soft Cushioning Bottoms Out Under a Pack
Bottoming out is the whole problem in two words. A soft midsole compresses under load, and once it compresses all the way, it stops absorbing anything. Every rock, root and edge you step on goes straight through the foam and into your foot. On a day hike with light hands, you never reach that point. Add thirty pounds and you reach it constantly.
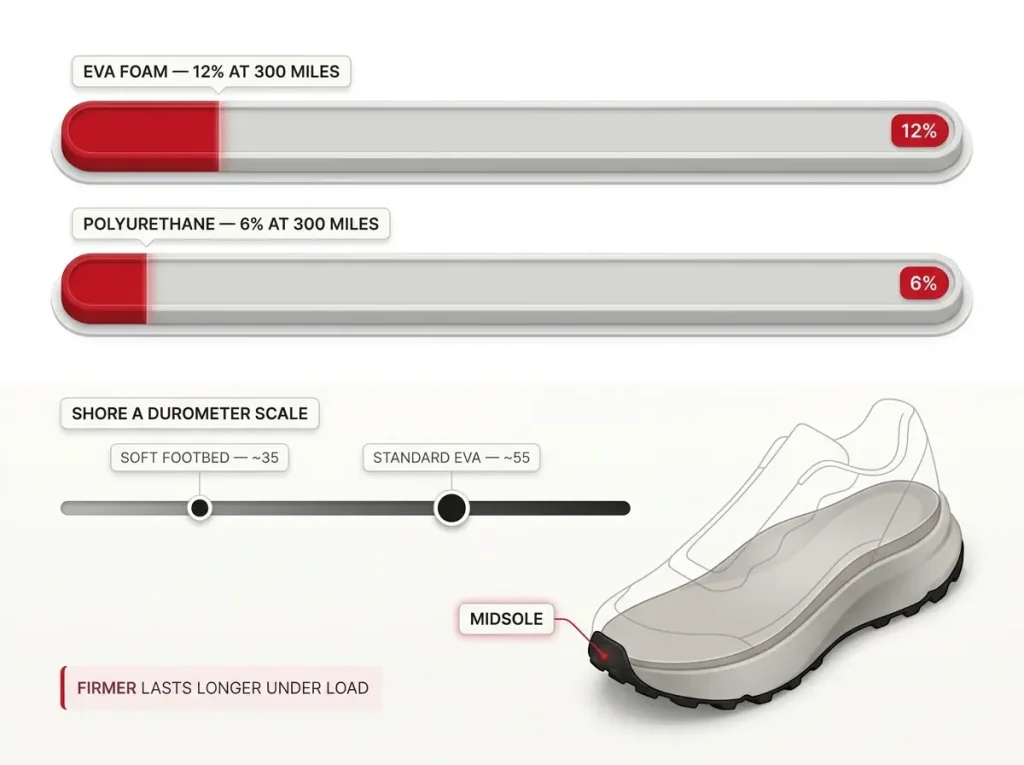
Foam type is where this gets measurable. EVA foam, the cushioning in most trail shoes, compresses roughly 12% by 300 miles. Polyurethane midsole foam compresses about 6% over the same distance and holds its shape for hundreds to thousands of miles under a heavy pack. On back-to-back trips or a thru-hiking season on the Pacific Crest Trail or the Appalachian Trail, an EVA shoe goes visibly flat well before a PU one does.
If you want a number to shop with, look for midsole durometer. Standard EVA runs around 55 Shore A. A soft footbed reads closer to 35. Most shoes don’t publish the figure, so the practical move is to compare against that 55 baseline: noticeably softer than a standard trail runner means it will pack down faster under weight. Firmer usually means it will still be supporting you on day three.
The Pack Weight Where a Boot Starts Winning
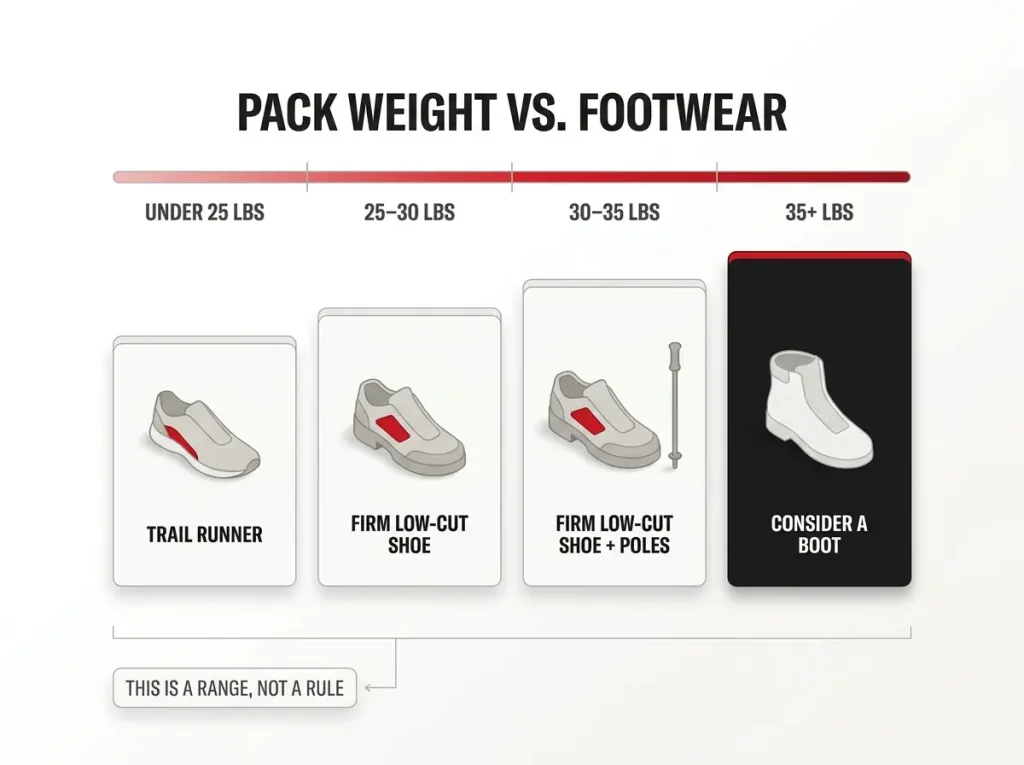
Here’s the honest version, because nobody benefits from a rule that pretends to be precise. Under roughly 25 to 30 pounds, a solid low-cut shoe handles backpacking fine. Past about 35 pounds, a stiffer boot starts earning the weight it costs you. Between those numbers you’re in judgment territory, and the judgment depends on your terrain and your ankles, not on a chart.
Some guides frame the same line as a pack weight percentage of what you weigh instead of a flat number, which scales better across a 130-pound hiker and a 220-pound one. Either way the conclusion is the same: the threshold is a range you test, not a number you obey.
The part that surprises people is that ankle support doesn’t come from the collar. Torsional rigidity, the shoe’s resistance to twisting underfoot, is what actually stabilizes you, and the Appalachian Mountain Club makes the same point: torsional rigidity, not collar height, is what stabilizes your ankle underfoot. A torsionally stiff low-cut shoe can out-support a floppy mid-cut boot. That’s why the twist test is a real gesture and not a party trick. It’s also why low-cut shoes hold their own on most trails even when the marketing says otherwise, and why the ankle-support case doesn’t survive the injury data as cleanly as most hikers assume.
So the useful question isn’t “boots or shoes.” It’s what you’re going to do about the terrain you picked. Trekking poles do more for a loaded descent than two extra inches of collar. Ankle strength you built before the trip does more than either. And knowing your own history matters most of all: if your ankles have rolled twice this year on technical ground, that’s information a spec sheet can’t give you.
Do the twist test in the store, not at home after you’ve worn them. Grab the shoe by the toe and the heel and wring it like a wet towel. If it turns easily, that shoe is going to let your foot roll around on rocky ground once you’re carrying weight. If it fights you, that resistance is what’s going to hold your ankle steady at mile 12.
The Mile 10 Gut Check
There’s a number that reframes this whole category, and almost nobody carrying a pack has heard it. One ounce of weight on your foot costs you about the same energy as four ounces in your pack. Run that math on real shoes and 10.6 ounces of extra shoe weight works out to roughly 2.65 pounds of extra pack weight. You can erase a careful two-pound pack upgrade by picking a shoe half a pound heavier per foot, because you lift that shoe with every single step. The community calls it swing weight, and it’s the reason a “barely heavier” shoe stops feeling barely heavier around hour five.
But here’s the thing the spec sheets can’t give you. If you’re second-guessing your shoe choice by mile 8 or 10, that’s your answer. Not the durometer, not the stack number, not what the review said. The doubt itself is the data. Feet talk before they blister, and the hikers who listen at mile 10 are the ones who don’t limp into camp on day three.
Best Overall for Loaded Miles: La Sportiva Ultra Raptor III
This is the pair to buy when you want someone to just tell you which one. Firm underfoot, sticky where it matters, and stable enough that you’re not negotiating with the trail four hours into a carry.
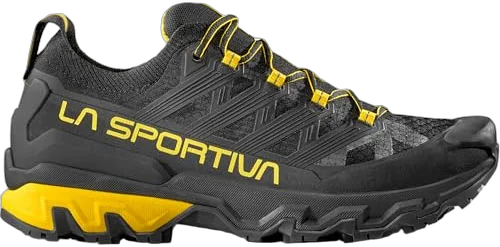
The outsole here is La Sportiva’s own FriXion White compound rather than a Vibram, which is worth knowing if you shop by rubber name. It runs an Impact Brake System lug pattern, meaning the lugs are shaped and angled to bite on descents specifically, which is exactly when a loaded pack is trying to push you down the hill faster than you want to go. The rubber name on a sole is a real signal, not marketing noise: Vibram Megagrip leans sticky for wet rock, Vibram XS Trek leans durable, Vibram TC5 splits the difference for general trail. If that trade-off interests you, it’s worth understanding how sticky rubber earns its keep on rock while deep lugs earn theirs in mud, because the right answer changes with the ground you’re on.
This is also the shoe that gets closest to approach shoes territory without becoming one. If your route involves real scrambling, that’s a different tool, but for loaded trail miles with rocky stretches the Ultra Raptor III covers the ground.
The firm platform is the direct fix for the bottoming out problem. This shoe holds structure where a plush trail runner surrenders, which is what you’re actually paying for.
Now the honest part. The La Sportiva Ultra Raptor III is neither the cheapest nor the softest shoe here. If your trips run under 20 pounds on smooth terrain, you’re buying stiffness you’ll never cash in, and the Moab 3 below will make you happier for less. Firm platforms also feel worse for the first two miles than a cushy shoe does. That’s not a defect. At mile 12 that firmness is the reason your feet are still working.
Best Budget: Merrell Moab 3
Everyone has seen this shoe on trail. It isn’t glamorous, it isn’t the firmest thing here, and it’s still the right answer for a lot of people.
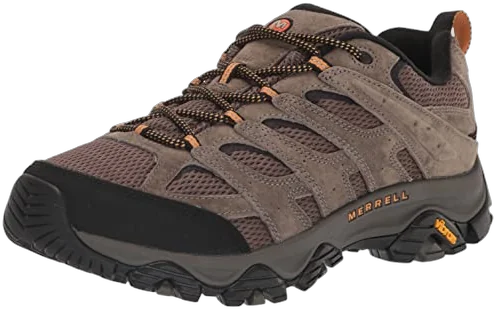
The Vibram TC5 outsole underneath is genuinely good rubber, not a budget compromise. Where the Merrell Moab 3 makes its trade is the upper: this is the breathable mesh upper and nubuck leather version with no membrane at all. That sounds like a downgrade until you spend a day in water crossing country and watch it soak through in one minute and dry in an hour, while a membrane shoe holds the water it took on.
The midsole firmness is the real caveat. Load thirty-plus pounds onto the Moab and you’ll feel more of the ground than you would in the Spire GTX or the Ultra Raptor III. That’s a conscious price trade, not a hidden flaw, and it’s a fine trade for weekend trips with a sane pack.
Be suspicious of a backpacking shoe that feels amazing the second you put it on in the store. Comfortable-out-of-the-box almost always means a softer midsole, and softer is exactly what gives out first under a pack. The shoes that feel just okay on the carpet are often the ones still supporting you on day three.
Firmest Midsole for Heavy Loads: La Sportiva Spire GTX
This is the shoe for people who already learned about bottoming out the expensive way and don’t intend to repeat the lesson.
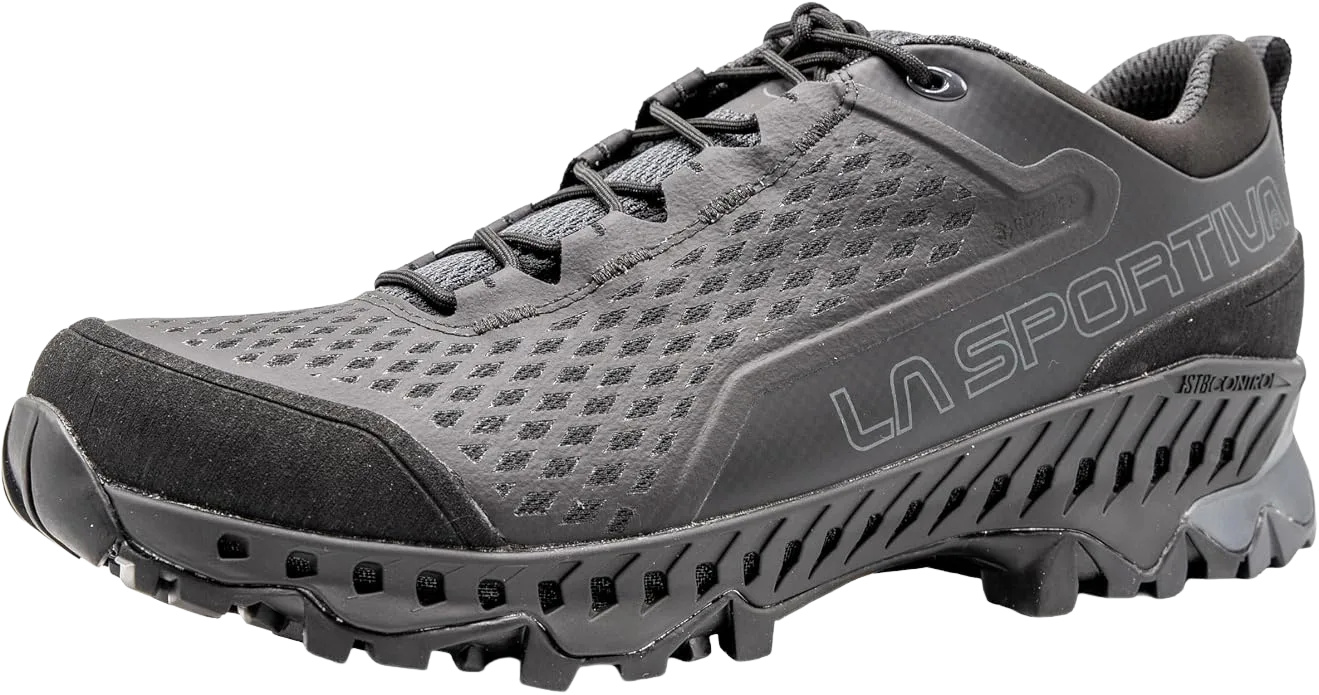
The firm platform plus the rock plate is a two-part answer to the same complaint: stiffness stops the foam from packing out, the plate stops sharp stone from reaching your arch. It’s the same firm platform flat-footed hikers get steered toward, which is a decent signal that the stiffness is real and not marketing.
The GORE-TEX does what a waterproof membrane does, with the breathability cost that comes attached. That trade gets its own treatment further down with the Oboz, and it applies here identically.
Heel-to-toe drop on the La Sportiva Spire GTX sits at the high end, 11 to 16mm depending on size. That’s the opposite pole from the Altra below. Drop is biomechanics, not a quality ranking, and a high drop suits an Achilles that’s used to a raised heel.
The anti-sell here is simple. This is the premium end of the lineup, and if your feet have never felt a shoe give out under you, that stiffness is going to feel like too much shoe, because for you it is. Beginners generally want the Ultra Raptor III or the Moab 3.
Most Cushioned for Long Days: HOKA Speedgoat 6
If the first section said soft foam collapses, why is the most cushioned shoe here on the list? Because stack height and softness are different things, and conflating them is how people pick wrong.
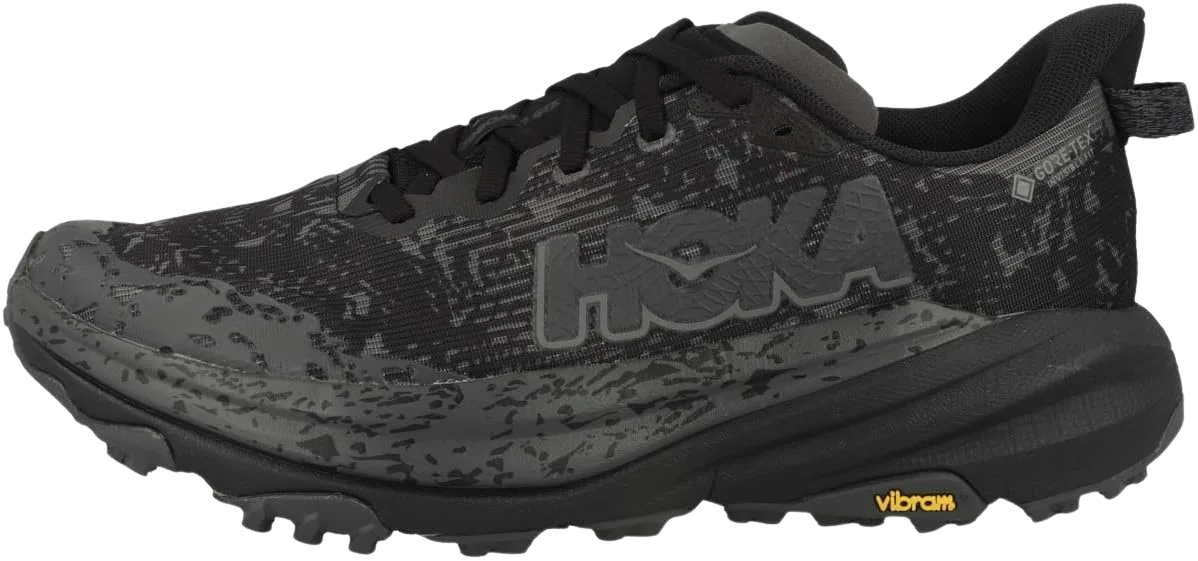
A tall stack height is not the same as a soft one. The question that decides whether cushioning helps or hurts under load is whether the foam keeps its structure once you compress it, not how much foam is there. The HOKA Speedgoat 6 stacks a lot and still holds shape, which is why it survives in a backpacking conversation at all when most max-cushion shoes don’t. It’s worth knowing where a trail runner still makes sense under a pack before you commit either way.
Remember the swing weight math from earlier: every ounce here costs you four in pack terms. Max cushion isn’t free, it’s just paid for somewhere you don’t see on the scale.
The real limit is technical terrain. A tall stack raises your center of gravity, and on uneven rocky ground with 35-plus pounds up top, your ankle does more work to keep you over your feet. This isn’t the pick for a heavy load on rocky terrain, and anyone who tells you it is hasn’t carried one there.
One more thing about deep stacks that nobody mentions in reviews. You stop feeling small rocks, which is the selling point. You also stop feeling the edge of the rock you’re placing your foot on, which is not.
Best Traction on Loose, Rocky Ground: Saucony Peregrine 16
Weight changes what a slip costs. Without a pack, a foot that skates out is a startle. With thirty pounds riding high, that same skate takes you down.
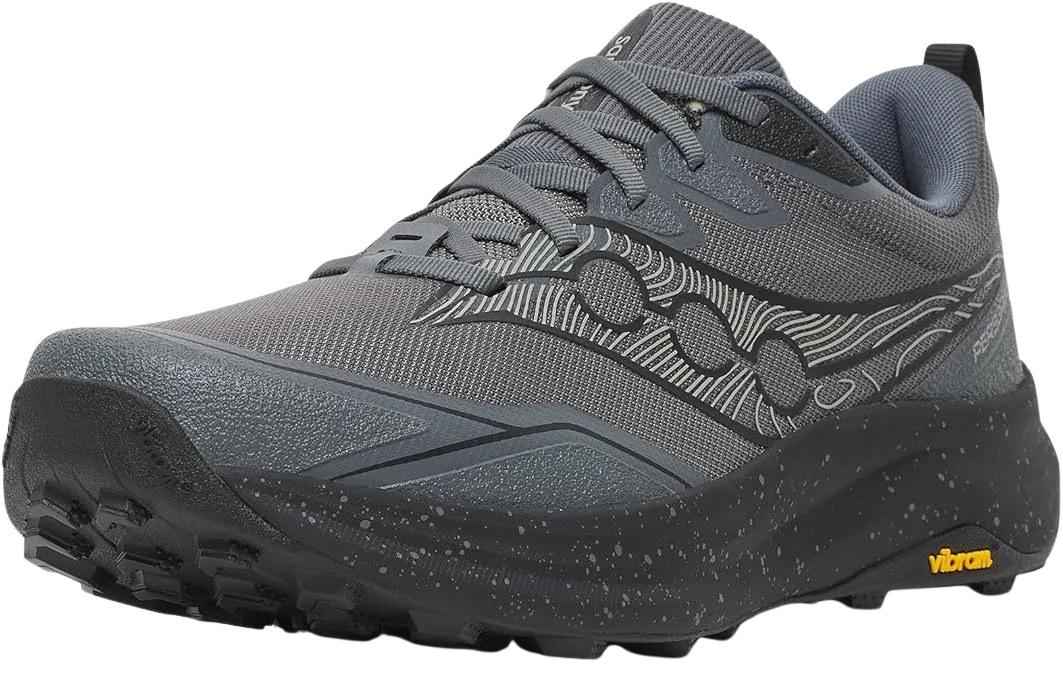
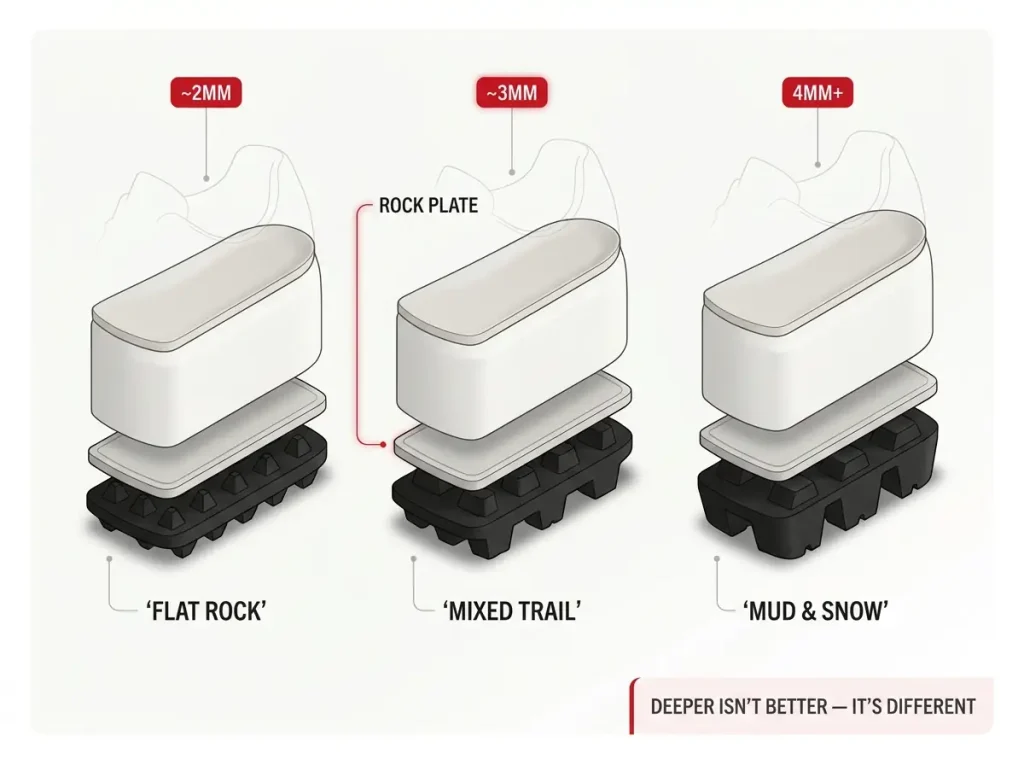
The integrated rock plate in the Saucony Peregrine 16 is a thin layer between midsole and outsole that spreads point pressure so a single sharp stone doesn’t drive into your arch. Whether you need one is a real question with a real answer, and it’s worth reading whether you actually need a rock plate or it’s just dead weight before you assume more protection is always better.
Lug depth is the spec most people skip and the one that changes behavior most. Shallow lugs suit flat rock, 4mm and deeper bite into mud and snow. Deeper isn’t better, it’s different, and lug depth is a terrain decision rather than a quality ranking. The rubber compound matters just as much as the tread pattern, same logic as the FriXion discussion up in the Ultra Raptor section.
Lug spacing is the part nobody reads about until mud season. Widely spaced lugs shed the mud they pick up as the shoe flexes, which is what self-cleaning lugs means in practice. Tightly packed lugs load up until the sole is a smooth brick of clay, and at that point tread depth stops meaning anything at all.
Here’s what a rock plate actually feels like: nothing. You never notice it doing its job. You notice its absence around mile 14, when every stone on the trail starts registering somewhere in the middle of your foot, and there are still four miles to camp.
Best for Wide Feet and Wet Trails: Oboz Sawtooth X Low B-DRY
Your day-three feet are not your day-one feet. They swell. The pair that fit beautifully in the store at 10am fits differently at mile 30, and if there’s a membrane wrapped around them, you now have a swollen foot inside a box that can’t breathe.
Start with fit, because fit beats every other spec on this page. Swelling feet are the norm on a multi-day trip, not the exception. Shop in the afternoon when your feet are already a little bigger, leave a thumb’s width in front of your longest toe, and walk on something other than the flat store carpet before you commit. That fit-first order is the same approach Scouting America’s trekking footwear guidance backs, and it’s worth knowing when sizing up is the right call and when it just creates slop before you order a half-size bigger by reflex.
If a shop has a boot fitter on staff, use them. A Brannock device measures your arch length, not just your toe-to-heel, and plenty of people have been buying the wrong size for a decade because those two numbers disagree.
Toebox width is why the Oboz Sawtooth X Low B-DRY is in this lineup at all. The last runs generous, which for wide feet is the difference between a trip and an ordeal. The flip side is real: on narrow feet that same roomy last leaves your foot swimming, and a foot that slides inside the shoe blisters just as fast as one that’s pinched.
Now the membrane. The B-DRY waterproofing is a regional and seasonal decision, not a universal upgrade. Appalachia, the Pacific Northwest, shoulder-season anywhere: a membrane earns its keep. Dry summer in the desert: it’s a sweat box you paid extra for. If you want the full mechanism, a waterproof shoe can still leave your foot soaked from the inside, and understanding why saves a lot of confusion.
The word the community uses is wet-out. It’s what happens when the outer fabric saturates and stops shedding water, so the shoe holds moisture even though the membrane itself is perfectly intact. People read that as “my GORE-TEX failed.” It didn’t. The face fabric wetted out and the breathability went with it.
The hidden cost of a membrane isn’t rain, though. It’s the day you cross a stream deeper than your collar. A mesh upper fills and empties. A membrane fills and stays full, because the same layer that keeps water out keeps it in.
Best Zero-Drop: Altra Lone Peak 9
Heel-to-toe drop is the spec people copy off reviews without understanding. Zero drop isn’t better. It’s different, and a loaded five-day trip is the worst possible place to find out how different.
One honest note about those two buttons before anything else. The men’s link goes to the standard Altra Lone Peak 9, which has no membrane. The women’s link goes to the Lone Peak 9 Waterproof Low, which does. Same platform, same wide toebox, different upper, because the standard women’s version isn’t reliably in stock right now. If you’re a woman shopping this pick, everything in the Oboz section about membranes applies to your pair and not to the men’s.
Drop runs from zero here to the 11–16mm of the Spire GTX. Neither end is correct. What matters is what your Achilles is currently adapted to, and a zero drop platform loads it differently than a raised heel does.
The StoneGuard plate is doing necessary work. A level, flexible platform transmits more ground than a stiff raised one, so the plate is what keeps sharp rock from becoming the story of your day.
Now the strongest anti-sell in this whole article. If you have never walked in zero-drop shoes, a multi-day trip with a loaded pack is not where you test them. The break-in period for a drop change is measured in weeks of gradual adaptation, not in a shakedown hike. The transition takes weeks, and rushing it is how people get hurt is not a caution anyone made up for liability reasons. It’s the actual failure mode.
Break Them In With the Pack On, Not Around the Block
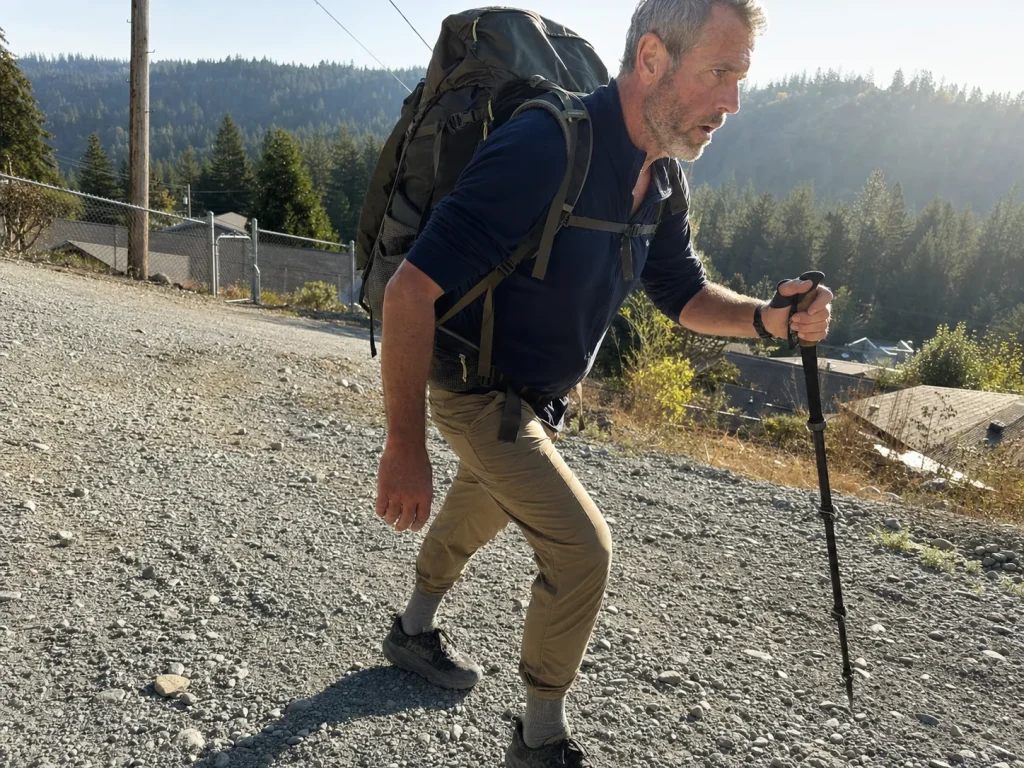
Every guide says break your shoes in before the trip. None of them say what to break them in with. Walking to the store in new shoes with your hands in your pockets isn’t a break-in. It’s just wearing shoes.
Why an Empty-Handed Walk Tells You Nothing
Load 25 or more pounds on your back and your gait changes. Your weight shifts forward, especially on descents, and your foot moves inside the shoe differently than it did on flat ground with empty hands. The heel works differently. The shoe flexes at a different point in your stride. Everything you learned about that fit on a neighborhood walk was learned under conditions you will not be in.
The hot spot is the specific casualty. On an unloaded walk your foot sits where the shoe designer intended. Under a loaded pack on a long downhill, your foot drives forward into the toebox on every step, and a seam that never touched you before now touches you a thousand times an hour. That’s the blister you find on day one of the trip, in the place you had no reason to suspect.
The heel counter is where this shows up first for most people. Unloaded, your heel sits still and the counter does nothing you can feel. Loaded and descending, your heel lifts and drops against it on every stride, and a counter that fits you fine on flat ground can start working on the same square inch of skin for four straight hours.
Swelling compounds it. Feet get bigger under load and mileage, so the fit you validated at minute 20 of an easy walk is not the fit you’ll have at hour six of a real day. This is discoverable in advance or discoverable on the trail. Those are the only two options, and only one of them is fixable.
The mistake shows up in trip reports constantly: someone did the break-in walks, felt fine, and then found the real fit problem 12 miles from the car with a pack on and no way to change anything.
A Break-In That Actually Predicts Your Trip
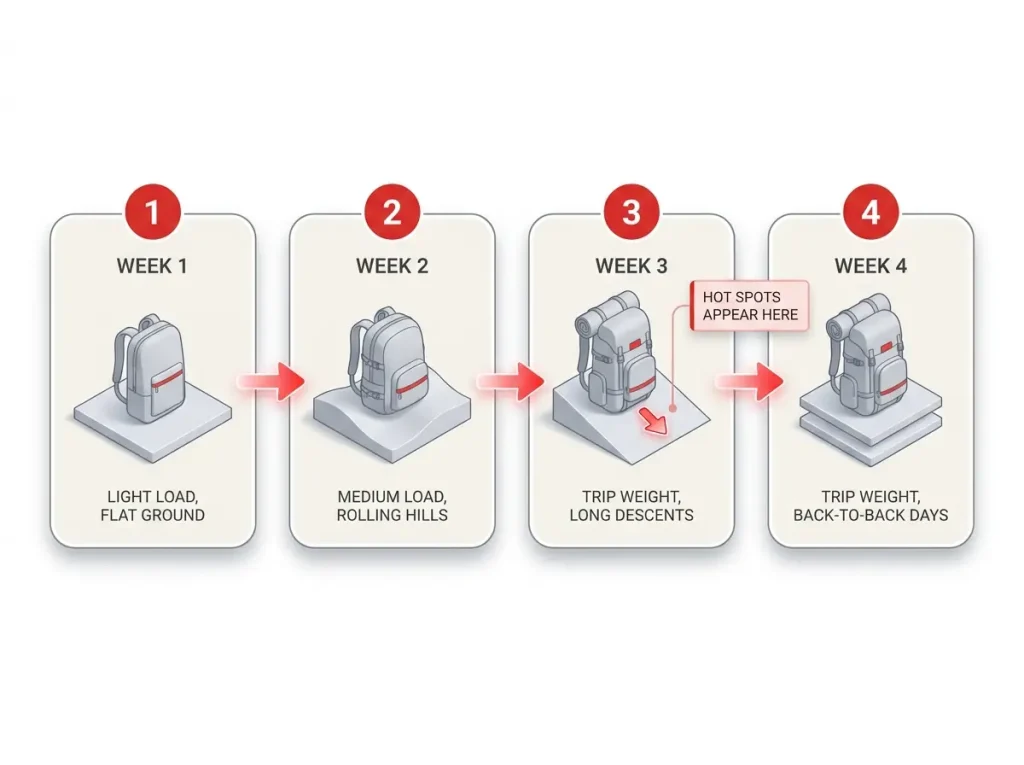
The protocol is boring, which is why nobody publishes it. Walk with the actual weight you plan to carry, over several weeks, adding distance and elevation gradually rather than all at once.
Three details make it work. Carry the real load, not a token daypack, because the whole point is reproducing the gait change. Include long descents, because that’s where forward drive finds the hot spots and where flat-ground walking teaches you nothing. Wear the socks you’ll actually hike in, since a different sock thickness is a different fit.
Blister prevention is the entire payoff. The break-in period isn’t about softening the shoe, which is a leftover idea from stiff leather boots anyway. It’s about finding where the shoe will rub you while you’re still 20 minutes from your own house instead of 20 miles from the trailhead. How long that takes depends on what the shoe is built from, and break-in time varies a lot by material, so a synthetic trail shoe and a leather-heavy build are on different schedules.
Find a hill with a long, sustained downhill and walk it with your loaded pack at least twice before any big trip. Uphill tells you almost nothing about fit. Downhill is where your foot slides forward, your toes find the front of the shoe, and every hot spot you were going to discover on day two announces itself early enough to fix.
Your Day 2 Plan for Soaked Shoes
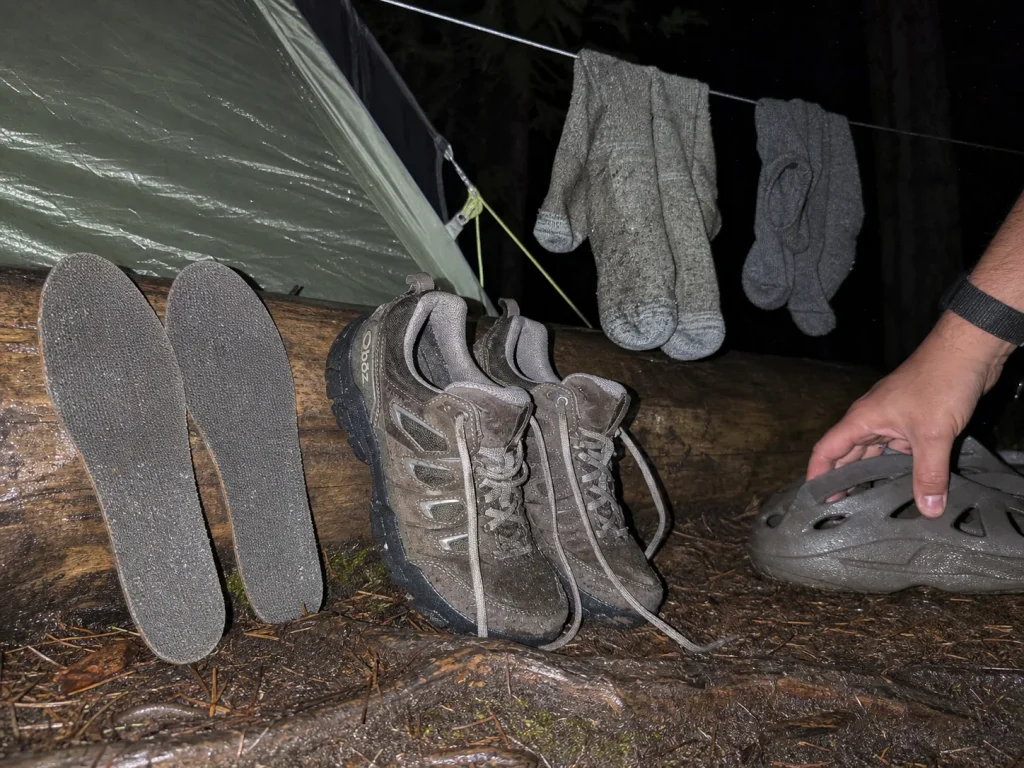
Day one you crossed a creek, or it rained. Now it’s morning on day two and you have a decision nobody’s buying guide prepared you for: walk 12 miles with cold, squelching feet, or burn camp time trying to dry shoes that don’t want to dry.
Waterproof or not, on a multi-day trip your shoes are getting wet. The membrane question decides how they get wet, not whether. So the plan matters more than the shoe, and this is the part every roundup ends before reaching.
The Sock Rotation That Saves Day 3
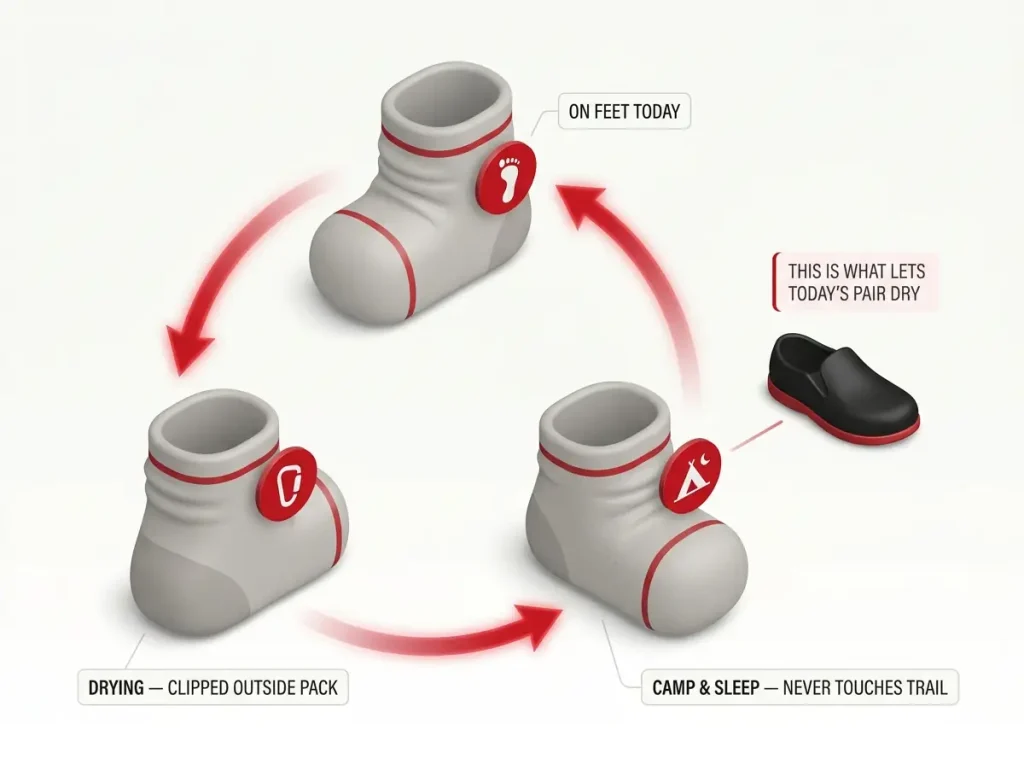
The system is three pairs, or two if you’re counting ounces hard. One pair on your feet. One pair drying, clipped to the outside of your pack where sun and moving air can work on it, weather permitting. One pair bone dry, untouched, reserved for camp and sleep only.
That third pair is the one people cut, and cutting it is the mistake. The camp pair never touches the trail. It doesn’t get worn for “just the last mile” because your feet are cold. Its entire job is being dry at the end of the day, and it can only do that job if it’s never done any other one.
Sock rotation fails in exactly one predictable way: someone packs a single pair, wears them through a wet day, and then sleeps in them. Now you have wet socks, wet feet all night, and nothing dry to start day three with. Two pairs and some discipline prevent the whole cascade.
Camp Shoes Are Functional Gear, Not Luxury Weight
Five or six ounces of camp shoes look like comfort weight on a gear spreadsheet. They aren’t. They’re the only reason your hiking shoes get a real chance to dry overnight, because a shoe with a foot in it dries approximately never.
This is where the membrane trade-off from the Oboz section comes due. A mesh upper that soaked through in a water crossing will be most of the way dry by morning if it’s off your foot and open to the air. A membrane shoe that took water in over the collar holds it, because the layer that blocks water from outside blocks it just as well from inside. That’s not a flaw in the shoe. It’s the trade you made at purchase, and it’s why shoes that drain beat shoes that hold water on wet trips in some regions and not others.
Pull the insoles when you take the shoes off. Prop the shoes on their sides with the tongues open, ideally somewhere with airflow and not sealed in a vestibule. Loosen the laces all the way down. None of this is clever, and all of it is skipped by people who are tired.
Here’s the real reason to carry the camp shoes. The worst part of wet shoes isn’t hiking in them. It’s the moment at 5am when you have to put a dry, warm foot back into a shoe that’s still cold and damp from yesterday, and you have 12 miles to walk. That moment is what five ounces buys you out of.
If your shoes are still wet at bedtime, stuff them loosely with any dry fabric you can spare and pull it out in the morning. It won’t dry them completely, but it wicks the standing moisture out of the footbed overnight, which is the difference between damp and squelching. Just don’t sacrifice your sleep socks to do it.
The Bottom Line
The midsole decides, not the ankle collar. Soft foam flattens under weight, and firmness is the actual line between a hiking shoe and a backpacking shoe. Everything else on the spec sheet is downstream of that.
Your load and your terrain pick the shoe, not the ranking. Thirty pounds on loose rock and twenty pounds on smooth trail are different problems, and the seven pairs above are sorted by problem for exactly that reason.
Buying is half the job. Break them in with the pack on, and have a plan for the morning they’re wet. That’s where a good trip and a long, sour one part ways.
Before your next trip, go do the twist test on the shoes already in your closet, then walk a long downhill with your real pack weight. You’ll learn more about your footwear in that hour than in ten reviews.
Frequently Asked Questions
01Are trail runners good enough for backpacking?
For pack weights under roughly 25 to 30 pounds, yes. A solid trail runner handles that load fine. Past about 35 pounds, a stiffer platform starts earning the weight it costs. The midsole firmness matters more than the category label on the box.
02Should backpacking shoes be waterproof?
It depends on your region and season, not on a universal rule. Wet climates and shoulder seasons justify a membrane. Dry summer trips do not, because you give up breathability and drying speed for protection you never use.
03Do you need ankle support for backpacking with a heavy pack?
Not from the collar height, which is the part most hikers assume does the work. A 2019 meta-analysis in the Journal of Athletic Training found no significant difference in ankle sprain rates between boots and trail runners. Torsional rigidity underfoot matters more.
04How long does it take to break in backpacking shoes?
Several weeks, and only if you do it with the pack weight you plan to carry. Empty-handed walks do not reproduce the gait change that finds hot spots. Synthetic trail shoes come around faster than leather-heavy builds.
05Are camp shoes worth the weight on a backpacking trip?
Yes, at roughly five to six ounces they do double duty. They give your feet a break at camp and, more usefully, they are the only way your hiking shoes get real airflow overnight. A shoe with a foot in it never dries.
Risk Disclaimer: Hiking, trekking, backpacking, and all related outdoor activities involve inherent
risks which may result in serious injury, illness, or death. The information provided on The Hiking Tribe is for
educational and informational purposes only. While we strive for accuracy, information on trails, gear, techniques,
and safety is not a substitute for your own best judgment and thorough preparation. Trail conditions, weather, and
other environmental factors change rapidly and may differ from what is described on this site. Always check with
official sources like park services for the most current alerts and conditions. Never undertake a hike beyond your
abilities and always be prepared for the unexpected. By using this website, you agree that you are solely
responsible for your own safety. Any reliance you place on our content is strictly at your own risk, and you assume
all liability for your actions and decisions in the outdoors. The Hiking Tribe and its authors will not be held
liable for any injury, damage, or loss sustained in connection with the use of the information herein.
Affiliate Disclosure: We are a participant in the Amazon Services LLC Associates Program, an
affiliate advertising program designed to provide a means for us to earn advertising fees by advertising and linking
to Amazon.com. As an Amazon Associate, we earn from qualifying purchases. We are also an official affiliate partner
of Black Diamond Equipment via the AvantLink network. If you click on a Black Diamond affiliate link and make a
purchase, we may earn a commission at no additional cost to you. We also participate in other affiliate programs and
may receive a commission on products purchased through our links. Additional terms are found in the terms of
service.