




















The pack that wrecks your shoulders usually isn’t too heavy. Its suspension is doing the wrong job, or it’s fitted wrong, and the weight ends up hanging off your collarbones instead of riding your hips. Ask anyone who’s carried a multi-day load: the gap between a great pack and a punishing one is almost never the brand on the label. It’s the frame type and how the load actually reaches your hips. This breaks down the three suspension types, the two things everyone confuses, and how to match a system to the weight you really carry.
What a Backpack Suspension System Actually Is
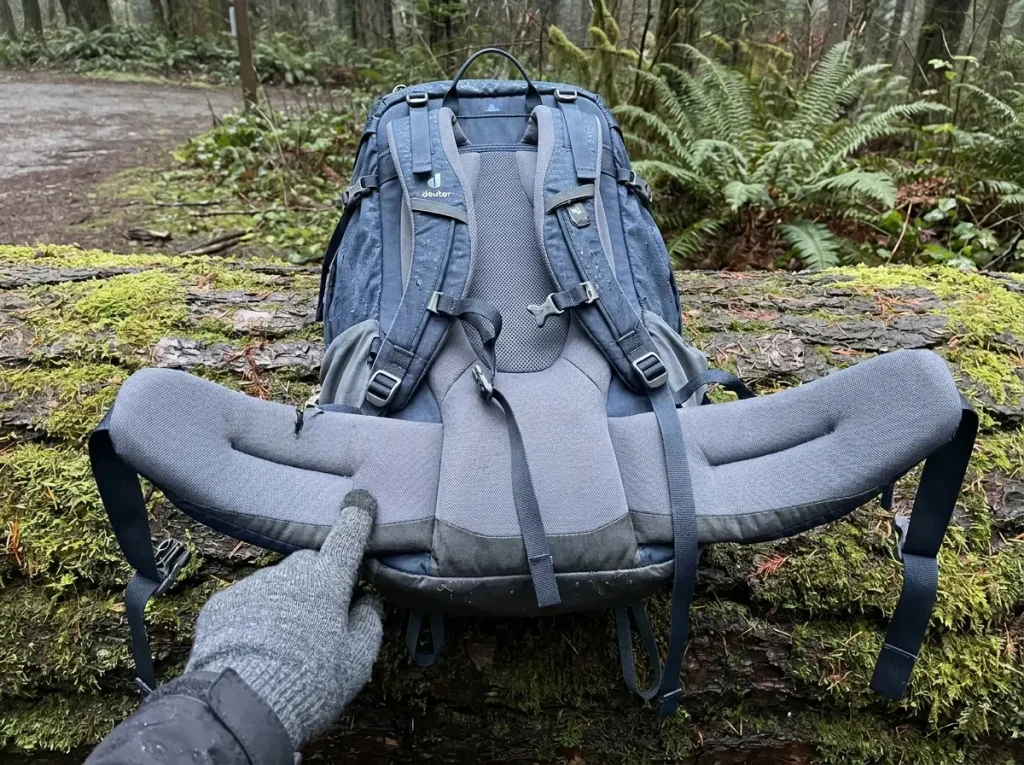
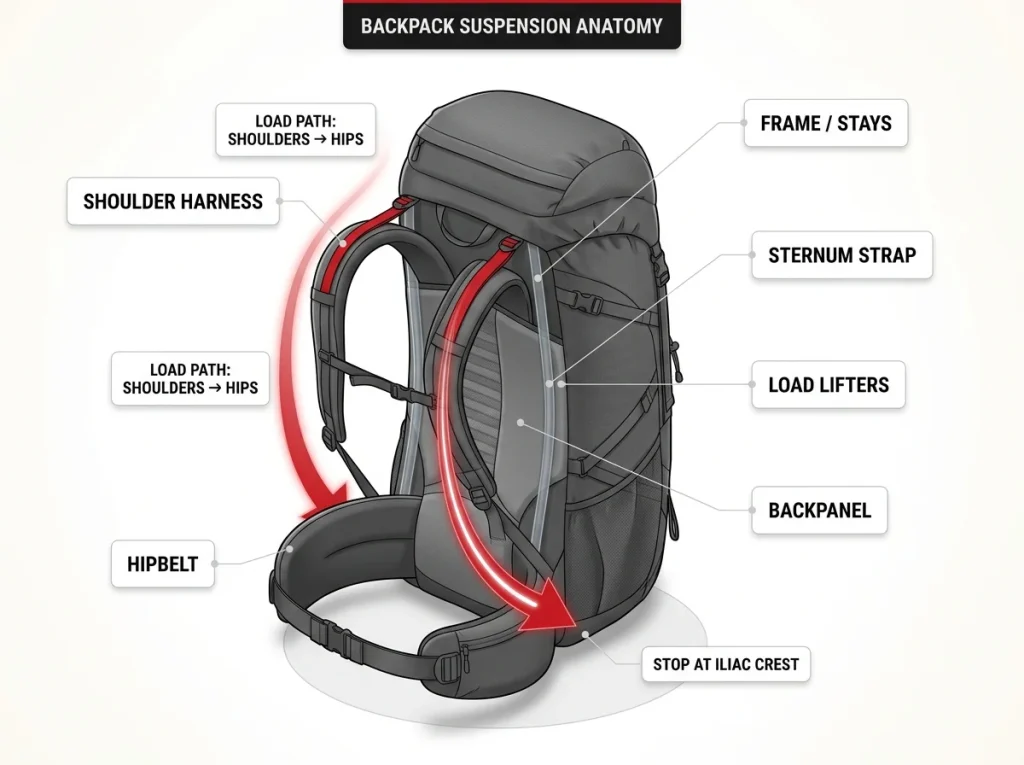
A backpack is a load-hauling tool, and the suspension system is the part that decides whether the weight rides your hips or hangs off your shoulders. It isn’t one thing. It’s six parts working as a unit: the frame, the shoulder harness with its shoulder straps, the padded hipbelt, the backpanel, the load lifters, and the sternum strap. Weaken any one of them and the whole carry falls apart.
The job of the system is load transfer, the weight distribution that pulls the load off your shoulders and routes it to your hips. A correctly loaded hipbelt should carry somewhere around 80% of the pack’s weight, with sources putting the range at 70 to 90%. Your shoulders are there to steady the load, not bear it. Osprey’s own suspension breakdown spells out how the load actually routes down to the hips, and the short version is this: the frame gives the weight a path, and the hipbelt is where it lands.
That landing spot has a name hikers throw around: the iliac crest, the top ridge of your hip bones. When the belt sits there and the frame is doing its job, a heavy pack feels planted. When it doesn’t, you get the classic complaint.
If your shoulders ache at the end of a day, don’t blame the padding. Nine times out of ten the hipbelt isn’t loaded, so the suspension is fighting you instead of working for you. Drop the pack, reset the belt on your hip bones, and re-snug it before you touch anything else.
If you’re still picking a pack from scratch, our guide to choosing a hiking backpack without wasting money covers the bigger picture. Suspension is one decision inside that, and it’s the one that decides comfort.
Internal Frame Packs (The Modern Default)
When most people picture a backpack, they’re picturing an internal frame pack. The frame lives inside the pack body, hugs your back, and disappears when it fits right. It’s the default for a reason.
How an internal frame routes the load
An internal frame sits flush against your back, which keeps the load close to your spine and lowers your center of gravity. That’s what makes these packs stable on uneven ground. The weight tracks with you instead of pulling you around on a side-hill or a rocky step. For day hikes through multi-day trips, this is the carry you want.
Stays, framesheets, and carbon rods (what’s inside)
The structure usually comes from aluminum stays, thin bendable metal rods you can shape to your back, or an HDPE framesheet, or lightweight carbon fiber rods. Some packs combine a framesheet with stays, or use composite stays for a semi-rigid spine. Those stays do a second job most people miss: they’re what makes the load lifters work. No frame behind the strap means nothing for the lifter to pull against.
Who an internal frame is for
This is the right answer for the majority of hikers, especially anyone carrying a standard backpacking load. The honest catch is heat. A frame that sits flush also sits against your back, so a contact-back internal frame runs warmer, which is exactly the trade-off the ventilation section gets into. For most people the stability is worth it, though there’s a clear point, around the 25-pound mark, where a frame stops being worth its weight and it’s time to look at something lighter.
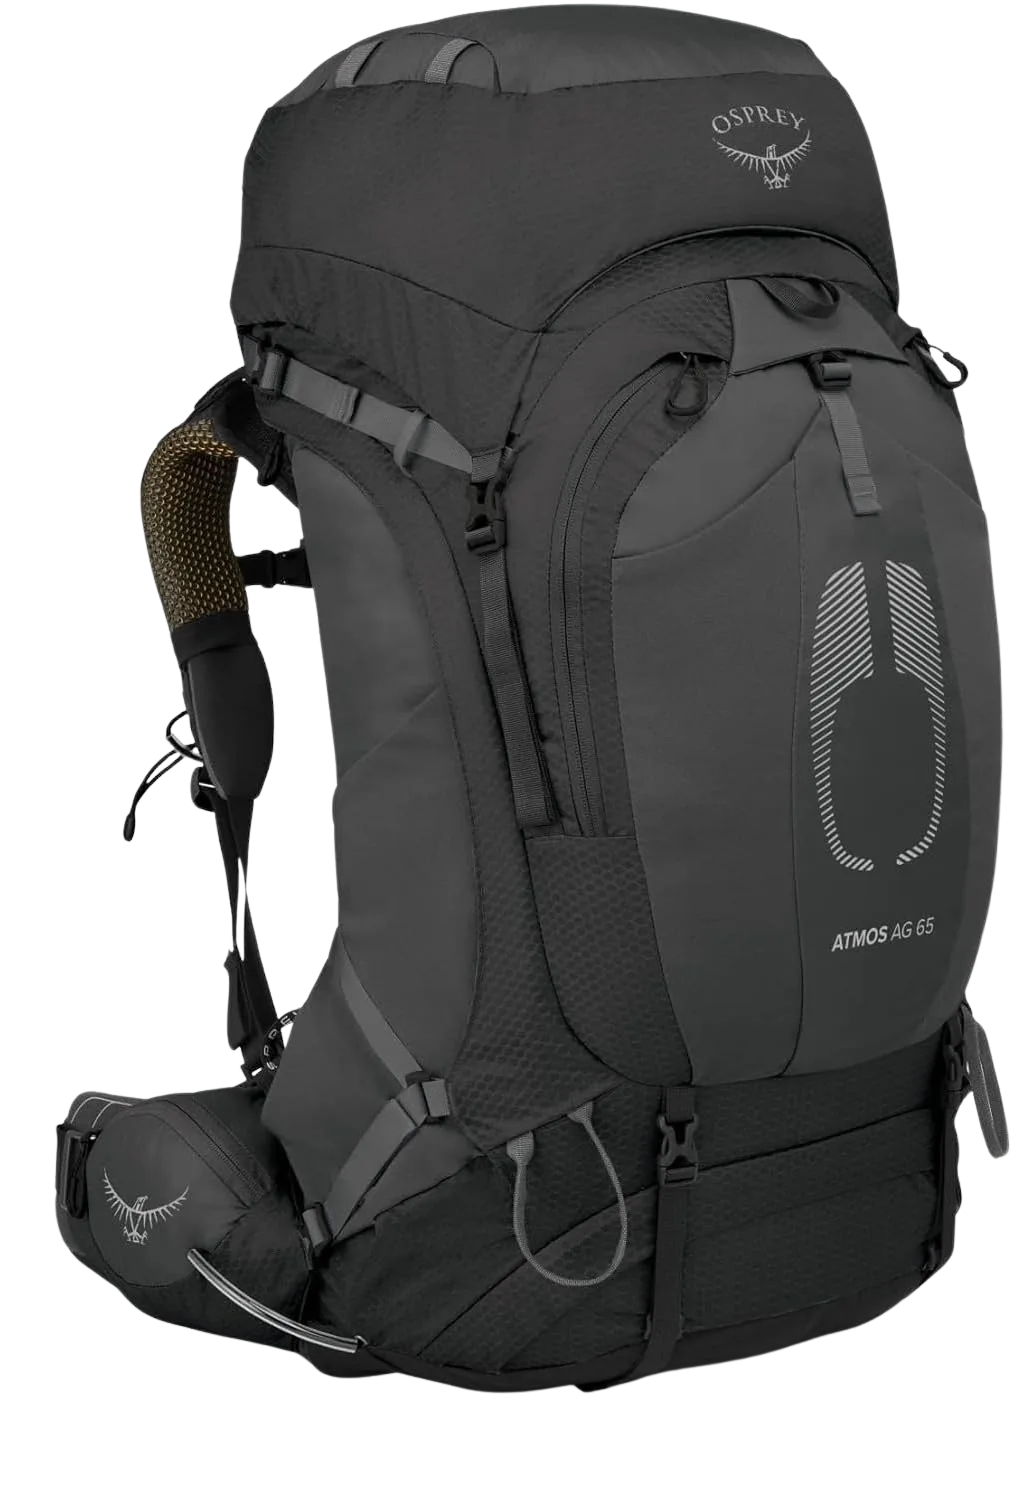
The Atmos AG earns its spot here because it shows both ideas at once. The Osprey Anti-Gravity system is the internal frame doing the load bearing, the suspended mesh handles the airflow, and the adjustable suspension lets you dial in your torso fit. Hold that thought, because plenty of people assume those two features are the same decision. They aren’t.
External Frame Packs (Still Alive for Heavy Hauls)
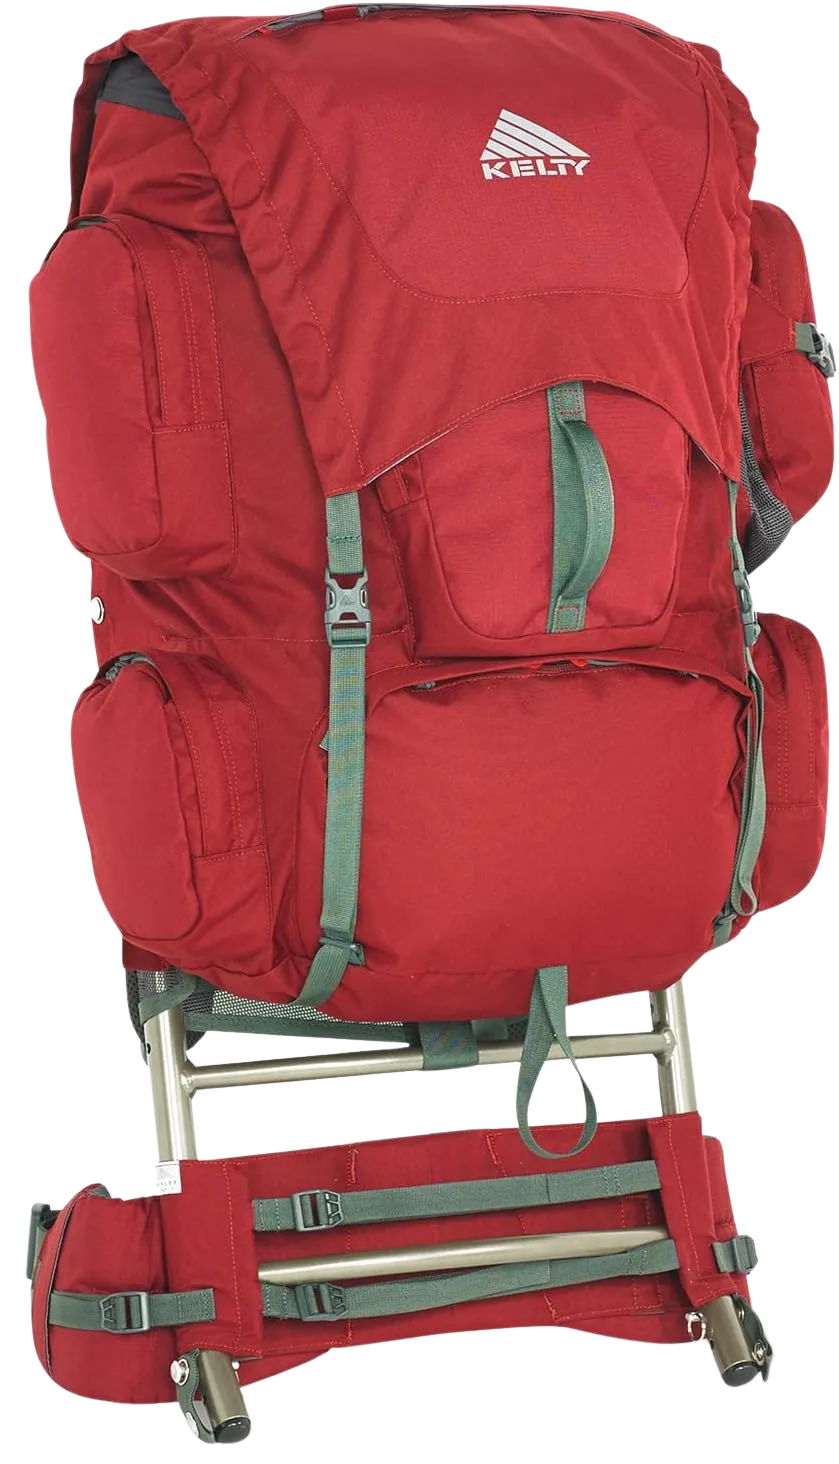
The external frame pack is the design the trail crowd loves to call obsolete and the elk hunter swears by. Both are right, for different loads. The frame rides on the outside, the bag bolts to it, and the whole thing is built to haul weight your average internal frame would hate.
Why the weight rides high (and when that helps)
External frames carry best in the 50 to 90 pound range and place the load high, at or above your shoulders, on a rigid frame. That high, stiff placement lets you keep an upright posture under a brutal load, and the rigid bars hold the bag off your back so air moves freely. On a long, hot haul with serious weight, that combination beats an internal pack.
The hauling and hunting use case
This is where externals never died. Hunters strap meat and quarters straight to the bare frame with the bag pulled off, which no internal pack can match. The same logic helps anyone carrying awkward, heavy, oddly shaped gear. If you’re routinely lashing bulky gear to the frame the right way, an external frame gives you more rigid anchor points to work with.
Who should skip it
Most backpackers. The high center of gravity that helps on a fire road works against you on technical terrain, where it makes you tippy and catches on brush. For normal trail loads it’s overkill. As longtime backpacking writers point out, external frames didn’t disappear so much as retreat to hunting and heavy hauling, which is exactly where they still belong.
Frameless Packs (Ultralight, With a Catch)
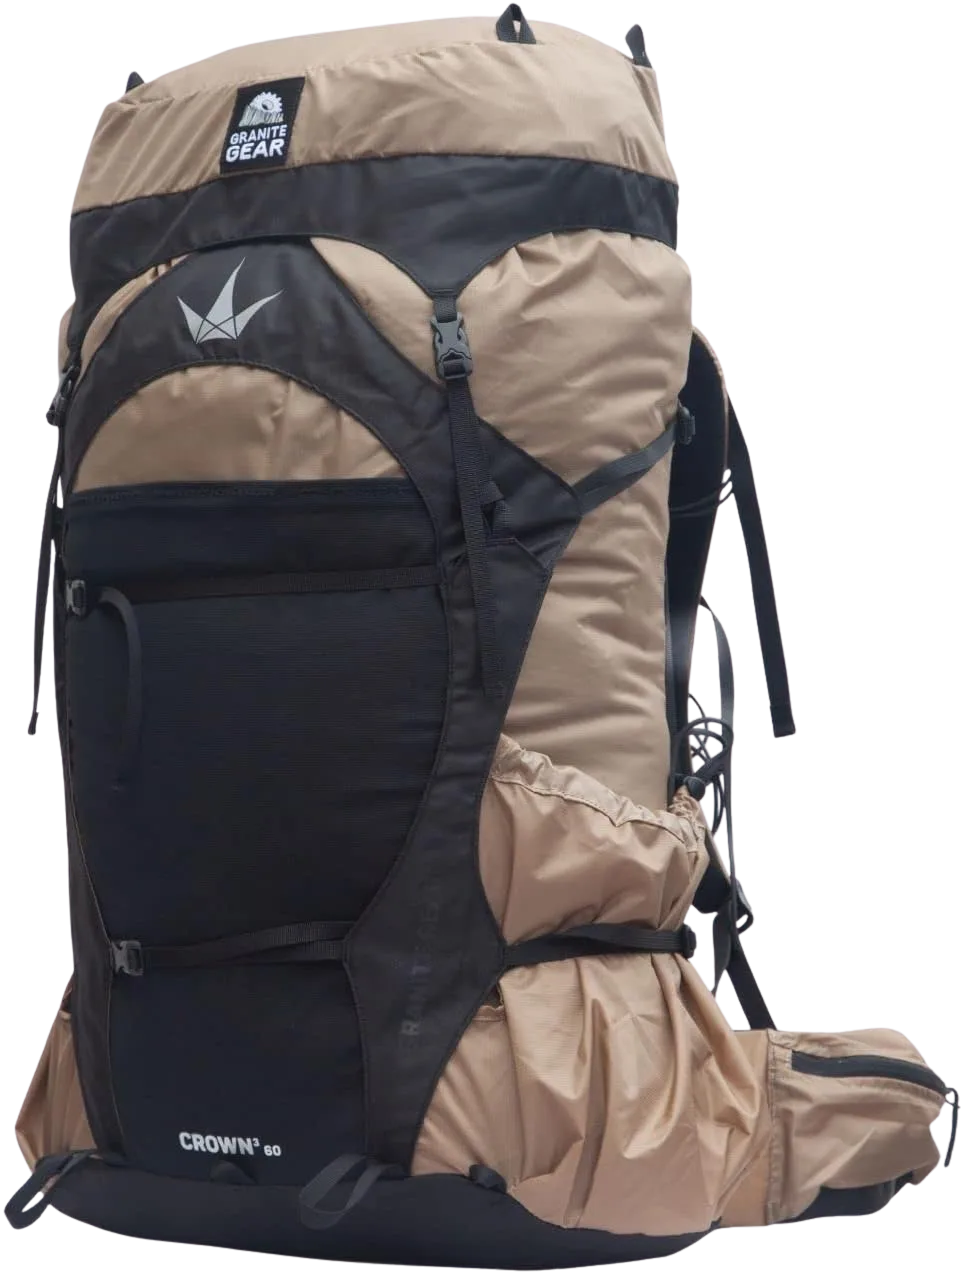
A frameless pack has no frame at all. It’s sewn fabric and straps, and that’s the point. Strip the structure and you strip the weight, which is why frameless is the ultralight darling. The catch is that the structure has to come from somewhere, and that somewhere is you.
How packing creates the “frame”
In a frameless pack, the load itself becomes the frame. Pack it tight and even, like stacking a brick, and the bag stiffens into a virtual frame that carries surprisingly well. Pack it loose and lumpy and the whole load sags into your shoulders within a mile. Frameless rewards packing discipline and punishes laziness, with no in-between.
The base-weight ceiling that decides it
There’s a hard ceiling, and it’s about 25 to 30 pounds, which lines up with the 25-pound rule. Under that, a well-packed frameless bag is comfortable and gloriously light. Over it, the weight rides your shoulders because there’s no frame to send it anywhere else. Your base weight, the pack’s weight minus food, water, and fuel, is the number that tells you whether you can play this game.
The story that keeps coming up in ultralight threads is the same one every time: someone loves their frameless pack at 22 pounds, then adds eight pounds of winter gear and spends the day with the load hanging off their collarbones. Frameless doesn’t fail at the ceiling, your shoulders do. Know your loaded weight before you commit.
Who frameless actually fits
Frameless fits experienced hikers and thru-hiking ultralighters with a low base weight and the discipline to pack well. If that’s you, the ultralight packs that truly clear two pounds are worth a look. If you’re still figuring out your weight, make the honest framed-versus-frameless call once you weigh your loaded pack before spending anything. Some packs split the difference with a removable framesheet you can pull to drop weight, which is the most forgiving way in.
Frame vs Back Panel (The Two Axes Everyone Confuses)
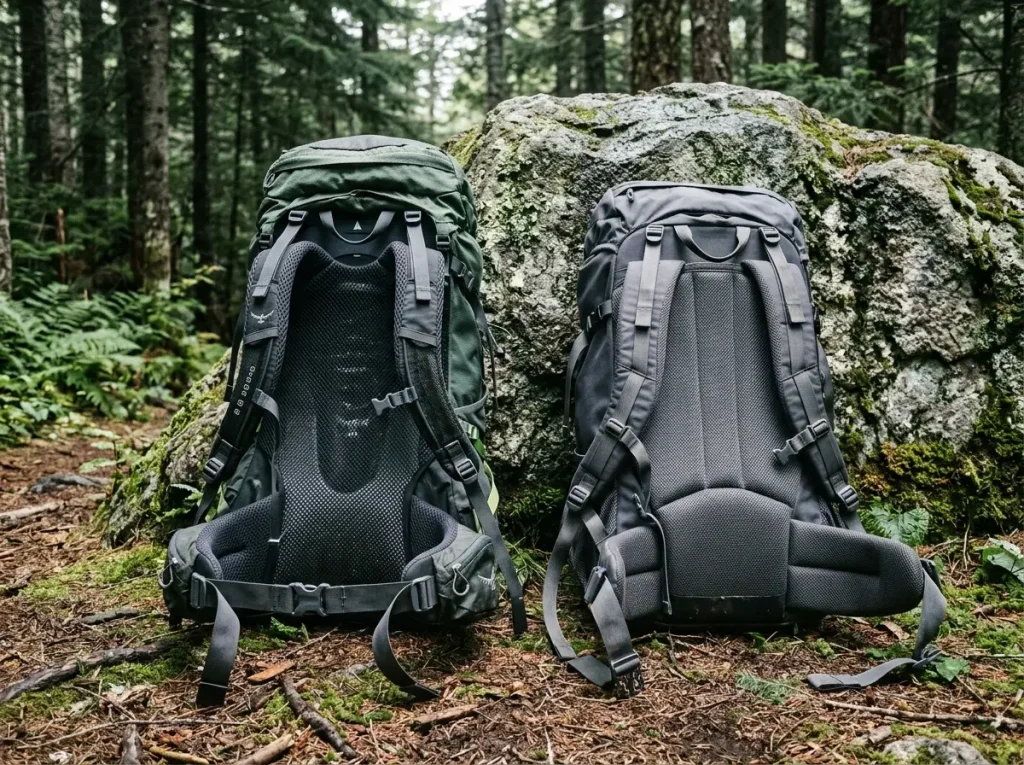
Here’s the mix-up that costs people money. They shop for a pack as if “ventilated or not” is the same question as “what frame,” and then they’re surprised when a breezy pack carries worse. Frame type and back panel are two separate axes. You set them independently.
The frame dial: load transfer
The frame dial is about load transfer, how the weight gets from your shoulders to your hips. Frameless, internal, external, that’s the spectrum, and it’s decided by how much you carry. This dial is the carry. It’s the one that matters most when the load is heavy, and it’s the reason the load lifters only work when there’s a frame behind them. No frame, no real load transfer.
The back-panel dial: airflow
The back-panel dial is about airflow, how much air moves between the pack and your spine. A contact back sits flush against you. A suspended trampoline back holds the pack off your back with a tensioned mesh wall. This dial is comfort and sweat, not carry. It changes how hot you get, not how the weight transfers.
Why mixing them up costs you
The proof that these are separate dials is sitting in the internal-frame section above. The Atmos AG is an internal frame with a trampoline back, so it scores high on both axes at once. You can also buy an internal frame with a flat contact back, or, rarely, a ventilated frameless. When people treat ventilation as the frame decision, they buy a breezy pack expecting a better carry and get a tippier one instead. Decide the frame first, by your load. Decide the back panel second, by your climate and terrain.
Ventilation (Trampoline Mesh vs Contact Back)
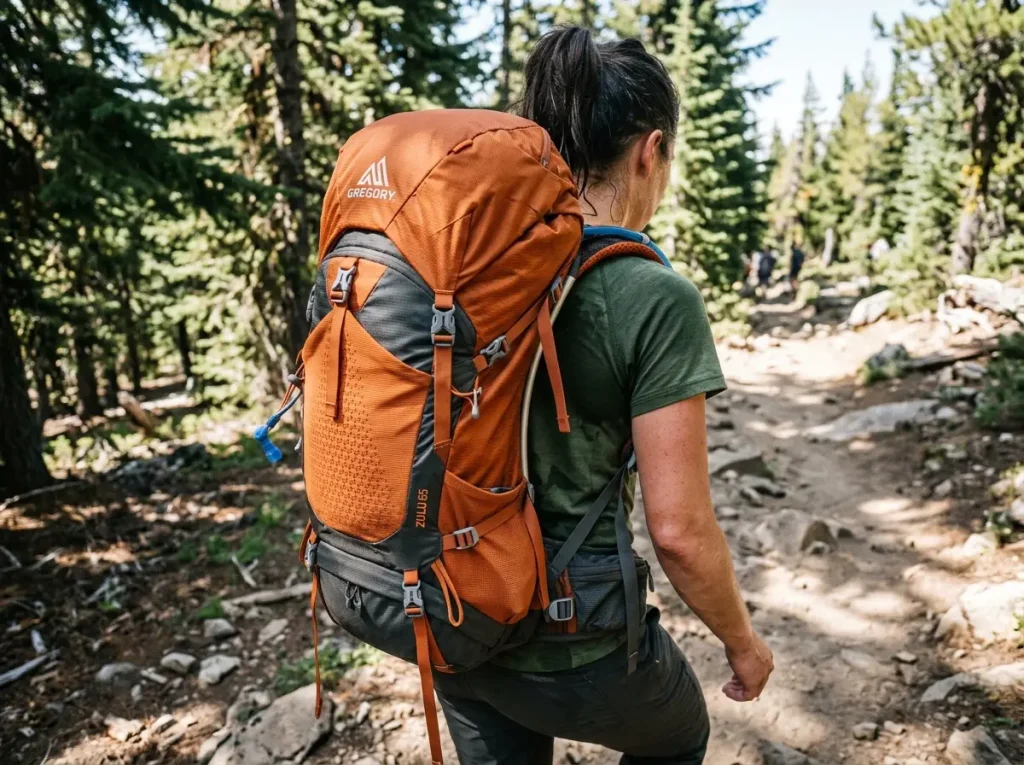
Now the dial nobody markets honestly. Trampoline packs get sold on the cool-back promise and stay quiet about the cost. There’s always a cost.
How trampoline mesh keeps you cool
A suspended trampoline mesh stretches a taut wall of tensioned mesh, usually a 3D mesh or spacer mesh panel, across the frame and holds the pack body a couple of inches off your back. Air flows through that ventilation gap, which cuts sweat buildup and keeps your back drier on a hot climb. In heat and humidity it’s a real, noticeable relief. The lightweight Osprey Exos 58 for men or Eja 58 for women shows the design on a trail-weight pack, with an AirSpeed mesh back that breathes while keeping an internal frame. The women’s Eja runs the same suspension on a women’s fit.
The stability cost nobody mentions
That air gap moves the load away from your spine, and the farther the weight sits from your core, the tippier the pack feels. On flat trail you won’t care. On a scramble or under a heavy load, you’ll feel the pack wanting to lever you around and upset your balance, because the center of gravity drifted backward off your back. Cooler does not mean better. It means a different trade.
When a contact back wins
A padded contact back sits flush and carries steadier, which is what you want for heavy hauls and cold-weather stability, where airflow matters less anyway. It runs hotter, and that’s the deal. A budget pick like the TETON Sports Scout 3400 is a contact-back internal frame that’s a fine first pack, and it makes the point: you can get a stable carry without paying for suspended mesh. Match your back system to the season. Trampoline for heat, contact for cold and weight.
A common mistake is assuming a ventilated pack is strictly the upgrade. Then you’re on a boulder scramble fighting a load that won’t sit still. If most of your hiking is hot and non-technical, take the airflow. If it’s heavy, cold, or scrambly, a contact back will out-carry the breezy one every time.
Why a “Good” Suspension Still Feels Miserable
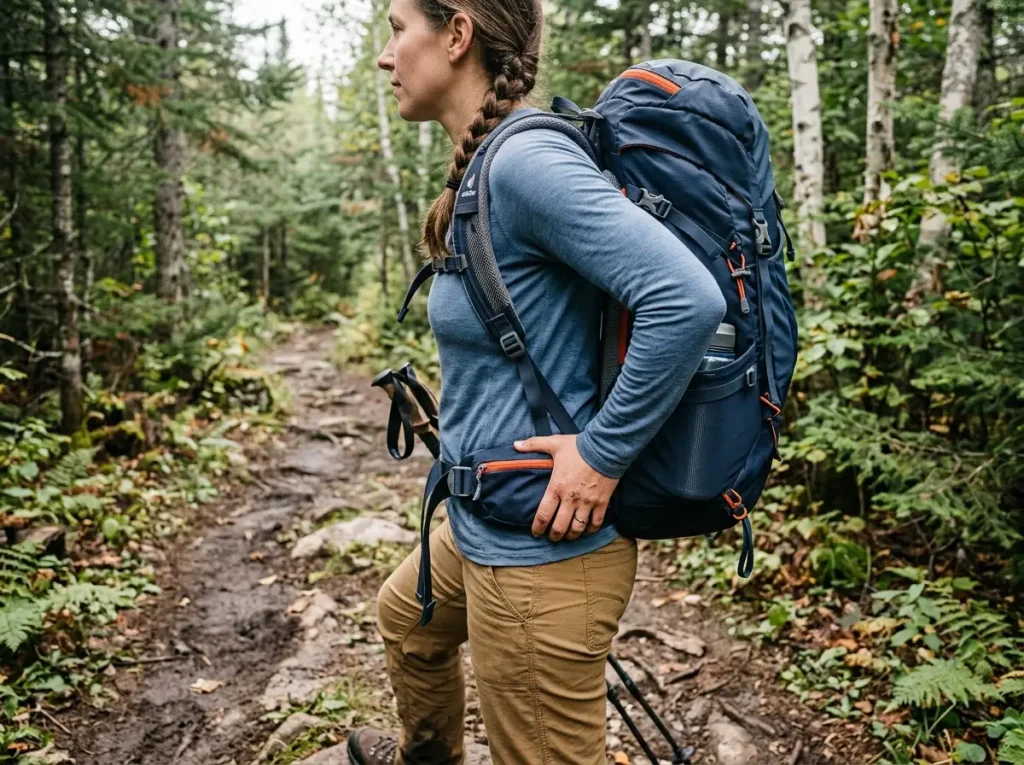
Most “this pack is awful” stories aren’t about the pack. They’re about fit, and fit is free to correct. A great suspension fitted wrong feels worse than a mediocre one fitted right.
Torso length is the number that matters
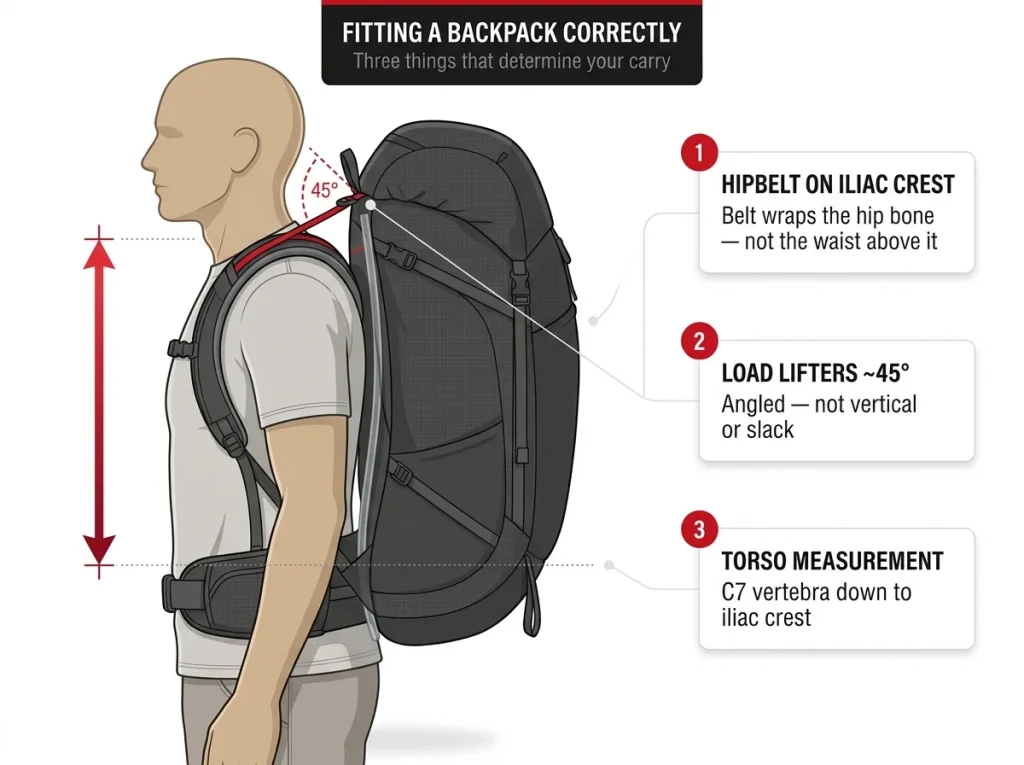
Pack size is set by torso length, not your height. A tall guy can have a short torso, and sizing a pack by height is the single most common fit mistake there is. You measure from the C7 vertebra, the bump at the base of your neck, down to the iliac crest. Get that number and a lot of “bad pack” complaints vanish. Here’s how to measure your torso length from the C7 vertebra to the iliac crest without a helper.
Where the hipbelt actually sits
The hipbelt has to wrap the iliac crest, the hard ridge of your hip bones, not the soft part of your waist above it. Riding high on the belly, the belt has nothing solid to push against, so it can’t bear load and your shoulders inherit everything. The story you hear over and over is the hiker whose “great” pack was miserable for a season, until someone pointed out the belt was riding two inches too high.
Reading your load lifters
The load lifters, the short straps running from the top of the shoulder harness back to the pack, should sit at roughly a 45-degree angle. Near vertical or slack and your torso is the wrong size, because lifters can’t fix a fit they were never meant to fix. And cranking them to chase away shoulder pain backfires every time, since the pain almost always traces to a hipbelt that isn’t seated, not to loose lifters. If any of this is fuzzy, walk through dialing the whole fit in, step by step.
Matching Suspension to Your Load (Who Each One Suits)
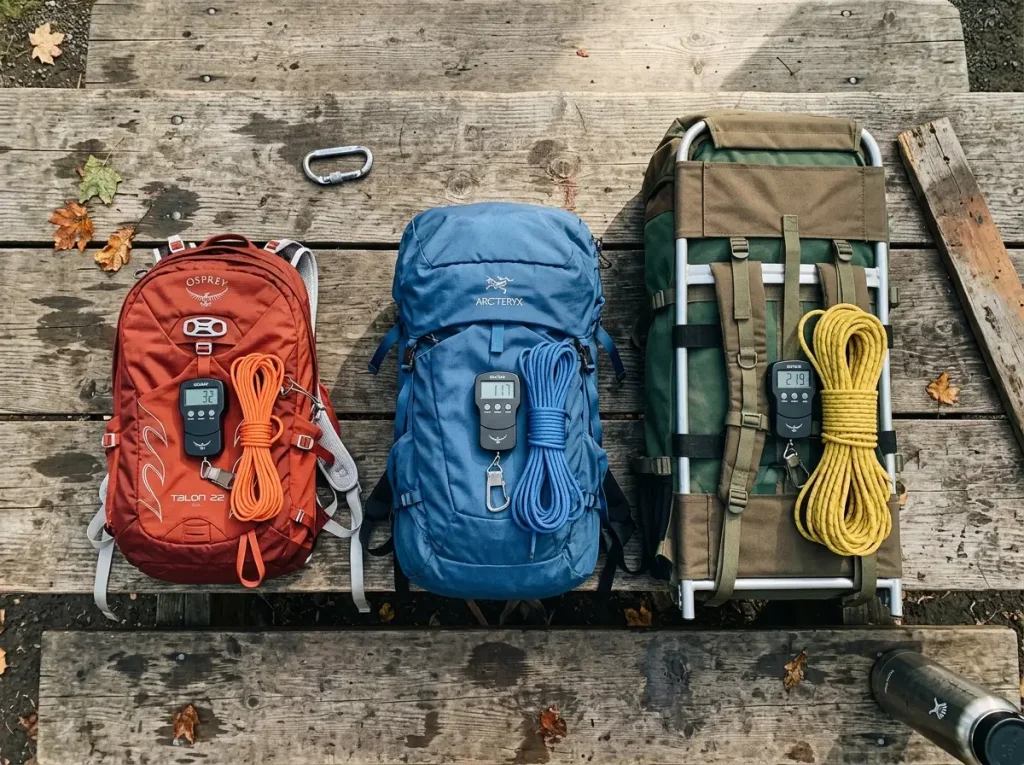
All of this collapses into one move: weigh your loaded pack, then pick the type. The number settles the argument before the brand debate even starts.
Weigh the load before you choose
Put everything you’d carry into a pack you already own, food and water included, and weigh it. That figure, not a marketing line, tells you which suspension and load capacity you need. Most “which pack should I buy” arguments end the second someone reads the scale.
A quick load-to-type cheat sheet
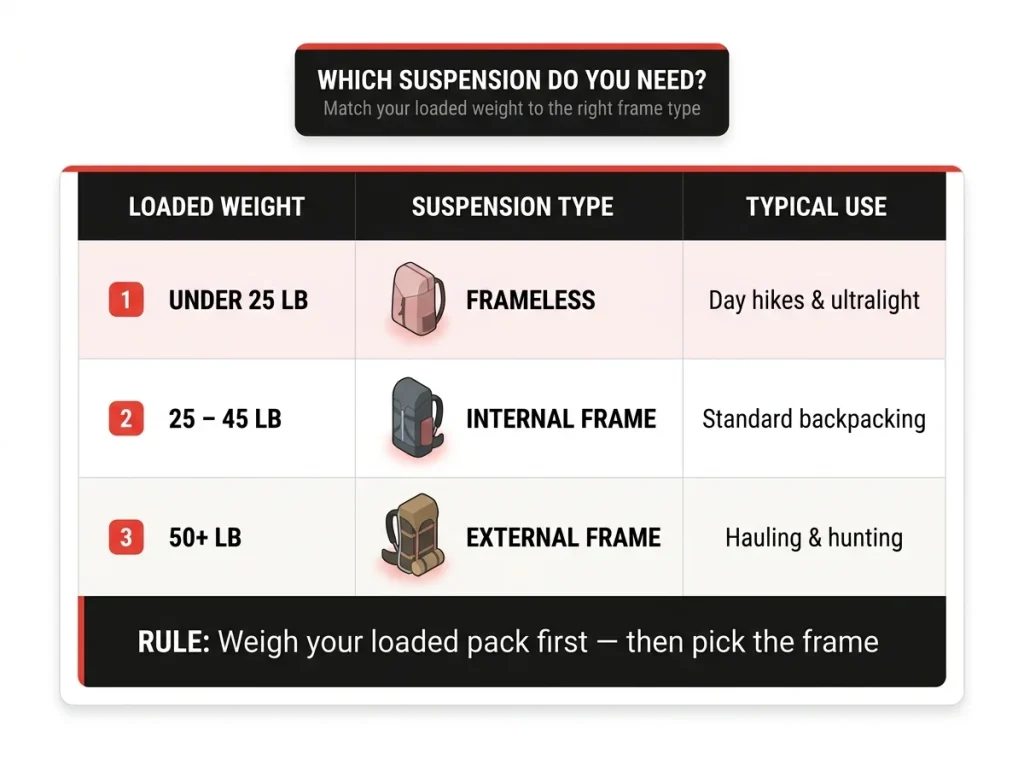
Under about 25 pounds, frameless is fine and lightest. From roughly 25 to 45 pounds, an internal frame earns its keep, which covers most backpackers. At 50 pounds and up, or with heavy, awkward, strap-it-to-the-frame gear, you’re in external frame territory. Capacity tracks with this, so matching liters to the trip length helps once you know the weight class.
Day loads vs multi-day vs hauling
For day hikes and light overnights under about 30 pounds, a light internal-frame daypack is all the suspension you need. The Osprey Talon 22 for men or Tempest 20 for women is a good example of a framed daypack that carries a day load cleanly without the bulk of a full pack; the women’s Tempest is the matched fit. If you’re stuck on where a daypack stops and a backpacking pack starts, the line between the two comes down to capacity, frame, and hipbelt.
Don’t shop for a suspension type until you’ve weighed the load you actually carry, not the one you imagine. The hiker who buys an expedition external frame for 28-pound weekends ends up hauling extra pack weight for nothing, and the ultralighter who goes frameless for a 40-pound winter load pays for it on the trail.
How a Suspension System Ages
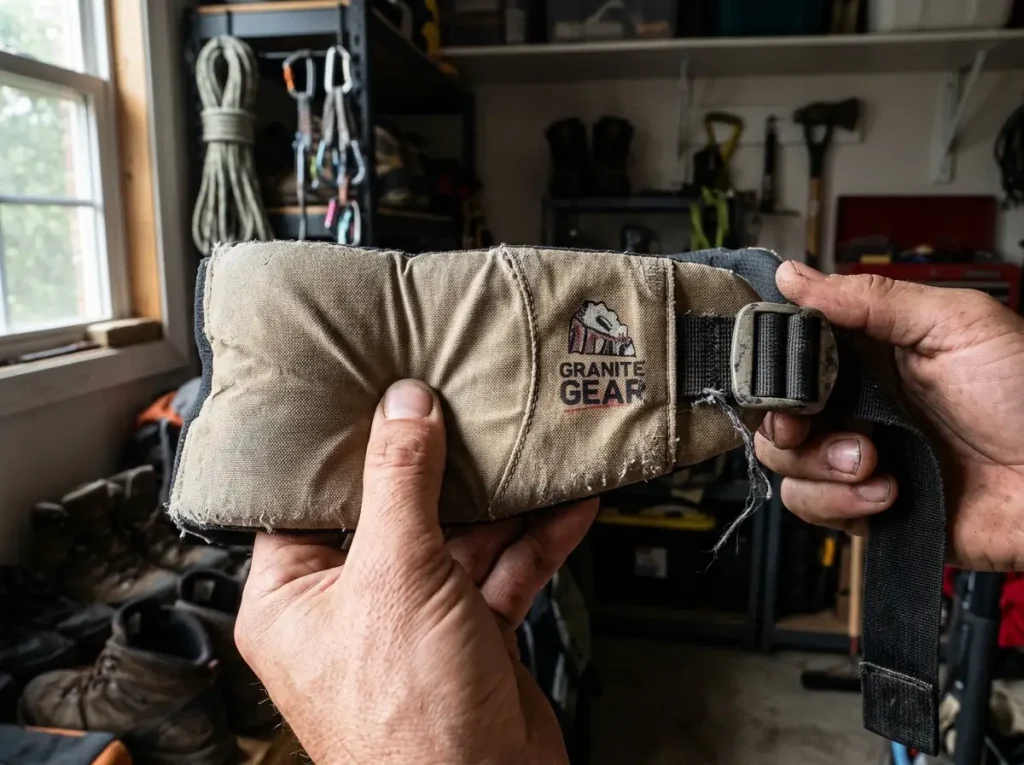
A suspension that fit perfectly three seasons ago can quietly go soft on you, and because it happens slowly, most hikers blame themselves before they blame the pack.
Foam and mesh lose their shape
The EVA foam in your hipbelt and backpanel compresses over time and stops springing back, so it loses the shape that lets it bear load. Suspended mesh stretches and sags, losing the tension that held the pack off your back. Neither failure looks dramatic. The pack just slowly carries worse.
Frame stays and tension fade
Aluminum stays can lose their bend and tension, and a flattened hipbelt stops transferring load even when nothing is technically broken. That’s the sneaky part. You don’t get a snapped buckle to point at, just a carry that drifted from planted to punishing over a couple of seasons.
Refresh, fix, or replace
Some of this is fixable. You can re-bend stays and re-snug straps to recover a surprising amount. But compressed hipbelt foam and a sagging mesh back are usually terminal, because there’s no resetting crushed foam. That’s the line between a tune-up and a new pack, and the signs that say it’s time to replace the pack, not just the foam, are worth knowing before a trip instead of during one.
Conclusion
Three things carry over from all of this. Frame type follows your loaded weight, not the brand on the pack. Frame and ventilation are two separate decisions, so set them one at a time. And most “bad pack” misery is a fit problem you can fix for free.
So before your next trip, do the two-minute version. Weigh your loaded pack to confirm you’re in the right suspension class, then re-check that the hipbelt sits on your iliac crest and the load lifters fall around 45 degrees. That’s the difference between a pack that disappears and one you fight all day.
Frequently Asked Questions
01How much of the pack weight should the hip belt carry?
A properly fitted hipbelt carries roughly 70 to 90% of the load, about 80% in practice. Your shoulders should feel steadied, not loaded. If they ache, the belt isn’t seated on your hip bones.
02Are frameless backpacks good for heavy loads?
No. Frameless packs carry well under about 25 to 30 pounds. Past that, the weight rides your shoulders because there’s no frame to route it to your hips. Heavy loads need an internal or external frame.
03Is a ventilated trampoline back better than a contact back?
Not always. Trampoline mesh runs cooler but shifts the load off your spine, costing stability on scrambly terrain and heavy loads. A contact back carries steadier but hotter. Match it to your climate and terrain.
04What’s the difference between an internal and external frame pack?
Internal frames keep the load close and low for stability, the default for most hikers. External frames carry weight high on a rigid frame and shine for heavy, awkward hauls like hunting and expeditions.
05Can you fix or refresh a backpack’s suspension?
Sometimes. Re-bending frame stays and tightening straps recovers a surprising amount. But compressed hipbelt foam and a sagging mesh back are usually terminal, and that’s when it’s replacement time, not repair time.

I've spent more than a decade researching hiking gear and trail technique. I read the specs, the forum threads and the long-term reviews, and every pick here comes with what it gets wrong.
End of the trail
You read every mile of this one. Here's where the trail goes next.