

In this article
The dream of a thru-hike is often met with the daunting reality of a gear spreadsheet. The “analysis paralysis” is real; aspiring hikers are buried under endless options, conflicting advice, and the fear of making expensive mistakes. Most gear lists show you what to buy, but they fail to teach you how to think about your choices, which can lead to a heavy pack and on-trail misery. This guide will teach you the process of building a thru hiking gear list as an integrated system, tailored to your unique “Hiker Avatar”—your specific trail, budget, and hiking style. We will focus on the “why” behind every gear selection, transforming you from a gear consumer into an educated, self-reliant backpacker ready for long-distance trails. We’ll start with foundational philosophies, dive deep into each gear system, and finally, show you how to test and refine your kit for the real world of trekking.
The Philosophy of Packing: Thinking Like a Thru-Hiker

Before we even look at a single piece of gear, we need to establish the mental models that govern every decision a thru-hiker makes. These concepts are the foundation of a successful and enjoyable long-distance hike, aligning with our mission to foster deeper understanding and skill for any hiker.
Understanding Base Weight vs. Consumables
To optimize your gear, you must first understand the most critical metrics. A thru-hiker’s Base Weight is the total weight of your pack and all its contents, excluding items that you will use up and replace. Your thru-hike base weight is the static, comparable number hikers focus on reducing. Consumables, on the other hand, are the variable-weight items—food, water, and fuel—that fluctuate daily between your resupply points in the backcountry.
For example, while your base weight might be a lean 15 pounds, your total pack weight could be 30 pounds when you leave town with five days of food and a full water carry. Grasping this distinction is the first step in making intelligent gear trade-offs. A lower base weight provides more capacity to comfortably carry the necessary food and water without excessive strain, which is a key part of selecting essential backpacking gear for safety.
The Spectrum of Hiking Styles: Ultralight, Lightweight, and Comfort-Focused
Your “hiking style” is a philosophy directly reflected in your base weight. The community generally recognizes a few categories: Traditional or Comfort-focused (over 20 lbs), Lightweight (under 20 lbs), and Ultralight (UL) (under 10 lbs). Each approach to backpacking involves distinct trade-offs. The ultralight backpacking approach prioritizes low weight to increase daily mileage and reduce physical stress, often by using minimalist equipment that requires more skill and may sacrifice some in-camp comfort. You can read more about The ultralight backpacking philosophy to see if it’s for you.
Conversely, a Comfort-focused hiker prioritizes a more pleasant experience at camp with items like spacious tents, thicker pads, or even a small chair, accepting the penalty of a heavier pack. There are many community discussions on ultralight gear that explore these trade-offs with fellow hikers. There is no “better” style; there is only the one that is right for your personal goals on the trail.
The Golden Rule: Embracing “Hike Your Own Hike” (HYOH)
“Hike Your Own Hike” (HYOH) is the most important mantra in the thru-hiking community. It is a philosophy of personal empowerment and a vital counter-narrative to gear-shaming or dogmatic advice. HYOH encourages you to make choices that align with your personal pace, comfort level, budget, and goals, rather than conforming to a single “correct” way to hike. This applies to your daily mileage, your gear choices, your diet, and your overall trail strategy for all your hikes.
Consider HYOH a “release valve” from the pressure to be ultralight or to carry the most expensive gear. It grants you permission to build a kit that works for you, which is the ultimate goal of this guide. This mindset is a core component of successfully preparing for a thru-hike.
The Ethos of the Trail: Leave No Trace
The Leave No Trace (LNT) principles form the core ethical framework for all outdoor recreation. Being a responsible hiker is just as important as having the right equipment in the wilderness. These principles directly influence your gear choices and on-trail habits, from packing out all your trash to properly disposing of human waste and deciding whether to carry a stove versus relying on campfires where they are permitted.
Viewing every gear choice through the lens of minimizing your impact is fundamental. This ensures that you respect the environment and the experience of all the hikers who will come after you. You can learn more about the seven principles of LNT directly from the source. The philosophy of applying outdoor ethics is a shared responsibility among all who enjoy public lands, and you should always be practicing Leave No Trace principles on any trail.
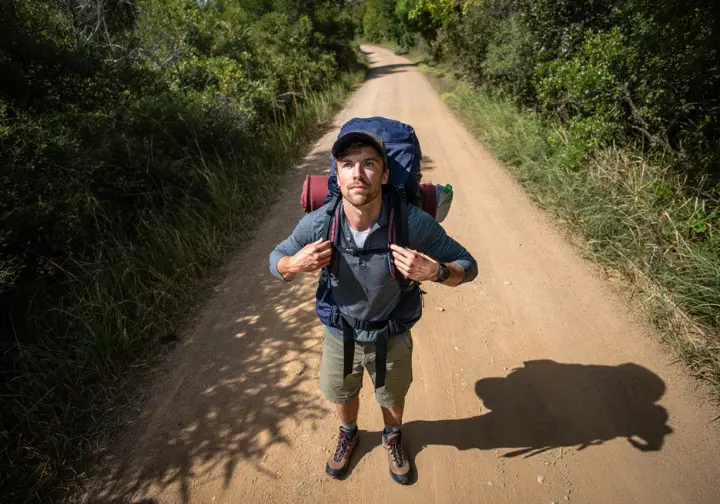
The Big Three: Your Core Shelter & Carry System
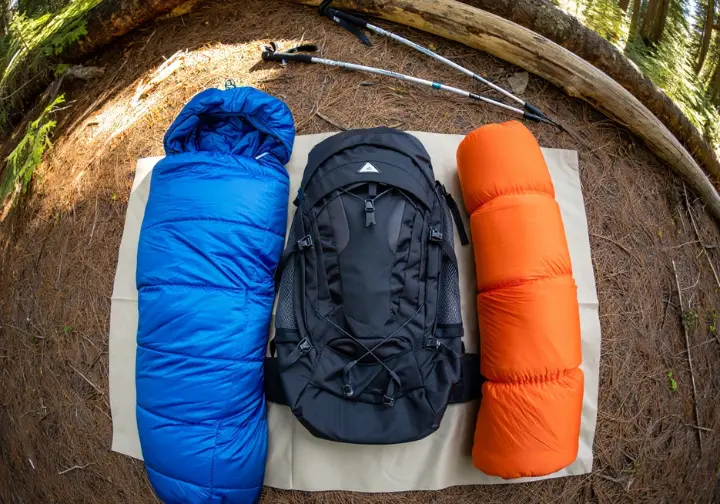
This is the heart of any thru hiking gear list. The “Big Three”—your backpack, shelter, and sleep system—are typically the heaviest and most expensive items you will purchase. Here, we will deconstruct the trade-offs using the “Weight vs. Cost vs. Comfort” triangle to help you make informed decisions for your full gear setup.
The Backpack System
Your backpack is the foundation of your kit, responsible for comfortably carrying everything you own for months on end. The primary decision is between a frameless superlight backpack, used by ultralight purists with very low base weights, and an internal frame pack, which is the choice for the vast majority of hikers. When choosing the best backpack, you must consider its volume; a 50-liter pack is a common size, but your choice should be matched to the remoteness of your trail and the bulk of your other gear.
A pack’s load rating is also critical, as it must comfortably handle your total pack weight. Materials like DCF are light but expensive, while fabrics like Robic Nylon offer a great balance of durability and weight. Hiker survey data shows the ULA Circuit is a durable workhorse, while an ultralight backpack from Atom Packs prioritizes lower weight. Regardless of your pack’s material, a pack liner like a Nylofume® pack liner or an Osprey pack liner is non-negotiable to ensure your critical gear and bags stay dry.
The Shelter System
Your shelter is your home on the trail, and the options include tents, tarps, hammocks, and bivys, with the tent being the most common choice for thru-hikes. A key factor in choosing the best hiking tent is its structure. Freestanding tents are easy to set up anywhere, while non-freestanding (trekking pole) tents save significant weight but require specific site selection and staking. You’ll also encounter single-wall tents, which are lighter but require more skill to manage condensation, versus double-wall tents, which handle condensation better but are heavier. For some, tarp camping is the ultimate minimalist shelter.
A revealing contradiction often appears in hiker surveys: the Zpacks Duplex, an ultralight, non-freestanding tent, is often the most used, but the Big Agnes Copper Spur, a heavier, semi-freestanding tent, is often the highest-rated. This perfectly illustrates the tension between the aspiration for low weight and the practical desire for convenience and comfort when setting up camp.
The Sleep System: Sleeping Bag vs. Quilt
The debate between a traditional sleeping bag and the increasingly popular quilts is a central one in modern backpacking. Quilts save weight and offer more versatility by eliminating the unnecessary insulation on the bottom, which gets compressed under your body and provides no warmth anyway. This minimalist design is a key tenet of ultralight backpacking defined as a practice. This item will go into its own stuff sack for packing.
Insulation type is another major decision. Down is lighter and more compressible for its warmth, but synthetic insulation retains its insulating properties much better when wet—a critical consideration for humid trails. When you see down “fill power,” it’s a measure of quality, not warmth. For three-season versatility, a 10°F to 20°F quilt or bag is a solid choice for most thru-hikes, and understanding sleeping bag temperature ratings is key to making the right call.
The Sleep System: Sleeping Pad
The sleeping pad plays a dual role: it provides comfort from the lumpy ground and, more importantly, insulation from the cold that radiates up from it. A pad’s insulating power is measured by its R-value; the higher the number, the more insulation it provides. The two main types of pads are inflatable air pads and closed-cell foam (CCF) pads.
Air pads, like the popular Therm-a-Rest NeoAir XLite, offer superior comfort and packability but carry the risk of puncture. CCF pads, like the Therm-a-Rest Z Lite Sol, are bulkier and less comfortable but are indestructible and have multiple uses around camp. For general 3-season backpacking, a pad with an R-value between 4 and 6 is recommended. For warmer summer conditions, an R-value of 2 to 4 is often sufficient.
Clothing: Your Wearable Micro-Environment
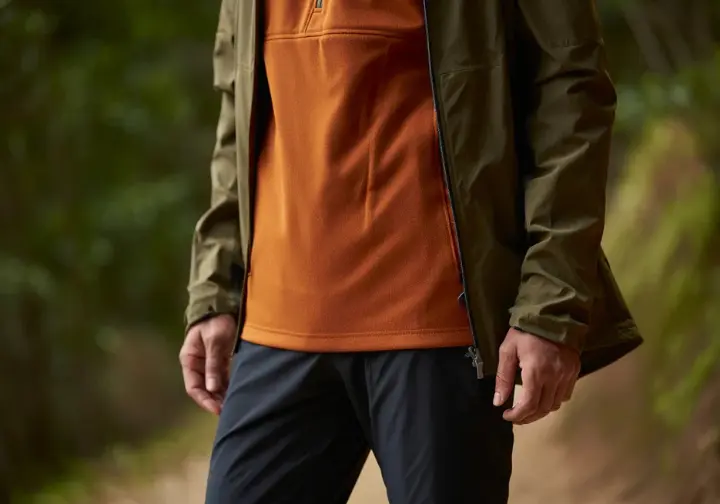
Think of your clothing not as a series of individual items, but as an integrated system of layers designed to manage moisture and temperature effectively. Getting this system right is crucial for both comfort and safety in the outdoors, especially during cold hiking.
The Layering System Explained
The fundamental concept of layering is the key to staying comfortable in variable weather. The system has three core components. The Base Layer is your next-to-skin layer, responsible for wicking sweat away from your body to keep you dry. Materials like merino wool or a synthetic sweater excel here; cotton should be avoided at all costs. The Mid-Layer is your insulation, designed to trap body heat. This includes items like a fleece jacket or the quintessential “puffy” down jacket.
Finally, the Shell Layer, or your rain gear, is the outer barrier that protects you from wind and rain. By adding or removing these layers of warm clothes, you can adapt to changing conditions without ever getting too sweaty or too cold. Mastering a proper layering system for hiking is a skill that pays dividends every day on the trail.
The Footwear System: Your Hike’s Foundation
The footwear system—your shoes, socks, and insoles—is arguably the most critical part of your entire gear list. Foot problems can end a thru-hike faster than almost anything else. Today, trail runners have largely replaced traditional hiking boots for most thru-hikers. These hiking shoes are lighter, more breathable, and dry much faster, which helps prevent blisters. When looking for The best trail running shoes for backpacking, prioritize a comfortable fit above all else.
High-quality socks like the Darn Tough light hiker micro crew are non-negotiable. Reinforce the system with aftermarket insoles for added support and comfort, and consider gaiters to keep trail debris out of your shoes, which is a major cause of irritation. Many hikers also carry lightweight camp shoes for relaxing at the end of the day.
The All-Important Rain Gear
Your shell layer, often a jacket and trousers, is a critical safety item, and reliable rain gear can be a lifesaver. The primary options are waterproof/breathable jackets and pants. Technologies like Gore-Tex are well-known, but they come at a high price. On the other end of the spectrum, budget gear options like Frogg Toggs are famously effective, though they lack durability and breathability.
It’s important to set realistic expectations, especially in certain environments. On the Appalachian Trail, the “green tunnel” is known for its constant humidity, where even the most “breathable” jacket can feel clammy. Optional but useful items in this system include waterproof rain mitts or a rain kilt, which offers superior ventilation for your lower body. For those seeking a new shell, there are many options when choosing men’s waterproof rain jackets.
The Sustenance System: Kitchen & Water
This system covers all the camping gear related to preparing and consuming food and water. After your Big Three, your food and water will be the heaviest items in your pack, so optimizing the gear that supports them is a high priority for any trip.
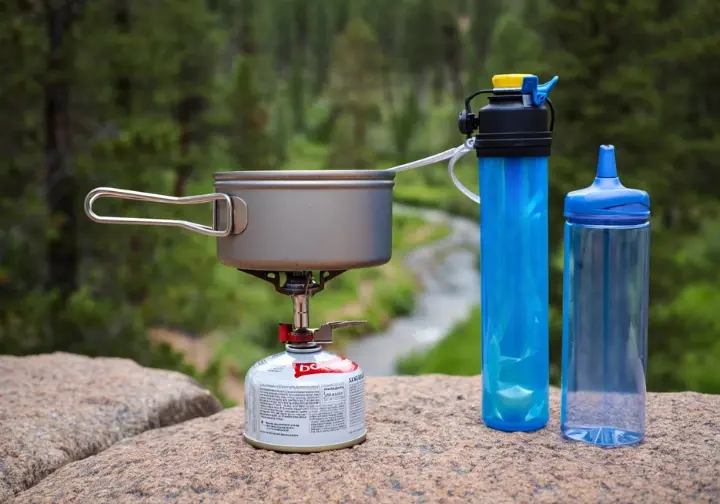
The Backcountry Kitchen
Your backcountry kitchen is all about boiling water efficiently. Most thru-hikers use lightweight canister stoves like the MSR PocketRocket for their convenience and reliability. Ultralight and DIY enthusiasts often favor alcohol stoves for their simplicity and low weight. A growing number of hikers are also embracing a “stoveless” philosophy, rehydrating their meals with cold water to save the weight of a stove and fuel entirely.
When it comes to cookware, titanium pots are the standard for thru-hikers due to their extreme light weight, though they are more expensive and not ideal for complex cooking. The long-handled titanium spoon has become an iconic piece of gear, perfect for eating out of dehydrated meal bags. These items are distinct from the heavier essentials for campfire cooking that you might use on a shorter trip.
Water Treatment and Storage
Treating backcountry water is a non-negotiable for staying healthy on trail. The most popular method for thru-hikers is a squeeze filter, like the Sawyer Squeeze, which is fast and effective against bacteria and protozoa but can clog and is susceptible to freezing. Chemical drops or tablets are an ultralight and effective backup that also kill viruses, but they require time to work and can affect the water’s taste.
For water storage, most thru-hikers have ditched heavy and hard-to-clean hydration reservoirs. Instead, they opt for disposable plastic water bottles, like Smartwater bottles, which are incredibly lightweight, cheap, durable, and easy to replace. Understanding the difference between a water filter and purifier is fundamental to choosing the right system. On certain trails, you can find official information on the Appalachian Trail from the Appalachian Trail Conservancy itself. It’s a system that requires constant attention, similar to principles outlined in the guide for Leave No Trace for the workplace.
Food Storage: Bears and Critters
Protecting your food from wildlife is essential for both your safety and the well-being of the animals. The two primary methods are bear bagging and using a hard-sided bear canister. The proper technique for hanging a bear bag, such as the PCT method, can be difficult to execute correctly and is not always effective against clever bears and smaller critters in the woods.
Hard-sided bear canisters are a more secure method and are mandatory in specific, high-use areas, such as the Sierra Nevada on the Pacific Crest Trail and along the iconic John Muir Trail. You can find official information on the Pacific Crest Trail and canister requirements on the PCTA website, and similar details are available from the official information on the Continental Divide Trail coalition. This requirement has major implications for your gear list needs, as canisters are heavy and bulky, and your backpack must be able to carry one.
The Support, Safety & Hygiene System
This section covers the wide array of smaller but critical items for navigation, first aid, electronics, and general well-being. These additional items form the backbone of your daily life on the trail and shouldn’t be overlooked.
The Modern Navigation Toolkit
The modern thru-hiker’s approach to navigation is dominated by smartphone apps. FarOut (formerly Guthook) is the primary tool used by the vast majority of hikers on major trails for its crowdsourced data on waypoints, water sources, and town services over difficult terrain. There is a lot of community discussion on navigation tools that confirms this trend. While apps are incredibly useful, you must have redundancy for safety.
This means always carrying a power bank or rechargeable battery pack to keep your phone charged. It also means carrying a physical map and compass as a fail-proof backup and knowing the basics of how to use them to navigate to a summit or through a canyon. While dedicated GPS devices are an option, their function has largely been replaced by more versatile smartphones. You can find official PCT maps to print for your backup system. Many hikers also start by using free hiking apps for navigation for a day trip.
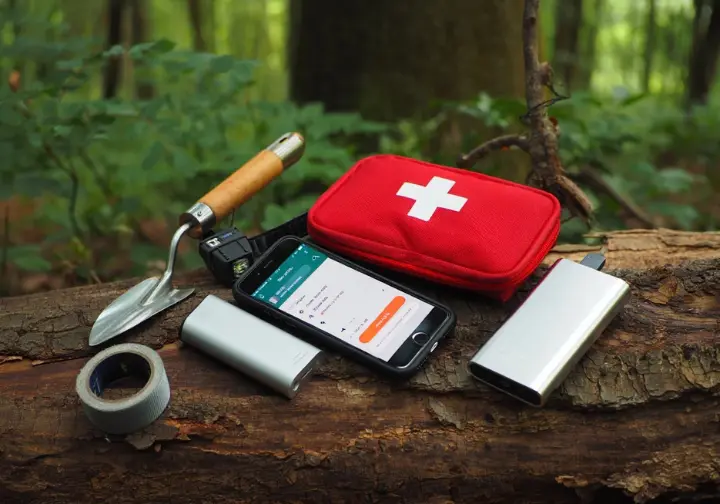
First-Aid and Hygiene Kits
It’s best to build a personalized, lightweight first-aid kit rather than buying a bulky pre-made one. Your aid kit should focus on items that address the most common thru-hiking ailments: blister care (Leukotape is a hiker favorite), pain and inflammation (Ibuprofen), and supplies for small cuts and scrapes. A good hiking first aid kit checklist can provide a starting point. Building a customized first-aid kit is one of the ten essentials for any hike.
For hygiene, the essentials for staying healthy include a toothbrush, toothpaste, hand sanitizer, a trowel for digging catholes according to LNT principles, and toilet paper, often stored in a plastic baggy. This is a core part of the Scouting America’s Leave No Trace guide. Many hikers also carry specific items that improve their quality of life, like a pee funnel (FUD) or menstrual cup for women, which add convenience on the trail.
Trekking Poles and Other Essentials
A few other critical items form your support system. We strongly recommend trekking poles; they are much more than walking sticks. They save your knees on long descents, provide power on ascents, improve your stability on tricky terrain, and are often required to pitch non-freestanding shelters. Understanding the benefits of using trekking poles can convince you of their value. Many hikers debate using a single trekking pole versus a second trekking pole.
You’ll also need a reliable headlamp with spare batteries, a minimalist repair kit (with items like duct tape and Tenacious Tape in a pocket), and a small knife/multi-tool. This support system of essential gear enhances your safety, efficiency, and comfort over thousands of miles. The official website of the ATC often has safety recommendations from the Appalachian Trail Conservancy that highlight the need for these items.
From List to Reality: Testing and Refining Your System
A gear list on a spreadsheet is just a starting point. The practical roadmap that follows will take your gear from theory to a trail-ready reality, helping you address beginner anxiety and the fear of making a costly mistake as you finalize your entire packing list.
The Crucial Shakedown Hike
The “shakedown hike” is an essential, non-negotiable step in your preparation. This is a short practice hike, typically one to three nights of overnight backpacking, where you use your complete gear system exactly as you would on your long trail. The purpose of shakedown hikes is to test everything in a low-stakes environment. This is where you identify comfort issues, gear breaks, and, most importantly, items you packed but never used.
Think of the shakedown as the moment of truth. It’s your opportunity to ruthlessly evaluate and eliminate unnecessary items to reduce your base weight before you take your first step on the actual thru-hike. It is one of the most essential tips for beginner hikers. Even a partner organization for the AT would agree that preparation is key.
The Gear Evolution Roadmap
To address the fear of expensive mistakes, view your gear list as a dynamic, evolving system. We recommend a phased approach for beginners.
Phase 1 is the Pre-Hike Build. Start with a “good enough” kit. Prioritize affordable gear and durability over the absolute lowest weight. You have our permission not to buy the most expensive, ultralight gear at the outset.
Phase 2 is the On-Trail Evolution. This phase explains how to adapt your new gear during the thru-hike. You can use resupply or “bounce” boxes to swap seasonal gear, such as mailing heavy cold weather gear home in exchange for a lighter summer one. You should also plan to buy new shoes every 500-700 miles in trail towns. This reframes your initial gear list as a starting point, not a final object, which is a valuable concept when you are transitioning from day hiker to backpacker.
Conclusion: Your Trail, Your Gear, Your Hike
Let’s bring it all together. A thru hiking gear list is not a static checklist to be completed; it is a personal, dynamic system that reflects who you are as a hiker. The goal is never to have the “best” gear, but the right gear that is best for you. By understanding your base weight, the constant trade-offs between weight, cost, and comfort, and the “Systems, Not Items” approach, you are now equipped to make smart choices. Remember that your gear will evolve. The shakedown hike and on-trail adjustments are part of the learning process. Aim for progress, not perfection from day one. Now, go use this guide as a tool to discover your own style, and confidently build the kit that will carry you through the adventure of a lifetime. Hike Your Own Hike.
Frequently Asked Questions about Thru-Hiking Gear
What is a realistic budget for a complete thru-hiking gear list? +
What is the single most important piece of gear to invest in? +
How do I know what temperature rating sleeping bag or quilt I need? +
Do I really need to carry a map and compass if I have a phone app? +
We are a participant in the Amazon Services LLC Associates Program, an affiliate advertising program designed to provide a means for sites to earn advertising fees by advertising and linking to Amazon.com. As an Amazon Associate I earn from qualifying purchases. We also participate in other affiliate programs. The information provided on this website is provided for entertainment purposes only. We make no representations or warranties of any kind, expressed or implied, about the completeness, accuracy, adequacy, legality, usefulness, reliability, suitability, or availability of the information, or about anything else. Any reliance you place on the information is therefore strictly at your own risk. Additional terms are found in the terms of service.


