

In this article
Embarking on a backpacking trip in Glacier National Park is a formidable endeavor that tests a hiker’s preparation and skill. While the park offers many spectacular day hikes, access to its deepest sanctums—its true wilderness—is reserved for those willing to go beyond the roadside pullouts. To truly experience the core of this wild landscape and its vertical, glacier-carved peaks, one must shoulder a backpack. This guide provides a comprehensive masterclass, moving beyond simple logistics to arm you with the advanced strategy, skills, and stewardship ethics required to confidently and responsibly navigate the Crown of the Continent.
- Master the Permit System: A strategic breakdown of how to navigate the competitive advance lottery and the high-risk, high-reward walk-up process.
- Explore Premier Itineraries: Detailed multi-day route plans for legendary trips like the Pitamakan-Dawson Loop and traverses incorporating the Ptarmigan Tunnel.
- Develop Essential Glacier Skills: In-depth modules on advanced bear safety, navigating hazardous terrain like snowfields and scree, and handling low-visibility conditions.
- Pack for the Challenge: A purpose-driven gear list where every item is justified against Glacier’s specific environmental and safety demands.
How Do You Secure a Glacier Backcountry Permit?

Navigating Glacier’s notoriously competitive backcountry permit system is the first critical hurdle. A complete strategic approach covers both the advance lottery and the high-risk, high-reward walk-up options.
What Are the Two Pathways to a Permit?
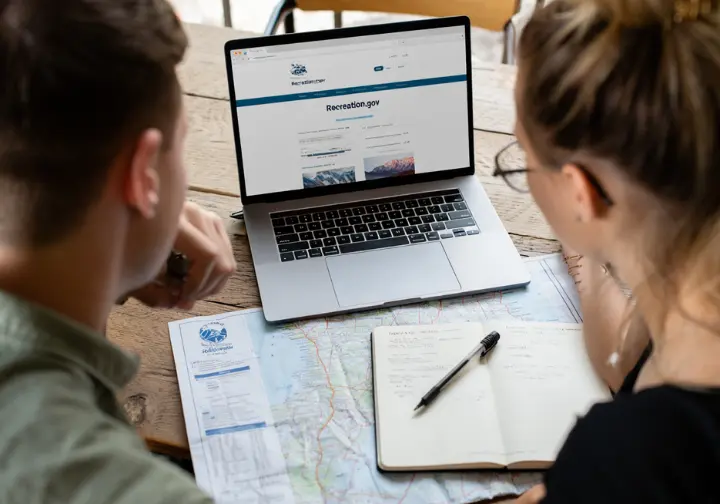
Glacier National Park allocates its coveted backcountry campsites for any wilderness adventure through a bifurcated system. Approximately 70% of sites become available via an advance online reservation lottery, while the remaining 30% are held for walk-up applicants at the park. For nearly all prospective backpackers, the advance reservation process is the primary and most viable strategy, as it offers the security of a planned itinerary.
The lottery, managed on Recreation.gov, is intensely competitive. It’s crucial to understand that winning this lottery does not award a specific permit. Instead, it grants you an “early-access” time slot—a specific date and time—to log in and build an itinerary from the available campsites on the recreation.gov wilderness portal. This makes understanding the official NPS wilderness permit process essential. The walk-up backcountry permit system is a high-risk backup plan that demands extreme flexibility, making it a challenging but possible path for locals or travelers with fluid schedules. This entire process is a significant part of transitioning from day-hiker to backpacker, as it requires a new level of foresight and planning.
Permit Acquisition Strategies
Compare the different strategies for acquiring permits based on your planning style and flexibility.
Best For
Planners who need a confirmed trip and have a specific itinerary in mind.
Key Dates
March 1 (Large Groups) / March 15 (Standard Groups)
Required Flexibility
Moderate (must have backup itineraries ready for booking window)
Cost
$10 application fee + $7/person/night
Best For
Those who missed the lottery but still want to plan in advance.
Key Dates
Begins May 1
Required Flexibility
High (must take whatever is left or monitor for cancellations)
Cost
$10 permit fee + $7/person/night
Best For
Locals, spontaneous travelers, or those seeking high-mileage permits (>16 miles/day).
Key Dates
Day before trip start
Required Flexibility
Extreme (must be willing to change route, duration, and start date)
Cost
$10 permit fee + $7/person/night
What Is the 16-Mile Rule and Why Does It Matter?
The advance reservation system enforces a strict maximum daily hiking distance of 16 miles between campsites. This regulation is not arbitrary; it is a critical safety protocol designed to discourage hiking at dawn or dusk. These are the periods of heightened grizzly bear activity, and by limiting daily mileage, the park system effectively shortens the usable hiking day to protect both hikers and wildlife. Adhering to this is a core component of the park’s official Leave No Trace guidelines.
This rule creates a fundamental strategic trade-off. If your trip plan requires covering more than 16 miles in a day—perhaps to position yourself for a long ascent or to complete a specific link-up—you must obtain a walk-up wilderness permit. Only with a walk-up permit can a backcountry ranger, at their discretion, grant a high-mileage exception. This means your desired daily mileage directly influences which permit strategy you must pursue, forcing you to consult your guide to sustainable hiking pace and fundamentally linking your itinerary to park safety regulations.
What Are the Premier Backpacking Itineraries in Glacier?
Glacier’s backcountry offers a vast network of trails, but certain routes have rightfully earned legendary status. The following itineraries represent some of the park’s most spectacular and rewarding multi-day backpacking trips, each presenting a unique character and set of challenges.
What Makes the Pitamakan-Dawson Loop a Bucket-List Hike?
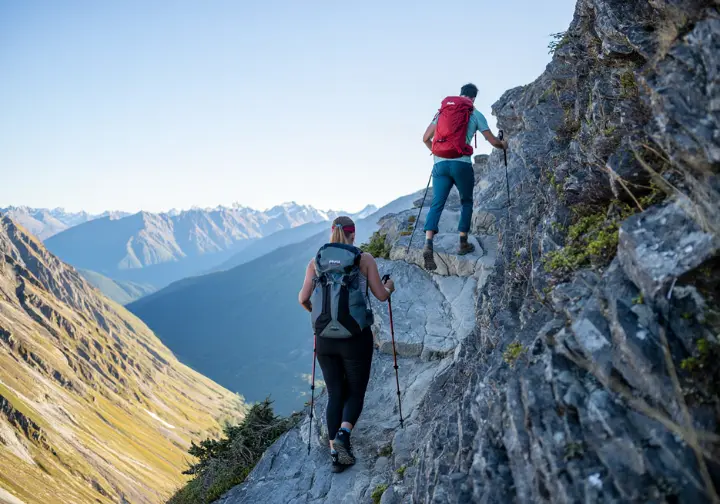
Widely regarded as one of the most spectacular multi-day backpacking trek options in the entire National Park system, the Pitamakan-Dawson Loop is an 18- to 19-mile strenuous circuit defined by a breathtaking traverse across high alpine passes. The marquee section is a stunning 3-mile “goat trail” benched into the mountainside, connecting Pitamakan and Dawson passes. It delivers unparalleled panoramic views for miles on end but requires a confident footing and a solid head for heights.
A counter-clockwise approach is generally preferred, as it presents a more gradual ascent up the Dry Fork drainage and positions you for the most dramatic scenic reveals. This route showcases a stunning cross-section of Glacier’s landscapes, from forested valleys still showing evidence of the park’s history of fire ecology to wildflower-strewn basins and lush alpine meadows. The primary backcountry campgrounds are Oldman Lake (OLD) and No Name Lake (NON). Water sources can be scarce along the high traverse, making it essential to carry enough to last through this multi-mile, exposed section. Its grandeur firmly places it among other bucket-list hikes in the USA.
How Can You Incorporate the Ptarmigan Tunnel into a Traverse?
The Ptarmigan Tunnel, a 250-foot engineering marvel blasted through the Ptarmigan Wall in the 1930s, serves as a gateway for a longer trek. It connects the bustling Many Glacier valley with the much wilder and more remote Belly River valley to the north. Using it as part of a point-to-point traverse offers a profound sense of journey and solitude as you move through vastly different landscapes. A classic of the many backpacking routes in this area runs north-to-south, beginning at the Chief Mountain Customs station on the U.S.-Canada border and concluding at the Iceberg/Ptarmigan Tunnel Trailhead in the Many Glacier valley.
This route requires transportation logistics, as it is a one-way trip. Since Glacier’s shuttle system details confirm that the public shuttle does not service these trailheads, you must arrange a private shuttle or position a vehicle in advance, though hitch-hiking is a common practice within the national park for resilient hikers connecting trailheads. The route follows the Belly River south, with typical overnight stays at Cosley Lake (COS) or Elizabeth Lake Foot (ELF). For those with an extra day, a side trip to the stunningly remote Helen Lake (HEL) is highly recommended. Mastering the logistics of a traverse makes our guide to digital route planning an invaluable resource for creating a reliable GPX track.
What Skills Are Essential for Backpacking in Glacier?
A successful backpacking trip in Glacier demands more than just physical fitness and logistical planning; it requires a specific set of wilderness skills tailored to the park’s unique and formidable environment. Mastering these skills is not just about comfort—it is about safety and self-sufficiency.
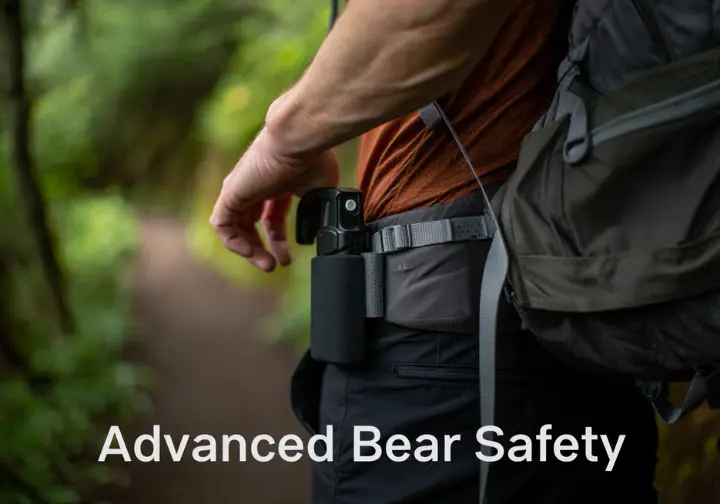
How Should You Manage Bear Safety in Grizzly Country?
Coexisting safely with grizzly bears is the single most important skill a Glacier backpacker can learn. Beyond the mandatory basics of making noise, hiking in groups, and carrying accessible bear spray, you must be able to read bear behavior to determine the correct response in a close-range encounter.
A defensive bear, one that is surprised or feels its cubs or food are threatened, will show clear signs of agitation: huffing, jaw-popping, and ears laid back. In this scenario, STOP. Do not run. Speak in a calm voice and slowly back away. If contact is made, play dead.
A non-defensive bear—one that is curious, habituated, or seeking food—will show no stress and may approach deliberately. Here, you must be assertive. Group together, make loud noises, and fight back with everything you have if it attacks. Proper food storage at the designated food poles or bear boxes in backcountry campsites is a non-negotiable cornerstone of this safety system. An encounter is a true test of your composure, making our comprehensive hiker’s emergency guide critical reading for developing the right mindset.
How Do You Navigate Hazardous Terrain like Snow and Scree?
Glacier’s high-elevation alpine passes can hold steep, dangerous snow well into July, and snow lingers on many north-facing slopes, making snow travel a key skill. For any travel on this terrain, an ice axe and microspikes are mandatory safety equipment, not optional extras. Trekking poles are useful for balance across the varied terrain, but cannot stop a slide on hard snow. The most critical skill is the self-arrest with an ice axe, a technique that requires dedicated practice to stop a fall. Before ever stepping onto a snowfield, assess the runout zone below: a fall above a cliff or rock field has catastrophic consequences.
Many of Glacier’s high routes also traverse slopes of loose rock. When descending scree (small, gravel-like rock), a controlled “boot-ski” technique is efficient. When ascending, use small, deliberate steps and switchback up the slope. On larger talus, always test handholds and footholds before committing your full weight. Understanding what gear to use and when is crucial, making a review of “Microspikes vs. Crampons: When to Use Each” a vital pre-trip task.
[PRO-TIP]: Yell “Rock!” immediately and loudly if you dislodge one. This simple action can save the life of a hiker below you.
What Is the Optimal Gear for a Glacier Backpacking Trip?
What Should Be on the Glacier-Ready Gear Checklist?
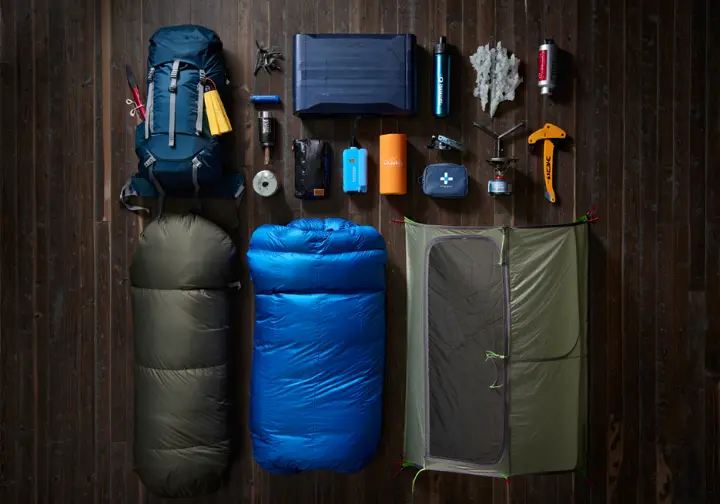
Packing for Glacier is an exercise in strategic preparation. Your backpacking kit must function as an integrated system where every item has a purpose tied directly to the park’s demands: volatile weather, challenging terrain, and the constant presence of grizzly bears. Think of this not as a collection of items, but as a life-support system for a self-sufficient traveler, where everything from your hiking boots to your backpacking tent is chosen with purpose. This list builds upon our foundational guide to backpacking gear for beginners, adapting principles for this specific wilderness and is not geared towards ultralight backpacking, which requires different trade-offs.
Key components include a robust sleep system, with one of many high-quality backpacking sleeping bags rated to at least 15°F (-9°C) and an insulated sleeping pad with an R-value of 3.0 or higher. A complete layering system, with absolutely no cotton, is essential for managing moisture and preventing hypothermia. Finally, navigation requires redundancy; a physical map and compass must be carried as a backup to any GPS device, as cell service is non-existent.
Your Glacier Backcountry Planning Tool
Glacier’s backcountry demands specialized gear. Use our interactive checklist to review every critical item, from your shelter system to non-negotiable safety gear like an ice axe. Check items off and download a PDF for your trip.
Conclusion
- Successfully backpacking in Glacier is a comprehensive test of logistical planning, wilderness skill, and physical endurance.
- Mastering the permit system through strategic planning and flexibility is the first and most critical step of any trip.
- Beyond planning, safety in Glacier requires specific, advanced skills in bear encounter management and navigating hazardous alpine terrain like snow and scree.
- To travel here is to accept a great responsibility—to become a steward of the landscape by practicing meticulous Leave No Trace ethics.
Call to Action (CTA): Share your own Glacier backpacking questions or experiences in the comments below to help our community of dedicated hikers.
Frequently Asked Questions about Backpacking in Glacier National Park
How hard is it to get a backpacking permit in Glacier?
It is exceptionally difficult due to high demand in the advance lottery. Success requires having multiple backup itineraries prepared and being flexible during your booking window.
What is the best month for a backpacking trip in Glacier?
The best and most reliable window is from late July through late September. Before mid-July, high mountain passes are often impassable due to snow; by late September, weather becomes colder and more unpredictable.
What happens if I see a grizzly bear?
Your response depends entirely on the bear’s behavior; do not run. If it appears agitated (defensive), speak calmly and back away slowly; if it is calm and approaches you (non-defensive), be assertive and make noise.
Does my backcountry permit cover my park entry fee?
No, it does not. Your backcountry permit does serve as your vehicle reservation for the area where your trip starts, but you must still pay the separate park entrance fee upon arrival.
Risk Disclaimer: Hiking, trekking, backpacking, and all related outdoor activities involve inherent risks which may result in serious injury, illness, or death. The information provided on The Hiking Tribe is for educational and informational purposes only. While we strive for accuracy, information on trails, gear, techniques, and safety is not a substitute for your own best judgment and thorough preparation. Trail conditions, weather, and other environmental factors change rapidly and may differ from what is described on this site. Always check with official sources like park services for the most current alerts and conditions. Never undertake a hike beyond your abilities and always be prepared for the unexpected. By using this website, you agree that you are solely responsible for your own safety. Any reliance you place on our content is strictly at your own risk, and you assume all liability for your actions and decisions in the outdoors. The Hiking Tribe and its authors will not be held liable for any injury, damage, or loss sustained in connection with the use of the information herein.
Affiliate Disclosure: We are a participant in the Amazon Services LLC Associates Program, an affiliate advertising program designed to provide a means for us to earn advertising fees by advertising and linking to Amazon.com. As an Amazon Associate, we earn from qualifying purchases. We also participate in other affiliate programs and may receive a commission on products purchased through our links, at no extra cost to you. Additional terms are found in the terms of service.


