

In this article
- Deconstructing the Terrain: Understanding Scrambling Classes
- The Foundational Layer: Re-examining The Ten Essentials for Scrambling
- The Scrambler’s Core Kit: Your Primary Interface with the Mountain
- The Alpine Environment Kit: When Snow and Ice Demand More
- The Technical Safety System: When and Why to Carry a Rope
- Dressing for Success: The Alpine Layering System
- Building Your Kit and Avoiding Beginner Pitfalls
- Conclusion: Key Takeaways for the Aspiring Scrambler
- Frequently Asked Questions about Alpine Scrambling Gear
The journey from a dedicated hiker to an alpine scrambler is an exciting evolution that moves beyond marked trails into the wild, unmanaged alpine environments of high peaks. This progression requires more than an upgraded packing list; it demands a new way of thinking where gear is not for convenience, but for survival. This guide will provide a comprehensive analysis of the non-negotiable equipment for alpine scrambling and introductory alpine climbing, exploring the “why” behind each item and emphasizing that the most critical piece of gear is a well-prepared mind. In scrambling, your equipment is an integrated safety system that must work in concert with your skills, judgment, and risk assessment.
Deconstructing the Terrain: Understanding Scrambling Classes

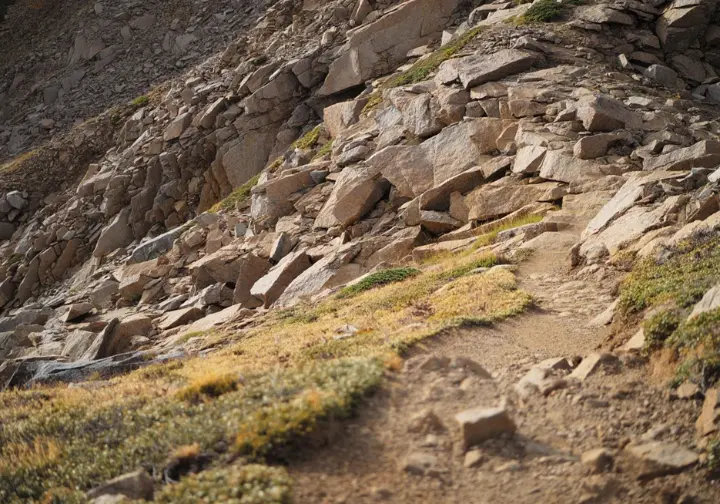
Before discussing gear, it’s critical to understand the environment where it will be used. We’ll define alpine scrambling and break down the subjective but crucial differences between YDS Class 3 and Class 4 terrain. Understanding the field of play is the first step in selecting the right equipment, as each class presents unique risks and demands specific tools to manage them safely.
What is Alpine Scrambling?
Alpine scrambling is defined as off-trail travel that requires using your hands for balance and to pull yourself up on holds, typically with a summit as the goal. This adventure sport inherently demands a high level of physical fitness and advanced wilderness navigation skills. The environment is varied terrain and can include everything from steep rock and rock scrambling to snow slopes and loose talus fields. A key distinction for scrambling is that it’s considered “non-technical,” meaning upward progress does not usually require ropes, harnesses, or other protection hardware.
This definition, however, comes with a significant caveat. While not strictly required for the ascent, a rope and safety gear are often carried to manage risk. This is especially true for descents or unexpectedly difficult sections. The transition from trail hiking to scrambling represents a significant evolution in how one travels through mountain environments. You are moving from well-defined paths to unmanaged alpine terrain where you are responsible for route-finding and constant risk assessment.
YDS Class 3: “Hands-On Hiking”
Class 3 is where true scrambling begins, defined by the frequent and necessary use of your hands for balance and to pull yourself up short sections. Compared to standard hiking, the exposure—the sense of open space below you—increases significantly. This is not simply a steep walk on gentler slopes; it’s hands-on climbing. The consequences of a mistake on this type of uneven terrain are severe. A slip or a fall could easily result in serious injury or could even be fatal.
This elevated risk is a primary differentiator from Class 2 terrain. While a rope is generally not considered necessary for a competent scrambler to make upward progress, it is often carried as a precaution. A rope can be invaluable for beginners uncomfortable with the exposure or for rappelling a difficult section on the descent, which is often more challenging. The exact point where difficult hiking ends and scrambling begins is often a frequent point of confusion and debate.
YDS Class 4: “Simple Climbing”
Class 4 occupies the ambiguous zone between difficult scrambling and what is considered easy technical rock climbing, bordering on trad climbing. The steeper terrain involves more sustained sections that require deliberate, simple climbing moves where handholds and footholds are essential. The defining characteristic of Class 4 is not the difficulty of the moves, but the consequence of a fall. A mistake on Class 4 technical terrain is highly likely to be fatal due to the high degree of exposure.
It is this life-threatening potential that elevates the seriousness of the route far beyond Class 3. Because a fall is likely fatal, a rope is “often used” or “advisable” for protection and safety. Even if the moves feel easy to a skilled person, the outcome of an unroped fall necessitates a technical safety system for all but the most experienced mountaineers attempting rope-free climbing. Many in the community see it as a nebulous zone between difficult scrambling and easy technical climbing.
The Subjectivity Trap: Why Ratings Aren’t Enough
The distinction between Class 3 and Class 4 is notoriously subjective. It varies based on regional culture, guidebook authors, and even local mountain guides. Experienced climbers often joke that if you ask ten people to define Class 4, you will get ten different answers. This ambiguity presents a significant and often hidden risk for newcomers. A beginner might see a “Class 4” rating and assume it has a universal, fixed meaning.
They might attempt a route based on this number, not realizing the person who assigned the rating has a vastly different risk tolerance. This mismatch between perceived difficulty and objective danger is a common way scramblers get into trouble. It is essential to move beyond blindly trusting a rating. The number should be a starting point for your research. A better approach is developing a personal framework for risk assessment and good mountain sense, which a formal scrambling course can help develop.
The Foundational Layer: Re-examining The Ten Essentials for Scrambling
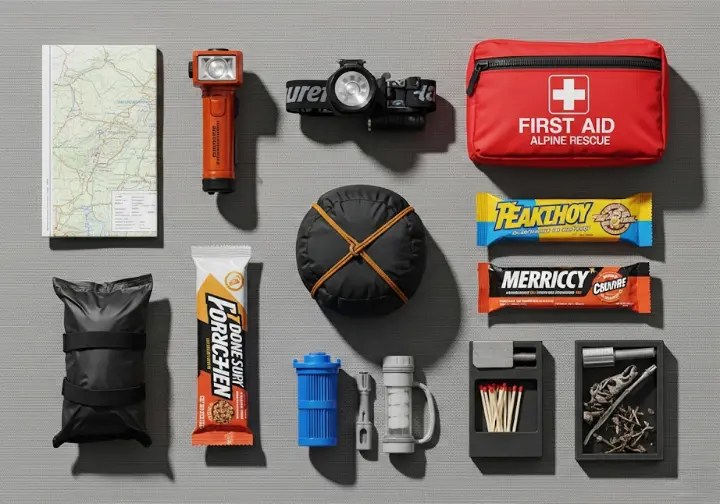
The familiar Ten Essentials take on an elevated importance in the alpine scrambling environment. Each essential must be reconsidered through the lens of increased risk and self-reliance. In the wild terrain of a high mountain, these are the mountaineering essentials that form the bedrock of your survival system on any alpine trip.
Critical Navigation and Illumination
In the off-trail alpine world of scrambling, you are the route-finder. There are no signs or blazes to follow, so proficiency with a topographic map, a physical compass, and an altimeter is non-negotiable. These are fundamental skills that do not rely on batteries. A GPS device is an excellent supplemental tool, but it must never be your primary system. Electronics can fail, batteries die, and screens can be impossible to see under the brutal alpine sun.
You must have the analog tools and knowledge to navigate when your electronics fail. A reliable headlamp with fresh batteries is an absolute necessity. Many scrambles require an alpine start—beginning hours before sunrise to avoid afternoon thunderstorms—and unexpected delays are common. Being caught in complex, high-consequence terrain in the dark without a light is a life-threatening situation.
Environmental Protection and First Aid
At higher altitudes, the atmosphere is thinner, and UV radiation is much more intense. This effect is amplified by reflection from snowfields, which can cause high-alpine terrain—snow blindness. A comprehensive sun protection system, including high-quality glacier glasses, sunscreen, and a sun hat, is mandatory. A minor injury on a trail can become a life-threatening emergency on an exposed ledge. A lightweight emergency bivy provides critical protection from wind and precipitation if you are forced into an unplanned stop.
This simple item can be the difference between a miserable night and a fatal one. The potential for injury from slips, falls, and rockfall is much higher in scrambling. Your first-aid kit must be customized, but more importantly, you must have the knowledge to use its contents. A Wilderness First Aid (WFA) certification should be considered the minimum standard of training for this activity.
Sustenance & Self-Reliance
Scrambling is physically demanding, and delays are common, so carrying a full extra day’s supply of high-energy, no-cook food is a critical safety margin. This is not just extra snacks; it is a dedicated emergency supply, a piece of extra gear that is often overlooked. Dehydration severely impairs physical performance and, more critically, your judgment. You must carry more water than you expect to need and always have a reliable method for treating water from sources found along the route.
The ability to start an emergency fire can be life-saving. Your kit must include reliable tools like a lighter and waterproof matches, along with a dedicated fire starter. A knife or multi-tool is also essential for gear repair, first aid, and potentially cutting away old, unsafe webbing from rappel anchors.
The Scrambler’s Core Kit: Your Primary Interface with the Mountain
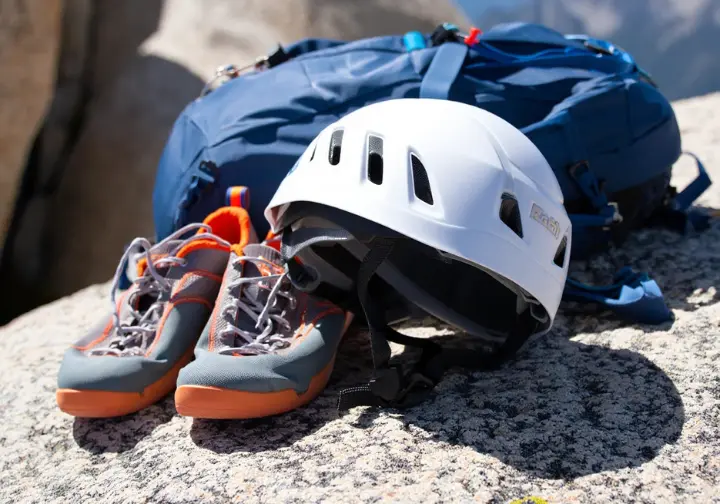
Here we’ll detail the three foundational pieces of gear that represent the first major investments for a hiker moving into scrambling. These items form the core of your scrambling gear list and are the first pieces of beginner mountaineering equipment you should acquire. Proper gear selection starts here.
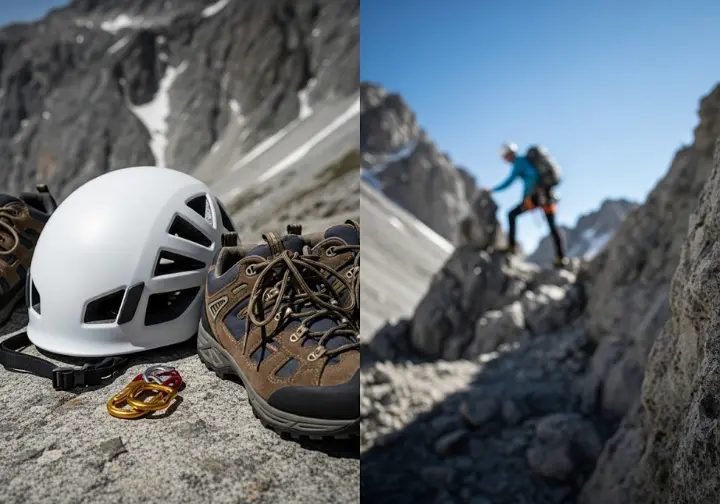
Head Protection: The Mandatory Climbing Helmet
A climbing helmet is non-negotiable in the alpine world of scrambling; it’s the most critical piece of protective climbing gear you will own. The primary danger is from rockfall, which can be caused by weather, animals, or other people above you. A helmet also provides critical protection to your head in the event of even a minor slip or fall. There are three main types: shelled foam (EPP/EPS), hardshell (ABS), and hybrid models.
Hybrid helmets offer a balance of both, making them a good all-around choice for scrambling. The single most important factor is fit. An ill-fitting helmet can shift or fall off, rendering it useless. It should be snug and have an adjustment system you can operate with gloves. As detailed in expert advice on how to choose the best climbing helmet, you should always look for one certified for climbing by the UIAA or CE/EN.
Footwear Debate: Approach Shoes vs. Mountaineering Boots
The choice of footwear is one of the most debated and critical decisions for a scrambler. It requires a compromise between hiking comfort and climbing performance. Approach shoes are specialized hybrids that feature “sticky rubber” soles for exceptional friction on rock terrain and a “climbing zone” at the toe for precision. They are lightweight and ideal for dry, technical rock but offer minimal ankle support and perform poorly on wet trails or snow.
Lightweight mountaineering boots are much stiffer, providing excellent ankle support and a stable platform for kicking steps in snow. Crucially, they are designed with welts to accept crampons, making them the non-negotiable choice for any scramble that involves crossing a glacier or steep snowfields. Their stiffness, however, reduces sensitivity on technical rock.
The Scrambling Pack: A Streamlined System
The ideal backpack for scrambling must be durable, streamlined, and allow for complete freedom of movement. It should share many features with technical mountaineering packs: a capacity of 30 to 45 liters is generally sufficient. Key features to look for are a durable face fabric, like those used by brands such as Mountain Hardwear, and a simple design. The pack should have reinforced loops for securely attaching one or two ice axes, and a good design allows for easy gear access.
Many scramblers prefer a top-loading design, as the lid can secure a helmet or rope. A low-profile hip belt is an important consideration. It should provide support but not be so bulky that it might interfere with a climbing harness if you need to wear one for more technical alpine sections or a rappel. The pack is an integrated part of your movement system.
The Alpine Environment Kit: When Snow and Ice Demand More
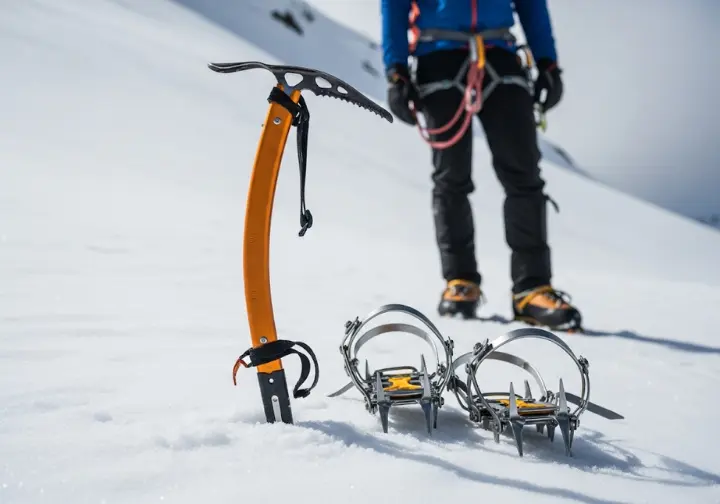
Specialized equipment becomes non-negotiable when a scramble involves snow and ice. This same equipment is often the foundation for more advanced pursuits like ski mountaineering and ice climbing. We will detail how to choose and use an ice axe—your lifeline on snow—and explain the critical safety differences between microspikes and crampons, a distinction every scrambler in the Alps or any other major range must understand.
The Ice Axe: Your Lifeline on Snow
An ice axe for hiking on snowy slopes becomes an essential tool the moment you step onto terrain— snow where a simple slip could turn into an uncontrolled slide. Its primary functions are for balance, security, and most critically, performing a self-arrest. Knowing how to self-arrest is a mandatory skill before carrying these snow tools. For general mountaineering, you need a “walking” axe, not a technical tool for vertical ice-climbing. These general mountaineering axes are your lifeline.
According to a respected guide to ice axes, it should have a “Basic” (B-rated) rating and a straight or slightly curved shaft. Modern wisdom favors a shorter axe (55-65 cm for most people). A shorter axe is more ergonomic on steeper slopes and safer to control during a self-arrest. An overly long axe can be unwieldy and its spike can catch, causing you to lose control.
Essential Traction: Microspikes vs. Crampons
Choosing the correct traction device is a critical safety decision dictated by slope steepness and snow condition on icy terrain. Microspikes and crampons are not interchangeable; using the wrong tool creates a profound danger. There’s a persistent debate about Microspikes vs Crampons, but the use cases are distinct. Microspikes are for walking on flat or low-angle terrains, like icy trails. They are not designed for climbing steep frozen slopes.
Crampons are for climbing. They are robust devices with large teeth designed to penetrate hard snow and ice. They are non-negotiable when the terrain becomes steep enough that you must kick your front points into the slope to ascend. Using microspikes on terrain that demands crampons is a common mistake that can lead to a sudden, catastrophic fall.
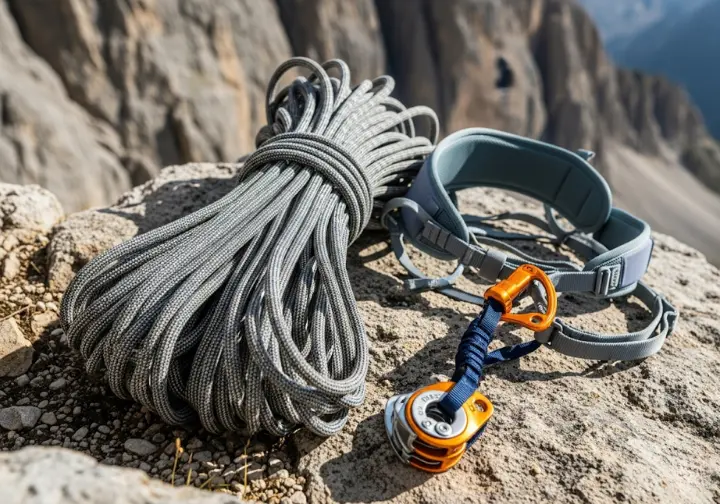
The Technical Safety System: When and Why to Carry a Rope
We now cross into the realm of technical equipment, emphasizing that these tools are dangerous without proper training. It’s not enough to simply own the gear; you must possess the skills. We will provide a decision framework for when to carry a rope and detail the components of a lightweight safety kit, including essential glacier gear for routes involving glacier crossings.
A Framework for Carrying a Rope
Before considering this gear for more technical alpine routes, you must seek hands-on training from qualified alpine guides. Carrying a rope without knowing how to build proper anchors provides a false sense of security and is incredibly dangerous. The skills must come before the hardware. The decision to carry a rope is a nuanced risk assessment. You should carry one if the consequence of a fall on the most exposed section is unacceptable. If you doubt your party’s ability to safely downclimb the crux, a rope is essential for building a rappel anchor.
The decision should always be based on the comfort of the least experienced person. What feels like an easy solo for one person may be terrifying for another. Marginal conditions, such as unexpected ice, a thinner snowpack, or very loose rock, can also turn a simple scramble into a situation requiring a rope.
The Lightweight Scrambling Rack
When a rope is deemed necessary, the goal is not to carry a full traditional rack, but a minimalist system. The philosophy is “light is right.” This kit is for short pitches, building emergency rappel anchors, and protecting exposed sections. The ideal scrambling rope is a short (30-35 meters), thin, and dry-treated single rope. For routes with significant glacier travel, a dedicated glacier rope might be considered. It should be paired with a minimalist, packable alpine harness and a lightweight tube-style belay/rappel device.
A basic scrambling rack is a small, curated selection of gear. Expert advice on what to pack often suggests it should include several long (120cm) lightweight slings for slinging rock horns, a small set of nuts, a few extra locking carabiners, a nut tool, and pre-tied Prusik loops for backing up rappels.
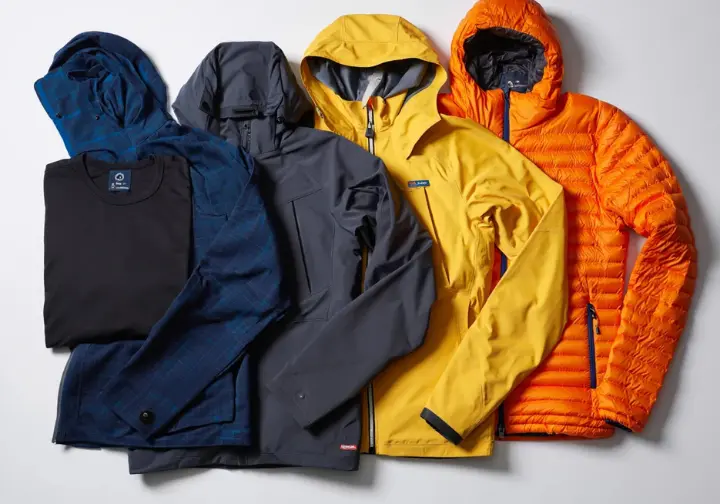
Dressing for Success: The Alpine Layering System
A versatile alpine wardrobe is paramount for safety and comfort in the rapidly changing alpine weather. To function correctly, we’ll break down the function of each layer, from baselayer to puffy jacket. The goal of this clothing system is to manage moisture and regulate temperature effectively, keeping you dry and warm when conditions are cold and wet, and cool and dry during high-exertion periods.
The Action Layers
The foundation of your layering system is a baselayer, worn next-to-skin. Its primary job is to wick sweat away to keep you dry. A lightweight, long-sleeved shirt made of wool or polyester is ideal. Cotton must be avoided as it holds moisture. Your midlayer is the primary insulation you wear while on the move. A gridded fleece or an “active insulation” piece is perfect, as it traps heat while allowing moisture to escape.
A softshell jacket is often called the “action suit” and is the layer you will likely wear the most. It is a highly breathable, stretchy, and weather-resistant garment that performs well in most conditions, from windy ridges to light drizzles.
The Protective Layers
Your hardshell is your ultimate armor against severe weather. This is a fully waterproof and windproof jacket, typically made with a membrane like GORE-TEX. Because it is less breathable, it generally stays in your pack until the weather turns truly bad. A “puffy” jacket is a warm, insulated parka, and it is a critical piece of safety gear. This is your “rest stop” jacket, sized to fit over all your other layers to prevent rapid cool-down.
For your lower body, a single pair of durable, weather-resistant softshell pants is the workhorse for most three-season scrambling. You must also always carry a pair of lightweight, full-zip waterproof rain pants in your pack for heavy rain. The full zips allow you to put them on without taking off your boots, crampons, or having to juggle your trekking poles.
Building Your Kit and Avoiding Beginner Pitfalls
To help you get started on the right foot, we’ll provide practical, actionable advice for the aspiring mountaineer preparing for a high-alpine adventure. Acquiring a full set of gear can be expensive and intimidating. We’ll outline a strategic, phased approach to buying equipment and highlight common mental and judgmental errors that can lead to dangerous situations.
A Phased Approach to Buying Gear
The cost of buying expensive gear can be significant, so a phased approach is wise. The first and most important purchases should be the core safety items: a properly fitting climbing helmet, appropriate footwear, and a suitable backpack. For the alpine environment kit, it is smart to rent an ice axe and crampons for your first few outings. This allows you to understand different gear options and learn what features you prefer before purchasing. Many of these tools are also foundational for those interested in spring skiing or glacier skiing adventures.
The technical safety system—rope, harness, and protection—should be the absolute last items you purchase. This gear should only be acquired after you have received qualified, hands-on instruction. When you do buy this life-saving equipment, always buy it new, as the history and integrity of used ropes and harnesses are unknown.
Common Judgmental Errors to Avoid
“Summit Fever” is the irrational desire to reach the top at all costs, causing you to ignore warning signs like bad weather, approaching darkness, unstable snowpack, or increasing avalanche danger. Recognizing when to turn back is a critical sign of strength. Statistically, the descent is one of the most dangerous parts of any mountain experience, true whether on foot or planning technical ski descents. Fatigue, diminishing light, and the difficulty of downclimbing contribute to a higher risk of accidents.
You must plan your descent with the same care as your ascent. Never underestimate your intuition. If a situation feels wrong, it probably is. This is a key part of avalanche safety and assessing snowpack stability. It is always better to trust that feeling and retreat than to push forward into uncertainty.
Conclusion: Key Takeaways for the Aspiring Scrambler
- Invest in Skills First: Advanced equipment is useless without the knowledge to deploy it correctly. Invest in courses on navigation, first aid, and snow travel before investing in technical hardware.
- Gear is a Modular System: The non-negotiable gear list is not static. It is a system that you must adapt intelligently to the specific terrain, the weather, and the abilities of your party.
- Embrace a Safety Mindset: The descent is more dangerous than the ascent. A rating is just an opinion. Turning back is a sign of strength. Cultivate a mindset of caution and respect for the mountains to ensure a long and rewarding scrambling career filled with safe alpine endeavors.
Frequently Asked Questions about Alpine Scrambling Gear
Can I use my bike or ski helmet for scrambling? +
What is the very first piece of scrambling-specific gear I should buy? +
Do I really need a rope for a route rated Class 4? +
How do I know if I’m ready to start scrambling? +
We are a participant in the Amazon Services LLC Associates Program, an affiliate advertising program designed to provide a means for sites to earn advertising fees by advertising and linking to Amazon.com. As an Amazon Associate I earn from qualifying purchases. We also participate in other affiliate programs. The information provided on this website is provided for entertainment purposes only. We make no representations or warranties of any kind, expressed or implied, about the completeness, accuracy, adequacy, legality, usefulness, reliability, suitability, or availability of the information, or about anything else. Any reliance you place on the information is therefore strictly at your own risk. Additional terms are found in the terms of service.


