

In this article
- The Hiking Footwear Spectrum: How to Choose Your Platform
- The Anatomy of a Hiking Boot: Deconstructing the Technology
- The Science of a Perfect Fit: A Step-by-Step Guide
- Solving Common Hiking Pains: Lacing Techniques & Fit Adjustments
- Hiking with a Conscience: A Guide to Sustainable Boots
- From Trail to Summit: Key Takeaways for Choosing Your Boots
- Frequently Asked Questions about How to Choose a Hiking Boot
The single most important piece of gear that can make or break a hike is your footwear. Learning how to choose a hiking boot is not just about comfort; it’s a critical decision that impacts your performance, safety, and overall enjoyment on the trail. This guide moves beyond simple recommendations to provide a comprehensive framework for how to buy a hiking boot, empowering you to decode the technology, master the science of fit, and confidently select the perfect footwear for your specific adventures. We will help you understand what to look for in a hiking boot, from the core differences between hiking boots, shoes, and trail runners to deconstructing the boot’s anatomy, mastering the perfect fit, and hiking with a conscience by identifying sustainable options.
The Hiking Footwear Spectrum: How to Choose Your Platform


Choosing the right platform begins with understanding the fundamental differences between the three main categories of hiking footwear. Their core design philosophies and available footwear options dictate their best use, making this the most important step in narrowing your search for the right hiking boots.
Hiking Boots: The Foundation of Support and Durability
A traditional hiking boot is defined by its mid- or high-cut design, creating a high-cuff hiking boot that wraps the ankle to provide crucial support on uneven terrain or when carrying a heavy pack. This category includes flexible day-hiking boots for lighter loads and robust backpacking boots engineered for multi-day treks. The primary benefit is unparalleled protection and stability for backpackers, reducing the risk of ankle sprains over long, demanding miles. Backpacking boots offer superior support for multi-day treks with significant weight.
Backpacking models are built for the toughest conditions and rugged terrain, often with durable materials like full-grain leather boots and a stiff internal structure called a shank. This rigidity creates a stable platform, preventing the foot from over-flexing on rocky ground. This level of construction is just below that of true mountaineering boots, which are even stiffer plastic boots designed for use with crampons on snow and ice. The trade-off is weight and a longer break-in period, but for off-trail travel or packs over 20-25 lbs, their stability is indispensable.
Hiking Shoes: The Versatile, Low-Cut Hybrid
Hiking shoes are best understood as low-cut versions of their boot counterparts, offering much of the same technology in a lighter, more agile package. These low-cut hiking shoes feature durable uppers, protective toe caps, and firm midsoles, but without the ankle-covering cuff. This design strikes a balance, providing more support than a trail runner but more flexibility than a full boot, making them an excellent “do-it-all” option for many hikers and types of hikes.
These shoes excel on day hikes over moderate terrain and can be a suitable choice for experienced backpackers with strong ankles or those on three-season backpacking trips with lighter packs. Their versatility means they are comfortable on well-maintained trails but can still handle moderately rocky ground. The main trade-off is the lack of over-the-ankle support, making them less ideal for highly technical terrain. Popular models like the Merrell Moab 2 exemplify this category, offering reliable go-to footwear for a wide audience.
Trail Runners: The Lightweight, Fast-Paced Challenger
Originally designed for running on uneven surfaces, trail-running shoes, originally designed for running on uneven surfaces, have been widely adopted by the hiking community, especially by thru-hikers and fast-and-light enthusiasts. Their design prioritizes low weight, flexibility, and breathability, often featuring mesh uppers and soft, cushioned midsoles. This combination minimizes the energy required with each step, a benefit amplified over long distances and a key reason some prefer ultralight trail shoes.
The most significant advantages of using trail runners for hiking are the minimal-to-zero break-in period and superior comfort on a well-groomed trail. Their high breathability means they manage sweat well and dry extremely quickly. Proponents argue the lack of a stiff ankle cuff allows the foot to strengthen over time. This lightweight design does compromise durability and protection, as a trail runner pick has a shorter lifespan (300-500 miles) and offers less support for carrying a heavy pack on an extended hike.
The Anatomy of a Hiking Boot: Deconstructing the Technology
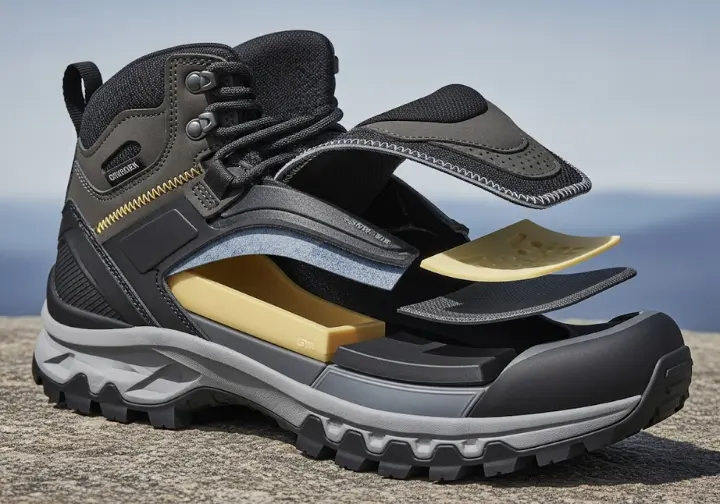
Breaking down a boot into its core components is essential for evaluating its quality. Understanding the function of each part and the materials used in modern boots will empower you to make an informed decision.
Uppers: The First Line of Defense
The upper is the entire part of the shoe that covers the foot, and its material dictates durability, breathability, and water resistance. Full-grain leather is the traditional gold standard, offering maximum durability but at the cost of weight and a long break-in period. Nubuck and suede are softer, more flexible forms of leather that offer a good compromise.
Synthetic materials like polyester and nylon are common in many compatible boots, especially lighter ones. Their advantages are low weight, high breathability, and minimal break-in. The primary disadvantage is reduced durability. Many boots now use a hybrid of synthetic/leather boots, combining durable leather in high-wear areas with synthetic panels to improve flexibility.
Midsoles and Support: The Engine of Comfort and Stability
The midsole is the critical layer that provides cushioning, absorbs shock, and determines the boot’s stiffness. The two most common materials are EVA and PU. EVA is a lightweight, soft foam common in a trail runner or light hiker. PU is a denser, firmer, and more durable foam found in sturdier backpacking boots, providing a stable platform under a heavy pack. A comfortable footbed is key to support.
Within the midsole, manufacturers embed support structures that are critical to understanding the functions of different boot parts. A shank is a stiff piece of material that adds load-bearing stiffness to protect the arch. A rock plate is a thinner, semi-flexible sheet in the forefoot that shields the bottom of your foot from sharp rocks and roots, a feature common in trail running shoes and lightweight boot models.
Outsoles and Traction: Your Connection to the Trail
The outsole is the rubber portion of the boot that contacts the ground, and boot outsoles are designed to balance grip and durability. Softer rubber compounds provide phenomenal grip on slick surfaces like wet rock but wear down quickly. Harder rubber compounds are much more durable but offer less traction. These rubber compounds offer trade-offs that you must consider for the terrain you’ll face.
The key to an outsole’s performance is its lug pattern—the knobs and grooves designed to bite into the trail. Deep, widely spaced lugs are excellent for digging into mud. Conversely, shallower, numerous lugs provide a larger contact surface area, which improves grip on hard-packed trails and solid rock. Vibram is famous, but many proprietary outsoles like Salomon’s Contagrip are also excellent.
Waterproofing Membranes: The Great Debate
Most waterproof hiking boots use a waterproof/breathable membrane, a microporous bootie like those found in GTX boots. The pores are too small for liquid water to pass through but large enough for sweat vapor to escape. Gore-Tex (GTX) is the best-known brand, but many companies have proprietary membranes. A DWR coating on the boot’s exterior is the first line of defense.
The benefit of waterproof boots is obvious: they keep your feet dry from rain or puddles, which is crucial for comfort in cool, wet climates or on snowy terrain. The trade-off is that even the best membrane reduces breathability, leading to hot, sweaty feet. Once a waterproof boot gets soaked, it can take extremely long to dry. For some three-season hiking, a more breathable, non-waterproof shoe that dries quickly is a viable footwear option.
The Science of a Perfect Fit: A Step-by-Step Guide

No amount of technology can save you from ill-fitting boots. Since a proper fit is the most critical factor for comfort and performance, it’s worth following a detailed, procedural guide to get it right and pick the right hiking boot.
How to Prepare for Boot Shopping
Timing is everything. You should always shop for footwear in the late afternoon because your feet naturally swell, mimicking how they will behave during a long hike. Trying on boots in the morning is a common mistake that can lead to a fit that is too tight. It is also essential to bring the exact type of hiking socks and any custom orthotics you plan to wear with your new footwear.
Do not assume you know your shoe size. It is highly recommended to have your feet measured by a professional at a specialty outdoor retailer, as these footwear experts can use a Brannock device. This tool measures length, width, and arch length, which is crucial for ensuring the boot flexes with your foot. Learning how to shop for hiking boots properly from the start will save you pain later.
The In-Store Testing Protocol
Once a boot is on your foot, there is a specific protocol to check for a proper fit. Before lacing, slide your foot forward until your longest toe touches the front. You should be able to slip one finger between your heel and the back of the boot. This ensures your toes won’t smash into the front on steep descents during a mile hike. Next, push your heel back and lace the boot snugly. It should feel secure, but you should have room to wiggle your toes.
The most critical test is checking for heel lift. As you walk, your heel should remain locked in place with minimal slippage. Excessive heel lift is the number one cause of blisters for sore-footed hikers. Most specialty stores have an incline ramp, which is the best tool for this. Use it to check for toe bang on the decline and heel lift on the incline, a key part of learning how to check and adjust the fit.
The Podiatrist’s Corner: Fit for Your Foot Type
Understanding your foot’s biomechanics and foot type can help you select a more supportive boot and prevent common injuries. Podiatrists often look at features that control pronation—the natural inward rolling of the foot. For hikers who overpronate, a boot with a stiff heel counter and good torsional rigidity can provide stability. Heel-to-toe drop, the height difference between the heel and the forefoot, also plays a role. Higher drops can sometimes alleviate stress on the Achilles tendon.
Conversely, “zero-drop” shoes, popularized by brands like Altra, promote a more natural, midfoot strike but require adaptation. If you have specific issues, consulting a podiatrist or footwear specialist is invaluable. They might recommend a boot with a firm PU midsole and a supportive shank to provide a rigid platform for collapsing arches. Finding the best hiking boots according to a podiatrist can address specific biomechanical needs and lead to better podiatrist recommended hiking boots.
Solving Common Hiking Pains: Lacing Techniques & Fit Adjustments
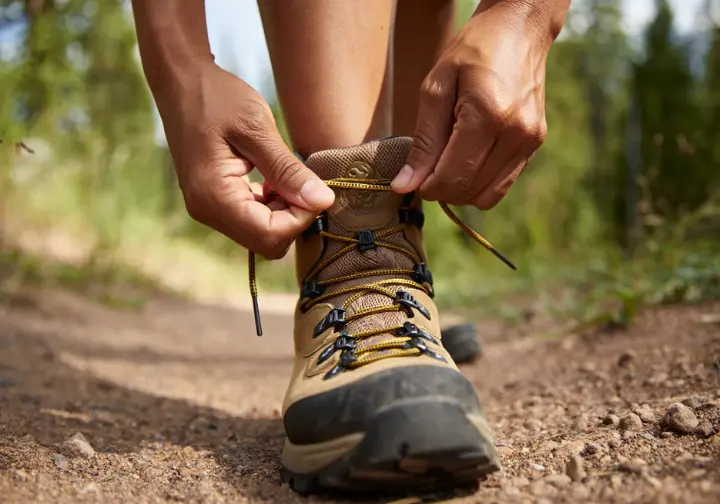
Even a well-chosen boot can cause issues on the trail. With a few actionable solutions, you can transform your laces from simple fasteners into a powerful tool for customizing the fit for the entire hike.
Advanced Lacing to Eliminate Heel Slip and Pressure Points
If you experience heel slip, the most effective solution is the “Heel Lock” or “Surgeon’s Knot.” This creates extra friction to lock your heel securely. Instead of crossing the laces at the eyelets before the ankle, pass each lace back through the eyelet on the same side to create two loops. Then, cross the laces, thread them through the opposite loop, pull tight, and continue lacing up the ankle hooks.
For hikers with high arches who experience pressure on top of the foot, “Window Lacing” provides relief. This technique creates a gap in the lacing pattern over the pressure point. Simply run the laces vertically up to the next set of eyelets on the same side, instead of crossing them over the sensitive area, and then resume your normal criss-cross pattern. These techniques can dramatically increase comfort and prevent painful blisters and hot spots.
The Break-In Period: Myth vs. Reality
The concept of “breaking in” is a process of allowing a stiff boot and your foot to conform to one another, not a method for fixing a fundamentally poor fit. This is most critical for heavy-duty, full-grain leather boots, which can require weeks of gradual wear. Mid-weight composite boots require less time, while a lightweight boot or trail runner often needs no break-in period at all, especially for a first trip.
The correct way to break in boots is a gradual process. Start by wearing them around the house. If they feel good, progress to short walks, then to easy day hikes. Finally, wear them on a hike with a weighted pack to simulate an extended trek. Avoid dangerous “shortcut” myths like soaking leather boots in water and wearing them dry, as these methods can cause irreversible damage to the materials and adhesives.
Hiking with a Conscience: A Guide to Sustainable Boots
In an era of increasing environmental awareness, choosing your camping gear involves more than just performance and price. Exploring the environmental impact of footwear will empower you to make a more responsible choice.
The Environmental Cost of Footwear
The production of hiking footwear carries a significant environmental footprint. Many synthetics are derived from petroleum, and manufacturing can be energy-intensive. Traditional leather tanning has its own challenges, as chromium tanning can release toxic heavy metals. The sheer volume of consumption is staggering; the global shoe waste and environmental impact are immense, with millions of pairs ending up in landfills where they can take centuries to decompose.
This data provides a compelling reason to consider sustainability as a key factor in your purchasing decision. Choosing boots from boot companies that prioritize recycled materials, responsible manufacturing, and durability contributes to the preservation of the wilderness we love to explore.
How to Choose Sustainable Options and Certifications
When shopping, look for brands that are transparent about their materials. Key sustainable features include uppers made from recycled PET, midsoles with bio-based materials, and outsoles using recycled rubber. Brands like Oboz, Patagonia, and Merrell are often recognized for their efforts.
Certifications are a powerful tool for verifying a brand’s claims. Look for Bluesign® certification, which ensures chemicals used are safe. The Leather Working Group (LWG) provides a rating for tanneries based on their environmental performance. Durability and repairability are also key. A high-quality boot that can be resoled has a much longer lifespan, making quality replacement footwear a very sustainable choice that reduces waste. Investing in a durable, repairable boot is one of the most sustainable choices a hiker can make.
From Trail to Summit: Key Takeaways for Choosing Your Boots
Choosing the right hiking boot is a journey of self-assessment and education. By understanding how to pick the right hiking boot using these core principles, you can move from purchase anxiety to empowered confidence.
- First, Match the Platform to the Purpose: The most critical initial decision is choosing the right category. Prioritize lightweight trail runners for speed, choose versatile hiking shoes for all-around day hiking, and select supportive hiking boots for rugged terrain and heavy backpacking loads.
- Second, Decode the Tech, Don’t Be Fooled by Jargon: Understand the trade-offs. Leather means durability but more weight; synthetics are light but less durable. PU midsoles offer support for heavy packs, while EVA provides cushioning. A waterproof membrane is great for wet climates but can be hot in the desert.
- Third, Obsess Over Fit Above All Else: A perfect fit is non-negotiable. Always shop in the afternoon with your hiking socks, ensure a thumb’s width of space for your toes, and confirm your heel is locked in place. Use incline ramps and try on numerous brands.
- Finally, Empower Yourself with Skills: Footwear is part of a system. Learn advanced lacing techniques to fine-tune your fit on the trail, and understand the proper, gradual process for breaking in stiffer boots. These skills will serve you long after your purchase.
Frequently Asked Questions about How to Choose a Hiking Boot
Do I really need to break in modern synthetic hiking boots? +
My feet are wide. What brands should I look for? +
How long should the waterproofing on my boots last? +
What are the best socks to wear when trying on hiking boots? +
We are a participant in the Amazon Services LLC Associates Program, an affiliate advertising program designed to provide a means for sites to earn advertising fees by advertising and linking to Amazon.com. As an Amazon Associate I earn from qualifying purchases. We also participate in other affiliate programs. The information provided on this website is provided for entertainment purposes only. We make no representations or warranties of any kind, expressed or implied, about the completeness, accuracy, adequacy, legality, usefulness, reliability, suitability, or availability of the information, or about anything else. Any reliance you place on the information is therefore strictly at your own risk. Additional terms are found in the terms of service.


