

In this article
This introduction frames self-arrest not just as an emergency action, but as a component of a broader “prevention-first” mountain safety philosophy. It establishes the critical importance of the skill while promising a clear, responsible, and step-by-step guide to both the technique and the mindset required for safe snow travel. The core concept of mountaineering self-arrest is a fundamental technique for stopping a slide on snow or ice. This article follows a “Prevention First” philosophy, positioning the ice axe primarily as a tool for stability and fall prevention, with self-arrest as the last-ditch effort. It will cover the mechanics for all four fall positions, how to practice self-arrest safely, common mistakes, and the critical limitations of the technique. This guide is a foundational resource for knowledge but is not a substitute for professional, hands-on instruction to learn proper ice axe safety.
Your Ice Axe: Understanding the Essential Tool

This section provides a detailed breakdown of the mountaineering ice axe, the primary tool for self-arrest. It will cover the anatomy of the axe and the correct ways to hold it for both stability and immediate readiness, a point of frequent confusion for beginners. Understanding your tool is the first step toward using it effectively when it matters most for your personal safety.
Anatomy of a Mountaineering Axe
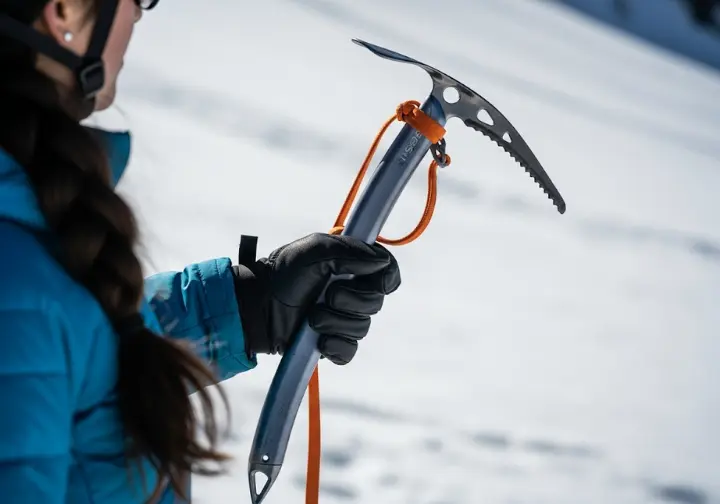
To self-arrest correctly, we first need a common vocabulary for the tool in our hands. The Pick is the sharp, pointed end of the head used to dig into the snow to arrest a fall; it serves as the primary anchor point. Opposite the pick is the Adze, a broad, hoe-like feature primarily used for chopping steps or platforms in firm snow. The long handle of the axe is the Shaft, and at its bottom is the Spike, a sharp point used for balance and support while walking on snow and ice.
For general mountaineering and an effective self-arrest, a straight shaft is preferred over the curved shafts designed for technical ice climbing, as it is more effective for plunging and creating a reliable anchor. It’s vital to differentiate between a standard mountaineering axe and more aggressive technical ice tools. Technical tools, with their shorter shafts and pronounced curves, are designed for climbing vertical ice and are significantly less effective for performing a self-arrest, which is a common and dangerous point of confusion for novices. You can learn more about the official UIAA standards for ice tools.
How to Hold Your Axe: Self-Arrest vs. Self-Belay Grip
The self-arrest grip involves holding the axe by the head, with your thumb wrapped under the adze and fingers over the pick, ensuring the pick points backward. The main advantage of this grip is that your hand and the axe are already in the correct orientation for an immediate axe self-arrest, saving critical time if you slip. This grip is your default when traversing or in any situation where a fall is a distinct possibility.
Alternatively, the self-belay grip is used when ascending steeper snow. Here, the axe is held by the head with the palm over the adze and fingers wrapping under the pick, so the pick points forward. This grip provides superior stability and security, allowing you to easily plunge the pick into the slope with each step for a secure third point of contact. The choice between them is a trade-off: the self-arrest grip prioritizes reaction time for a fall, while the self-belay grip prioritizes protection to prevent one.
The Ice Axe Leash Debate
The primary argument for using an ice axe leash is compellingly simple: it prevents you from dropping your axe. On a steep, exposed slope, dropping your primary safety tool can be a catastrophic error, leaving you with no way to self-arrest. It is a situation with potentially fatal consequences, and in such cases, the leash provides critical security.
On the other hand, the arguments against using leashes are more nuanced. A leash can become tangled during a fall, which might cause injury as the sharp tool flails around. It can also hinder and slow down hand-switching on long traverses, which is both inefficient and can be unsafe. The choice is often situational and based on experience. Some elite climbers prefer going leashless for freedom of movement, while others use a leash in extremely cold conditions where dropping the axe is a higher risk due to numb hands. This is a nuanced topic, and understanding fundamental tips for beginner hikers provides broader safety context.
The Core Skill: Step-by-Step Self-Arrest Instructions
This is the instructional heart of the article, breaking down the physical mechanics of how to self-arrest with ice axe in a clear, systematic way. After establishing the universal goal for any arrest, we’ll provide detailed procedures for each of the four primary fall orientations. These self-arrest techniques are designed to be paired with visual aids and, most importantly, real-world practice.
The Universal Goal: The Final Arrest Position
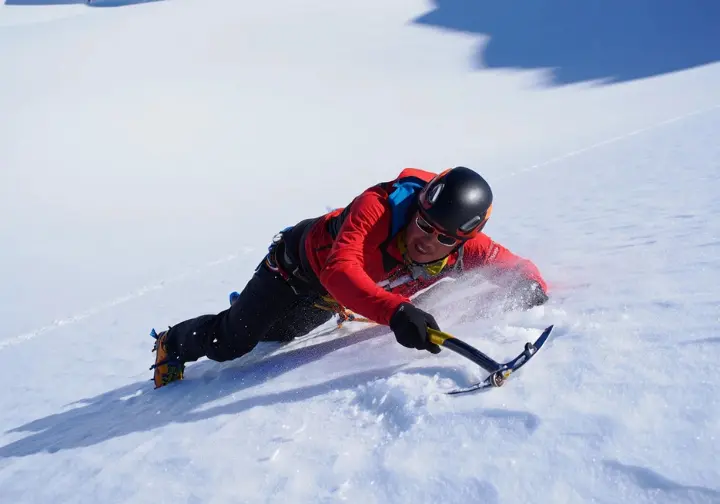
Regardless of how a fall begins, the single objective of any self-arrest maneuver is to get into the final, standardized self-arrest position as quickly as possible. This final position is designed to maximize stopping power and regain control. You will be on your stomach, with your head uphill and feet downhill, creating a low profile against the snow. Your entire body’s weight should be pressed down firmly on the head of the ice axe, applying significant force.
The axe must be held diagonally across your chest, with the pick driven aggressively into the snow near your shoulder. The shaft runs across your body to the opposite hip, which lets you use your body weight as leverage to keep the pick buried and create maximum friction. Your chest and stomach should be arched up, similar to a push-up position, focusing all pressure onto the pick. Your toes are kicked firmly into the snow to provide additional braking power, but only if you are not wearing crampons.
Position 1: Feet-First, on Your Front
This is the most straightforward self-arrest technique. Because you are already on your front and facing downhill, fewer movements are required to get into the final arrest position. As soon as the slip occurs, you must instantly and aggressively drive the pick of your ice axe into the snow surface at your side, near your shoulder. A quick arrest has to be decisive, using the fall’s initial momentum to help bury the pick deep into the snow.
Once the pick is in, immediately pull your body close to the axe head, applying your full body weight downwards onto the pick. At the same time, lift your stomach and chest off the snow to concentrate all your pressure on the axe head. Kick your feet into the slope to create additional resistance and help bring yourself to a complete stop.
Position 2: Feet-First, on Your Back
The first and most critical action in this scenario is to roll over. It is impossible to effectively arrest a fall while sliding on your back, so getting onto your stomach is the immediate priority. To do this, hold the axe across your chest and swing your legs and hips in one direction to initiate a roll onto your front. This must be a decisive and practiced movement to avoid tumbling out of control.
Once you are on your stomach, you are now in the feet-first, on-your-front orientation. The procedure becomes identical to the first scenario we covered. You must immediately drive the pick into the snow, pull your body into the axe head, arch your chest, and kick your feet into the slope to stop the slide.
Position 3: Head-First, on Your Front
This is a more dangerous scenario because you are accelerating downhill head-first, and a slow reaction could lead to a free fall. The main objective is to use the axe to pivot your body around into the correct feet-first orientation. The first step is to immediately drive the axe pick into the snow at your side. This action doesn’t stop the slide at first but creates a powerful pivot point. You must be prepared for the significant rotational force this generates.
As the pick digs in, your body will begin to swing around it like a pendulum. Your legs will swing down and around until they are pointing downhill. This move effectively transitions your body into the standard feet-first arrest position. As soon as your body has pivoted, maintain downward pressure on the axe head and immediately engage your feet by kicking into the snow to halt your momentum.
Position 4: Head-First, on Your Back
This is the most disorienting and dangerous fall scenario, requiring the most practice to master a good self-arrest. You are moving backwards, head-first, and are unable to see the slope below. The first action is counter-intuitive: reach out to one side with the ice axe and drag the pick in the snow. This is not an aggressive plunge but a controlled drag that initiates a turn, much like a rudder.
Dragging the pick starts a pendulum motion, swinging your feet around. As your body rotates, you must simultaneously roll onto your hip and then onto your stomach, finishing in the head-first, on-your-front position. This complex maneuver only gets you halfway there. Once on your front, you must immediately execute the pivot maneuver from Position 3: keep the pick engaged to swing your legs around downhill, then kick your feet in to achieve the final arrest.
The Human Factor: Practice and Pitfalls
Mastering the mechanics of self-arresting is only half the battle. This section focuses on the human element: the critical importance of practice to build muscle memory, how to do so safely, and the common mistakes that can lead to failure in a real-world fall. Many accidents could be prevented with better preparation.
Why Practice is Non-Negotiable
In a real fall, there is no time to think or remember instructions. A fall is sudden and violent, and the only way to react correctly is if the movements are an ingrained, reflexive action born from an instinct for self-preservation. The primary goal of practice is to build this instantaneous muscle memory. Momentum and speed increase exponentially during a slide. Waiting even a second or two to begin the arrest can make it impossible to stop. Consistent practice eliminates the hesitation that can have catastrophic consequences, which you can read about in consequences of failure to self-arrest.
It’s also important to practice the techniques correctly. Repeatedly practicing with poor form, like not getting your weight over the axe, will build dangerous muscle memory that will emerge under stress. This focus on practice is part of building confidence as a new hiker.
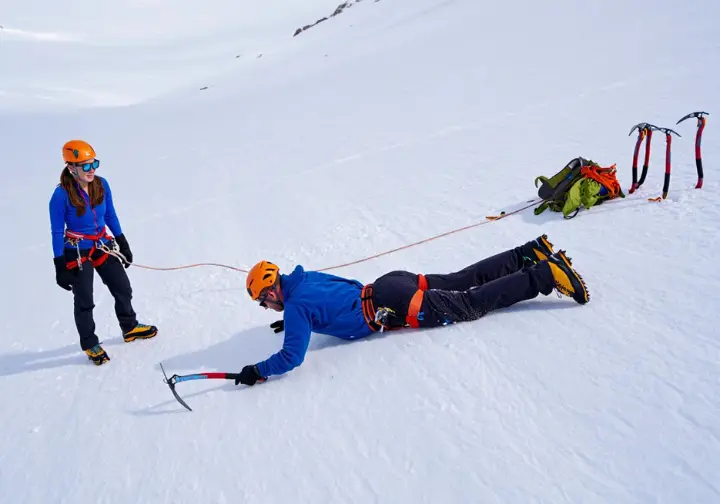
How to Practice Self-Arrest Safely
Selecting a safe practice location is the most critical first step. The ideal spot is a gentle, low-angle snow slope with a long, flat, and completely hazard-free runout. There must be absolutely no rocks, trees, or other danger at the bottom. Always wear a helmet to protect your head, and durable, waterproof outer layers. Practice with a partner for safety and to provide feedback. These guards against preventable injury.
The single most important safety rule for practice is to NEVER wear crampons when first learning. If the sharp points of a crampon catch on the snow while you are self-arresting, they can anchor your foot while the rest of your body is in motion, leading to severe leg injuries. It’s best to practice self-arrest from several different positions, starting with the easiest and gradually building confidence. These safety tips are essential for learning.
Common Self-Arrest Mistakes to Avoid
The most common error is hesitation. Waiting too long to initiate the arrest is a critical mistake, as a slide can become impossible to stop once you gain momentum. The action must be immediate. A grave error during a real self arrest is failing to lift the feet when wearing crampons. Catching a crampon point while sliding is a guaranteed way to cause a violent tumble and catastrophic leg injury.
Incorrect axe and body positioning is also a frequent issue. Holding the axe with a straight arm instead of pulling it in close prevents you from applying your full body weight. Failing to arch your chest diffuses pressure across your torso instead of concentrating it on the pick. Finally, avoid building “poor muscle memory.” It’s crucial to practice self-arresting by simulating a sudden fall to build the correct reflexive response.
Advanced Context: Beyond the Basics

A true understanding of self-arrest requires moving beyond the basic “how-to.” This section provides critical context on how the skill interacts with other equipment, how it applies to different groups like skiers, and most importantly, the objective hazards where it may not be enough to save you.
Self-Arrest Without an Ice Axe
This self-rescue technique is an absolute last-ditch emergency procedure when you have fallen without an axe in hand. This method is far less effective and should not be relied upon as a primary plan. The first step is to roll onto your stomach with your feet pointing downhill, getting into a low-profile position to maximize contact with the snow.
With no axe, you must use any available means to dig into the snow. This includes digging in with your hands, fists, and elbows, while aggressively kicking in with your boot toes to slow the slide. If other tools are available, they can be used as a last resort. For example, ski poles can be held together to try and dig the grips or tips into the snow to create a point of resistance. This worst-case scenario reinforces the importance of being prepared by packing the Ten Essentials.
A Comparison: Hikers vs. Skiers/Splitboarders
The tools used by hikers and skiers differ significantly. Hikers use a standard mountaineering ice axe designed for an effective self-arrest. Ski mountaineers often use a Whippet—a specialized ski pole with an integrated pick—or carry an axe on their pack, meaning it’s not always in hand. A hiker drives the axe pick into the snow, supplemented by kicking with boot toes. A skier must use their Whippet’s pick but also learns to apply careful pressure on the uphill edges of their skis to create a long braking surface.
Skiers face unique challenges. They must manage long skis during the slide to prevent them from catching or crossing, which could cause a tumble. Applying too much edge pressure too quickly can buck the user off their feet, requiring significant practice and core strength to modulate effectively.
The Limits of Self-Arrest: A Critical Reality Check
Self-arrests are not a foolproof guarantee of safety; their effectiveness is highly conditional. Understanding this is key for responsible risk assessment and avoiding a false sense of security. Slope angle plays a critical role. On very steep terrain, generally slopes exceeding 40-45 degrees, a climber accelerates so quickly that stopping becomes physically impossible. On such slopes, fall prevention is the only viable safety strategy.
Snow and ice conditions also have a major impact. On extremely hard, icy surfaces, an ice axe pick may not penetrate at all. Instead of digging in to create a secure anchor, it will simply skitter across the top. Finally, momentum is a deciding factor. The longer a climber falls before initiating the arrest, the more momentum they build. In these cases, the force may be too great to overcome. Understanding these limits is part of understanding the risks of a hike.
Conclusion: Prevention, Practice, and Preparedness
The central theme of this guide is the “Prevention First” philosophy. An ice axe’s most important job is to provide stability to prevent a fall in the first place; self-arrest is the critical last resort when prevention has failed. Your most critical action item is to practice. Reading about self-arrests is not enough; the skill must be practiced in a safe, controlled environment until it becomes an instant, correct reaction. Understanding the limits of self-arrest—knowing when a slope is too steep or icy—is as important as knowing the technique itself. Good judgment is your ultimate safety tool. We strongly encourage you to seek professional instruction; a one-day course with a certified guide is the best investment you can make.
Frequently Asked Questions about Self-Arrest
What is the difference between self-arrest and glissading? +
Why is it so important to wear a helmet when practicing self-arrest? +
Should I keep my crampons on during a real fall? +
How do I choose the right length for a mountaineering ice axe? +
We are a participant in the Amazon Services LLC Associates Program, an affiliate advertising program designed to provide a means for sites to earn advertising fees by advertising and linking to Amazon.com. As an Amazon Associate I earn from qualifying purchases. We also participate in other affiliate programs. The information provided on this website is provided for entertainment purposes only. We make no representations or warranties of any kind, expressed or implied, about the completeness, accuracy, adequacy, legality, usefulness, reliability, suitability, or availability of the information, or about anything else. Any reliance you place on the information is therefore strictly at your own risk. Additional terms are found in the terms of service.


