

In this article
- The Hiker’s Complete Guide to Snowshoeing Gear & Apparel
- Mastering the Moves: Fundamental Snowshoeing Techniques
- Winter Safety & Environmental Awareness
- Planning Your First Snowshoe Adventure
- Key Takeaways for Your First Snowshoeing Season
- Frequently Asked Questions about Getting Started with Snowshoeing
For the experienced hiker, the sight of a snow-covered trail can feel like a barrier. But what if it were an invitation instead? Snowshoeing is the key to unlocking a quiet and beautiful winter world, a natural extension of their favorite activity. This trailside guide defines the core principles of the sport, from its ancient origins to its modern benefits, showing why it’s one of the most rewarding outdoor activities available when the snow flies.
What is Snowshoeing?
Snowshoeing is a form of winter hiking that uses specialized footwear to walk over the snow. The practice is built on the principle of “flotation,” which involves distributing your body weight over a large surface area. This action is similar to how a boat floats on water and is what prevents the user from sinking into deep snow, making winter travel and winter transportation across the terrain efficient.
The basic motion is nearly identical to walking, making it exceptionally intuitive for beginners. It only requires a slightly wider stance to keep the snowshoe frames from overlapping. This ease of learning makes it a highly accessible outdoors activity. A modern shoe of this type serves two main functions: providing flotation to stay atop the snow and delivering traction with integrated snowshoe crampons to grip on packed or sloped terrain. This dual-purpose design allows for travel across varied snowy landscapes.
Without a snowshoe, a hiker will “post-hole”—sinking with each step. This is incredibly tiring, slow, and can ruin the trail surface for other users like cross-country skiers.
From Survival Tool to Modern Recreation: A Brief History
The origins of snowshoeing trace back 4,000 to 6,000 years to Central Asia, making it one of humanity’s oldest transportation technologies, predating even skiing. These first traditional snowshoes were simple wooden planks, created out of necessity for hunting and migration across snowy territories.
This technology migrated to North America via the Bering Land Bridge. Indigenous peoples across the continent innovated on the basic design, creating distinct styles suited to specific environments, from long, narrow designs for open country to the round “bear paw” style for dense forests.
The evolution from a utilitarian tool to a recreational activity began when European settlers adopted the technology. It has since grown into a global sport enjoyed for fitness, hiking, mountaineering, exploration, and competition, transforming from a tool of necessity into a passion pursued for its wellness benefits.
The Benefits: Why Every Hiker Should Try Snowshoeing
Snowshoeing offers a fantastic cardiovascular workout, a great cold-weather exercise that can burn between 420 and 1,000 calories per hour. As a low-impact activity, it’s easier on the joints than running while still providing a full-body workout. For a deeper look at its advantages, consider the unmatched health benefits of snowshoeing.
The mental wellness aspects are also compelling. Snowshoeing helps combat seasonal affective disorder by getting you outdoors in the sunlight and alpine air. It allows you to explore familiar hiking trails in a new season, experiencing them in a peaceful, new context.
Its accessibility is a key benefit. Unlike skiing or snowboarding, which have steep learning curves, the basic motion is just walking with a wider stance. This low barrier to entry means a hiker can be confidently enjoying the winter trails on their very first time snowshoeing.
The Hiker’s Complete Guide to Snowshoeing Gear & Apparel

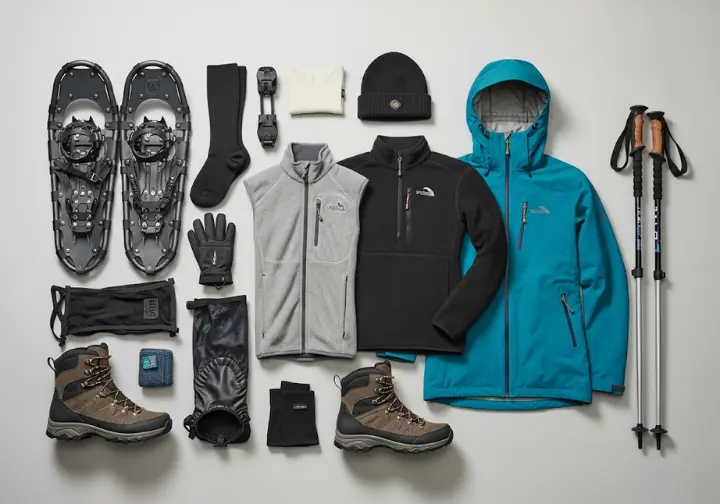
Viewing your gear and snowshoe clothing as an interconnected system is crucial for comfort and safety. Let’s break down how to choose the right snowshoes, footwear, and other appropriate gear, with a special focus on adapting their existing hiking gear for this adventure.
How to Choose the Right Snowshoes
A “Terrain-First” approach is the best way to select your equipment. First, consider where you plan to hike before you look at specific models. An excellent guide on how to choose snowshoes can provide more detail. Flat terrain snowshoes are ideal for beginners, while specialized trail-running snowshoes offer lighter options for packed conditions. For your next mountaineering adventure, you’ll need models built for steep, icy terrain. Before you get snowshoes, consider if you can first rent snowshoes or borrow snowshoes to try out different styles.
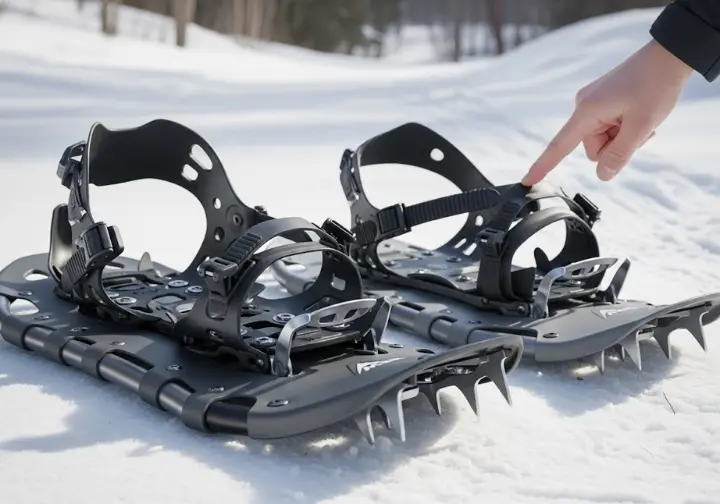
A snowshoe has four key components: the Frame and Decking for flotation, the Bindings to secure your boot, and the Crampons for traction. A feature particularly valuable for any mountaineer is the heel lift (televator), a small bar that flips up to reduce calf strain on steep ascents.
Finding the appropriate snowshoe size is based on your “total load”—your body weight plus your extra gear. A chart will help you match this load to a length for optimal flotation in conditions from powdery snow to hardpack snow. When you read snowshoes reviews, you’ll see MSR is known for traction, Tubbs for bindings, and Atlas as a solid all-around performer.
The Best Footwear for Snowshoeing
Waterproof and insulated winter boots are non-negotiable for warmth and safety. This brings up a common question: “Can I use my hiking boots?“. Many 3-season waterproof hiking boots are suitable, but dedicated snow boots or waterproof winter boots are a safer bet to keep your feet from getting cold.
Wool or synthetic socks are essential for wicking moisture away from the skin. The phrase “cotton kills” is especially true in winter; cotton absorbs sweat, loses its insulating properties when wet, and increases the risk of frostbite and hypothermia.
Gaiters are another crucial accessory. These are worn over your boots and pants to create a seal that prevents snow from getting inside your shoes. This simple piece of gear is vital for staying warm and dry. For more information, you can learn how to choose and use gaiters from outdoor experts.
How to Dress: The Winter Layering System
The best way to dress for a winter snowshoe adventure is by adapting the layering system experienced hikers already know. The Base Layer wicks sweat away. The Mid-Layer provides insulation. For your legs, waterproof snow pants are ideal. While some might use ski pants or even snowboarding pants, avoid using regular trekking pants unless they are fully waterproof.
The Outer Layer, or Shell, offers weather protection from wind and snow. It must be waterproof and windproof to keep the insulating layers dry. Look for features like “pit zips” for ventilation. Finally, protect your extremities with a non-cotton hat, a balaclava, and waterproof ski gloves or mittens, and always bring an extra pair. Proper warm clothing is essential.
Using Trekking Poles for Balance and Stability
We strongly advocate for using trekking poles, even if you don’t use them in summer. They provide significant balance and stability, acting as two extra points of contact to prevent falls and increase confidence on uneven terrain.
A crucial modification is needed to adapt a hiking staff for winter: snow baskets. These wide, plastic discs, which are often called essential snow baskets, screw onto the bottom of the poles to prevent them from sinking into soft snow.
Proper technique includes adjusting their length—shorter for uphill, longer for downhill—and using the pole straps correctly to propel yourself forward and to help get up after a fall.
Mastering the Moves: Fundamental Snowshoeing Techniques
With your required gear sorted, it’s time to master fundamental snowshoeing techniques. The following snowshoe tips and instructions cover the basic techniques needed to build your snowshoeing skills from the very first step on the snow.
Walking, Ascending, and Descending Hills
Start with the basic stride techniques: walking on flat terrain. Find a natural stride with a slightly wider stance to avoid stepping on your snowshoe frames. Lift your feet just enough to clear the snow, allowing the rotating binding to let the tail of the shoe—it should drag naturally.
When approaching uphill terrain, use the “kick-step” technique for hill climbing. This involves kicking the toe of the uphill snowshoe into the hillside to engage the toe crampons. Here, the heel lift is critical for conserving energy on any incline. Snowshoe Magazine Online offers excellent visual guides on techniques for the beginner.
For down-hilling or learning to snowshoe downhill, keep your weight slightly back, knees bent, and plant your heel first. This descending technique lets the rear crampons dig in securely, preventing slips.
How to Traverse Slopes and Turn
Traversing—moving sideways across a slope—requires using the edging technique. Put your weight on the uphill edge of your entire snowshoe, digging that side snowshoe edgewise into the snow to create a stable track. This improves grip. For more tips on how to ascend and descend hills, some guides can be very helpful.
For turning around, there are several techniques. The “step turn” is easiest for open areas. In tighter spaces, the more advanced “kick turn” is useful. This involves lifting one ski, or snowshoe, pivoting it 180 degrees to point downhill, and then bringing the other foot around.
How to Get Up After Falling
Falling in deep snow can be awkward, but knowing how to recover addresses a major beginner fear. The key is to first get your snowshoes untangled and positioned downhill from your body. If you need visual aids, some brands provide useful blogs that show you how to get up after falling.
Without poles, roll onto your stomach and push up. With poles, the process is easier. Bring both poles together, plant the downhill pole and uphill pole firmly near your body, and use them as a stable anchor to push yourself up.
Winter Safety & Environmental Awareness

While the activity is straightforward, the winter environment presents more winter hazards. It requires a higher level of preparedness and risk assessment, making these winter safety tips a top priority.
The Winter-Adapted Ten Essentials
This approach builds on a hiker’s existing knowledge of The Ten Essentials with critical upgrades for cold weather. For example, “Illumination” means a headlamp with lithium batteries. For a complete overview, the Appalachian Mountain Club has a definitive winter hiking essential gear list.
You need extra food and water. Navigation is more critical when trails are obscured by snow, so always carry a map, compass, and GPS. An emergency shelter, such as a lightweight bivy in your winter backpack, is a non-negotiable addition. Prolonged sun exposure on snow can also cause painful snow blindness, making sunglasses or goggles essential.
Identifying Hidden Winter Hazards
Winter—it presents unique dangers. Hypothermia and frostbite are two of the most serious. To understand all the primary safety risks involved, further reading is recommended.
Tree wells—loose, deep snow around a tree’s base—are a significant risk. Other hidden obstacles include snow shelves or snowbridges over creeks, which can collapse under weight. The snow pack can hide many dangers that are visible in summer, requiring constant awareness of the landscape.
A Beginner’s Guide to Avalanche Awareness
This guidance provides basic avalanche awareness, but is not a substitute for avalanche skills training. “Avalanche terrain” is generally defined as slopes steeper than 30 degrees.
Before every trip, you must check the avalanche forecast for local avalanche hotspots. The ‘holy trinity’ of avalanche safety gear includes an avalanche beacon, a shovel, and a probe. This equipment is the foundation of avalanche preparedness, but it’s useless without proper training on how to use it to rescue a partner buried in an avalanche. Carrying this gear is critical to avoid situations of uncontrolled sliding or worse on avalanche-prone slopes.
Planning Your First Snowshoe Adventure

Armed with new knowledge about gear and snowshoeing technique, you’re ready to plan your first snowshoe trek. Let’s cover the final practical steps, from choosing a safe location to understanding trail etiquette.
Where to Go: Choosing a Safe Location
For a first outing, or a guided snowshoe trip, it’s best to start with safe, designated locations. National Parks often have well-marked and patrolled snowshoe trails, with some even offering ranger-guided snowshoe walks. The process of Choosing a Safe Location is a core hiking skill.
State-managed Sno-Parks or snow-play areas are another great option, providing access to trail systems. Ski resorts or Nordic centers that allow snowshoeing are also fantastic for beginners, offering groomed trails and rental equipment in a controlled environment.
Winter Trail Etiquette: The Rules of the Snow
Knowing the “rules of the trail” helps ensure a better snowshoe experience for everyone. The most critical rule is to not walk on groomed cross-country ski tracks. The deep prints left by snowshoes can ruin the smooth grooves (a prepared ski track) that skiers rely on. You can find more details on winter trail etiquette from outdoor retailers.
General right-of-way principles apply: uphill traffic typically has the right of way, and snowshoers should yield to skiers who are moving faster. Also, if you find yourself on a hard-packed snow trail and sinking in without your snowshoes, put them back on. This avoids “post-holing,” which leaves deep, ankle-twisting holes for others.
Leave No Trace and Gear Care
The seven principles of Leave No Trace should be reviewed with a focus on their winter application. This includes packing out all trash, including food scraps, and knowing how to properly dispose of human waste. The Leave No Trace Center has resources on applying the 7 principles in winter.
After your adventure, protect your investment with proper gear care. Wipe down your snowshoes so they are completely dry before storing them, paying special attention to the bindings and metal crampons to prevent rust and degradation. Store them in a cool, dry place away from direct sunlight.
Key Takeaways for Your First Snowshoeing Season
- View your gear as an interconnected system where waterproof boots, a non-cotton layering system, and the right snowshoes work together for safety and comfort.
- While the technique is as simple as walking, the winter environment demands greater respect and avalanche preparedness. Always check avalanche forecasts and carry the winter-adapted Ten Essentials.
- Start on beginner trails at a local Sno-Park or Nordic center to build confidence before climbing more challenging terrain.
- Embrace the quiet beauty of the winter landscape; snowshoeing unlocks a whole new season of adventure on the trails you already love.
Frequently Asked Questions about Getting Started with Snowshoeing
Can I use my regular hiking boots for snowshoeing, or do I need special winter boots? +
What’s the real difference between using snowshoes and just putting microspikes on my boots? +
Realistically, how much more physically demanding is snowshoeing than a typical summer hike? +
Do I need to buy special winter trekking poles? +
We are a participant in the Amazon Services LLC Associates Program, an affiliate advertising program designed to provide a means for sites to earn advertising fees by advertising and linking to Amazon.com. As an Amazon Associate I earn from qualifying purchases. We also participate in other affiliate programs. The information provided on this website is provided for entertainment purposes only. We make no representations or warranties of any kind, expressed or implied, about the completeness, accuracy, adequacy, legality, usefulness, reliability, suitability, or availability of the information, or about anything else. Any reliance you place on the information is therefore strictly at your own risk. Additional terms are found in the terms of service.


