

In this article
The trail spools out ahead, a perfect ribbon of dirt under a clear sky. But two miles in, a familiar ache begins—a hot spot on your shoulder, a dull throb in your lower back. That nagging pain isn’t a rite of passage; it’s a signal. This backpack fit guide will teach you to interpret those signals and master the single most critical skill for comfortable, powerful hiking: achieving a perfect backpack fit. This isn’t just about adjusting straps; it’s about transforming your pack from a dead weight into a seamless extension of your body, unlocking the freedom to focus on the summit, not the suffering. By the end, you will understand why at least 80 % of the load must ride on your hips via a properly positioned hipbelt, how two simple measurements—torso length and hip size—trump brand hype every time, and how to execute a five-step on-body protocol that makes every hike feel like the first mile instead of the last.
Why Is a Perfect Backpack Fit the Unsung Hero of Every Hike?


An optimally fitted pack is engineered to transfer 80 % or more of its total weight directly onto the body’s primary load-bearing structure—the pelvic girdle—anchored by the iliac crest and powered by the glutes and quads. The shoulder straps, in contrast, are designed to carry no more than 20 % of the load, serving primarily as stabilizers that keep the pack snug against the back. The shoulder harness, a highly mobile yet inherently unstable joint complex, is simply not built for sustained vertical loads; when forced into that role it quickly succumbs to strain, fatigue, and nerve compression.
When the 80/20 rule is violated, a cascade of negative biomechanical consequences follows. Weight forced onto the shoulders increases metabolic cost, accelerates premature fatigue, and triggers a forward trunk lean that distorts natural gait mechanics. A poorly fitted pack also compromises balance, dramatically raising the risk of stumbles and falls—the leading cause of hiking injuries according to a systematic review of load carriage biomechanics. With the “why” firmly established, the first step toward harnessing this principle isn’t on the trail, but at home with a flexible cloth tape measure and a friend, as outlined in our broader fundamental hiking beginner tips.
How Do You Find Your Perfect Pack Size Before You Ever Touch a Strap?

How do you accurately measure your torso length?
The critical metric that determines a backpack’s size—Small, Medium, Large, or even XL—is torso length, not overall height, and mistaking the two is the most common and costly error in pack sizing. Begin by tilting your head forward to expose the most prominent bony bump at the base of the neck; that is the C7 vertebra and serves as the top anchor point. Next, place your hands on your hips to locate the bony shelf at the top of the hip bones—the iliac crest—and visualize a horizontal line across the spine level with that shelf; that is the bottom anchor. A flexible tailor’s tape measure and a helpful friend yield the most accurate result, but a non-stretchy string and a ruler work in a pinch.
Have the helper measure the distance along the natural contour of the spine from the C7 vertebra to the iliac-crest line, then match that number—whether in inches or centimeters—to the specific sizing chart of the manufacturer, because torso length ranges for Small, Medium, Large, and XL vary significantly between brands. If the measurement falls on the cusp, the seasoned recommendation is to size down; a slightly short adjustable suspension can often be cinched into place, whereas a pack that is too long makes proper weight transfer impossible. Whenever possible, verify the selection by trying on a weighted pack in an REI store or specialty retailer, because while numbers guide, the body has the final vote. This initial measurement is non-negotiable, a truth reinforced by the National Park Service hiking safety guidelines and explained further in our deeper dive on choosing a backpacking backpack.
What about hip circumference and pack volume?
While torso length determines the frame size, hip circumference governs how well the hipbelt itself cradles your iliac crest and actually transfers weight. Wrap the tape measure around the body at the level of the iliac crest, not the pant waistline, because that is precisely where the adjustable hipbelt rides. This measurement becomes essential on packs offering interchangeable hipbelts, where the padded sections must wrap securely around the front of the hip bones with at least an inch of gap between the webbing ends at full tension. A belt that gaps too widely or overlaps excessively fails to deliver the promised 80 % load distribution and will bruise or chafe within the first mile.
Backpack Sizing Calculator
Find the perfect backpack size based on your torso length.
Select your torso length above to see which brands have a perfect fit.
Your recommended sizes are:
Osprey (Extra Small), Hyperlite (Extra Small)Your recommended sizes are:
Osprey (Extra Small/Small), Gregory (Extra Small/Small), Deuter (Extra Small), Hyperlite (Small)Your recommended sizes are:
Osprey (Small), Gregory (Small), Deuter (Extra Small/Small), Hyperlite (Small)Your recommended sizes are:
Osprey (Medium), Gregory (Medium), Deuter (Small/Medium), Hyperlite (Medium)Your recommended sizes are:
Osprey (Medium), Gregory (Medium), Deuter (Medium), Hyperlite (Medium)Your recommended sizes are:
Osprey (Large), Gregory (Large), Deuter (Medium/Large), Hyperlite (Large)Your recommended sizes are:
Osprey (Large), Gregory (Large), Deuter (Large), Hyperlite (Large)Your recommended sizes are:
Gregory (Tall/XL), Hyperlite (Tall/XL)Choosing the correct pack volume—measured in liters—is not technically a fit variable, yet overloading any frame can overwhelm its suspension and negate perfect measurements. Broadly, 20–30 L suits day hikes, 50–80 L supports multi-day backpacking trips, and ultralight backpacks may shave even those figures, though they demand impeccable fit and packing technique. The golden rule, however, remains immutable: pick the pack that fits your body first, then confirm it offers the volume your adventures require. This hierarchy is echoed in a risk factor analysis for hiking injuries and underscored by our curated picks of best women’s hiking packs that account for differing hip shapes.
What is the 5-Step Protocol for On-Body Pack Adjustment?
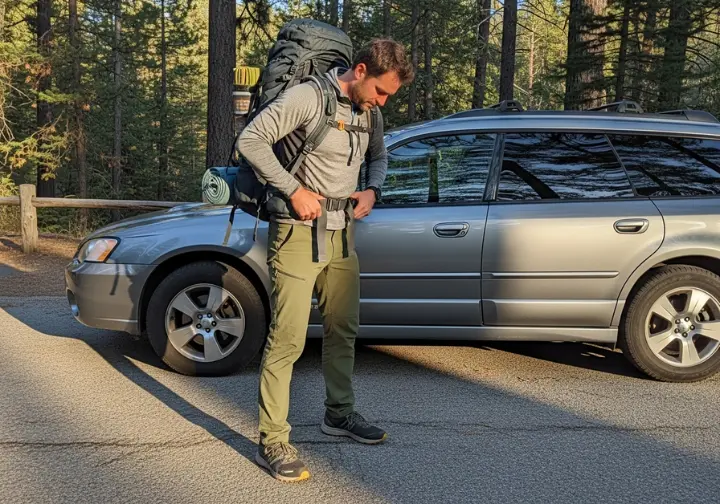
Step 1 & 2: How do you establish the hipbelt foundation and secure the shoulder straps?
Begin by loading 15–20 lbs (7–10 kg) into the pack to engage the suspension as it will behave on the trail, and loosen every strap completely. Position the hipbelt so its padded wings are centered on, or “hugging,” the iliac crest with the top edge of the pad resting about one inch above the crest itself. Cinch the webbing straps forward and inward until the belt is snug, supports the pack’s full weight without slipping, yet still allows free hip movement—this is the load-bearing foundation upon which everything else depends.
With the pack’s weight firmly on the pelvis, pull down and back on the shoulder-strap webbing until the straps are snug against the shoulders, remembering their role is stability, not weight-bearing. Overtightening is the classic rookie error that yanks load off the hips and back onto the shoulders. Verify with the two-finger test: you should be able to slide one or two fingers underneath the strap at the collarbone. The yoke—the point where the shoulder straps attach to the pack’s back panel—should sit 1–2 inches below the top of the shoulders; if it rides higher or lower, the torso length is wrong. A study on Characteristics of fall-related hiking accidents underscores why this foundation matters for stability, and our guide on how to pack your backpack like a pro reminds you that proper internal organization is the prerequisite for a balanced load.
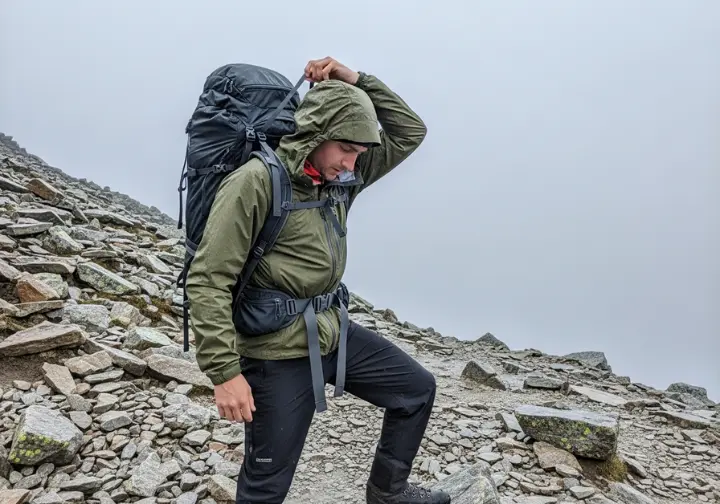
Step 3, 4 & 5: How do you fine-tune with load lifters, the sternum strap, and the final check?
With weight anchored on the hips and shoulders merely stabilizing, the load-lifter straps—running from the top of each shoulder strap to the pack frame—fine-tune balance. Gently pull them forward until taut, achieving an angle of 45 degrees between the shoulder strap and the pack body; this draws the upper portion of the pack closer, improving your center of gravity and overall stability. Next, fasten the sternum strap about one inch below the collarbones, cinching only enough to prevent the shoulder straps from splaying outward; overtightening here restricts breathing and distorts harness fit.
Pro-Tip: Before cinching your sternum strap, exhale fully and set it while your rib cage is at its smallest; this prevents the strap from tightening further when you breathe hard on an uphill grind.
Common mistakes include cranking the load lifters so steeply that a gap opens above the shoulders, or reefing the sternum strap until the chest feels corseted. Once all straps are set, perform a mobility test: bend, twist, and raise your arms—the pack should feel like a single unit moving with your torso. Visually inspect for large, unintended gaps between your back and the pack panel (excluding intentionally suspended mesh systems). Accept that this is a dynamic system; on-trail adjustments are inevitable as terrain changes or the load settles. Detailed kinetic data from a thesis on backpack load effects on gait biomechanics confirms the benefits of these angles, and our overview of choosing the right day-hiking rucksack shows how the same principles apply across pack categories.
How Do You Troubleshoot Pain and Find a Fit for Your Unique Body Type?
What’s causing my shoulder, back, or hip pain (and how do I fix it)?
Sharp pain on the tops of the shoulders almost always signals that the hipbelt is too loose or the pack’s torso length is too short, forcing the shoulder musculature to bear the load that the pelvic girdle was designed to carry. Stop, loosen the shoulder straps entirely, reposition the hipbelt so it truly cups the iliac crest, and cinch it until the pack’s weight lifts off the deltoids. Gaps visible above the shoulders suggest the opposite: the torso length is too long or the load-lifter straps are over-tensioned, cantilevering the harness away from the body; shorten an adjustable suspension or slacken the load lifters until they sit flush. A persistent lower-back ache coupled with the sensation of being pulled backward usually stems from loose load lifters or from heavy items packed too far from the spine—tighten the lifters and shift dense gear so it rides high and tight against the frame sheet or back panel.
One-sided shoulder pain often betrays an asymmetrically loaded pack or uneven strap lengths; stop and redistribute contents so weight mirrors the body’s midline, then verify that each strap tail measures the same length from buckle to webbing end. Hip bruising or chafing can arise from a belt cinched too aggressively, an overloaded pack, or simply prominent iliac crests that need more forgiving padding; ease tension, lighten the load, or consider a pack with a wider, more moldable adjustable hipbelt. Numbness or tingling in arms or hands is the red flag of brachial plexus compression from overtightened shoulder straps or a harness that is too narrow—immediately loosen both shoulder and sternum straps to transfer weight back to the hips. Train yourself to think like a pack-fitter: identify the symptom, isolate one variable, adjust, and retest. Pain is data; ignoring it courts injury, whereas a single targeted tweak often restores comfort within minutes. When feet are also barking, cross-reference our guide on how to stop blisters in their tracks to keep every system happy.
How do women’s-specific and plus-size packs differ?
Women-specific backpacks are far more than pastel colorways; they incorporate deliberate geometric adjustments based on statistically common anatomical differences. Torso-length ranges skew shorter to align with the generally shorter average female spine, while shoulder straps follow an S-shaped contour that curves outward around the chest instead of compressing it. The hipbelt is canted at a different angle and cut with a more conical flare to match the typical flare of the female pelvis, producing a wrap that feels secure rather than perched.
Pro-Tip: When trying women-specific packs, wear the same sports bra you use on trail; even slight differences in chest contour can shift where the S-straps land and whether the sternum buckle sits comfortably.
Plus-size designs extend the same philosophy to larger frames, but they are not simply scaled-up versions of standard internal-frame backpacks. The padded adjustable hipbelt is lengthened and reshaped so the load transfers comfortably around a broader circumference, and zippered pockets migrate forward so they remain accessible without contortion. Shoulder harnesses emerge from the pack at a wider angle to prevent the straps from pinching the neck or riding atop the trapezius. Regardless of gender-specific or plus-specific design, the universal truth remains unchanged: measure torso length, transfer weight to the hips, and adjust sequentially. For a holistic kit that respects female geometry from pack to pants, see our roundup of top hiking pants for women.
Conclusion
A perfect fit is non-negotiable: at least 80 % of the pack’s weight must ride on your hips via a properly positioned hipbelt centered on the iliac crest. Your torso length—not your height—is the single most critical measurement for selecting the correct pack size, whether you choose an internal-frame workhorse like the Osprey Atmos AG or an ultralight backpack such as the Hyperlite Headwall 55. Once the right size is in hand, the on-body adjustment proceeds in a strict sequence: hipbelt, shoulder straps, load-lifter straps set to a 45-degree angle, and finally the sternum strap one inch below the collarbones. Pain is not weakness; it is data on a comfort scale from 1 to 10. Learning to translate shoulder pain, hip bruises, or numbness into precise fit adjustments is the final step that separates casual hikers from confident backcountry athletes. Apply these principles to the rest of your kit by exploring our complete library of gear guides and field-tested reviews.
Frequently Asked Questions
How do I know if my backpack fits correctly?
A correctly fitted pack will feel stable and balanced, with the vast majority of the weight resting on your hips, not your shoulders. You should be able to move freely—bend, twist, and raise your arms—without the pack shifting or swaying. There should be no significant gaps between your back and the pack panel (unless the pack uses a suspended mesh design), no pinching at the neck or armpits, and no painful pressure points on the shoulders, hipbones, or lower back. If you can slide two fingers under your shoulder straps at the collarbone and the hipbelt cups the iliac crest without bruising, you are dialed in.
Should a backpack rest on your hips or shoulders?
A hiking backpack should rest squarely on your hips, which are evolutionarily engineered to carry at least 80 % of the load. Your shoulders should only bear about 20 % of the weight, acting primarily as stabilizers to keep the pack close to your back and prevent it from swaying. If you feel the weight pressing down on the tops of your shoulders or pulling backward on your upper back, the hipbelt is too loose or the torso length is wrong.
What is the correct angle for load lifters?
The ideal angle for load-lifter straps is between 30 and 45 degrees, measured from the top of your shoulder straps up to the pack frame. This angle effectively pulls the top of the pack toward your body, improving your center of gravity and reducing the backward lean that can strain the lower back. If the straps are too flat (horizontal) they do nothing; if they are too steep (vertical) they create a gap above the shoulders and lift weight off the hips.
Why do my hands get numb when backpacking?
Numbness or tingling in your hands is most often caused by overtightened shoulder straps compressing nerves and blood vessels in the armpit area—specifically the brachial plexus. Immediately loosen your shoulder straps and sternum strap to transfer weight back to your hips where it belongs. If the problem persists even after slackening the straps, your pack’s harness may be too narrow for your frame, or the sternum strap may be positioned too high and pulling the shoulder straps inward. Re-measure torso length and, if necessary, explore packs with wider-spaced shoulder harnesses.
Risk Disclaimer: Hiking, trekking, backpacking, and all related outdoor activities involve inherent risks which may result in serious injury, illness, or death. The information provided on The Hiking Tribe is for educational and informational purposes only. While we strive for accuracy, information on trails, gear, techniques, and safety is not a substitute for your own best judgment and thorough preparation. Trail conditions, weather, and other environmental factors change rapidly and may differ from what is described on this site. Always check with official sources like park services for the most current alerts and conditions. Never undertake a hike beyond your abilities and always be prepared for the unexpected. By using this website, you agree that you are solely responsible for your own safety. Any reliance you place on our content is strictly at your own risk, and you assume all liability for your actions and decisions in the outdoors. The Hiking Tribe and its authors will not be held liable for any injury, damage, or loss sustained in connection with the use of the information herein.
Affiliate Disclosure: We are a participant in the Amazon Services LLC Associates Program, an affiliate advertising program designed to provide a means for us to earn advertising fees by advertising and linking to Amazon.com. As an Amazon Associate, we earn from qualifying purchases. We also participate in other affiliate programs and may receive a commission on products purchased through our links, at no extra cost to you. Additional terms are found in the terms of service.


