

In this article
- The Financial Foundation: How Do You Build a Pre-Trek Budgeting Strategy?
- The Core Cost Nexus: What Are the Key On-Trail Expenditures?
- Data in Action: What Do Real-World Trek Budgets Look Like?
- Strategic Synthesis: How Can You Optimize Your Trekking Budget?
- Conclusion
- Frequently Asked Questions about Budgeting for a Major Trek
The journey to a major international trek begins not at the trailhead, but with a spreadsheet. The towering peaks of the Everest Region or the sweeping vistas of the Annapurna Circuit are earned long before the first boot hits the trail, through meticulous financial planning. This data-backed guide demystifies the costs and provides an actionable framework—including a free budgeting template in a downloadable file—to transform your dream trip into a financially viable reality.
- Financial Foundation: Discover how to build a master budget, maximize savings, and account for critical pre-departure expenses like flights and insurance.
- On-Trail Economics: Learn the key drivers of on-trail costs, including the teahouse economy, the impact of altitude on pricing, and a strategic framework for buying vs. renting gear.
- Data-Backed Case Studies: See detailed budget models for iconic treks like Everest Base Camp, the Annapurna Circuit, and Manaslu, allowing you to compare independent vs. package tour costs.
- Strategic Synthesis: Gain a universal budgeting equation and a taxonomy of cost-optimization strategies to make any trek more affordable without sacrificing safety.
The Financial Foundation: How Do You Build a Pre-Trek Budgeting Strategy?


Success in the high mountains is built upon a solid foundation of careful planning. The months leading up to your departure are just as critical as the trek itself. This is where you architect your financial strategy, accumulate the necessary funds, and account for the large, upfront investments that make the adventure possible.
How do you create a master budget and resettlement fund?
Your first step is to create a “travel blueprint,” a comprehensive inventory of your personal finances. This involves listing all current assets, like checking and savings accounts, and all liabilities, such as mortgages or student loans, that will persist while you are away. For long-term treks, a powerful strategy is converting a primary residence into a passive income stream by renting it out, which can help cover these fixed expenses back home.
A frequently overlooked but absolutely critical component of your annual budget is a post-trek resettlement fund. The adventure ends, but life resumes. Setting aside a separate fund equivalent to 2-3 months of your normal living expenses—typically $5,000 to $6,000—provides an essential financial cushion. This safety net allows you to transition back to daily life and find new employment without undue stress. For a deeper dive into this, see our comprehensive guide to thru-hike preparation.
The best way to create this master budget is with a dedicated budgeting tool. Our free budget tracker, a well-structured template in a spreadsheet file, provides a dynamic financial model to track savings goals, pre-trek outlays, and projected on-trail expenses.
To get started with your own plan, review some authoritative long-term travel financial planning advice to ensure you’ve covered all your bases.
Your Interactive Trek Budgeting Tool
Planning the finances for a long-term trek can feel overwhelming. Use our interactive framework to inventory your finances, plan your costs, and build your critical resettlement fund. Check off each step and download a PDF copy to guide your planning.
What are the most effective strategies for pre-trek savings maximization?
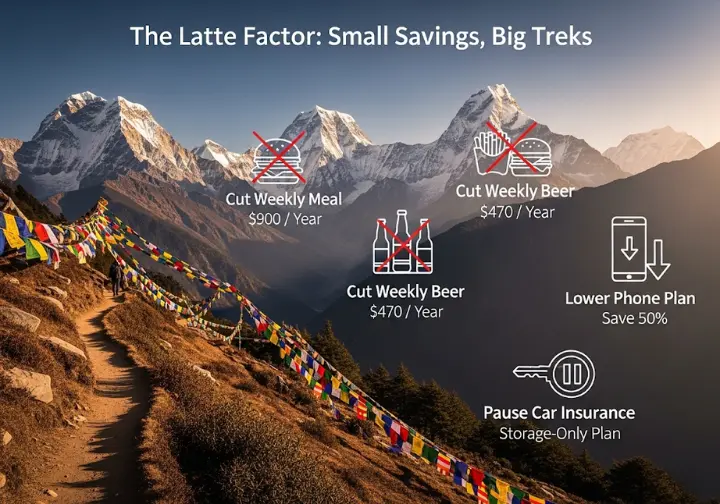
Accumulating the funds for a major trek requires discipline and a clear-eyed look at your spending habits. A powerful method to improve your overall spending is to quantify the small, regular, non-essential expenditures in your daily spending, often called the “Latte Factor.” The numbers add up with surprising speed.
Forgoing just one $15-$20 restaurant meal per week can create annual savings between $780 and $1,040. Cutting a weekly $9 six-pack of beer can add over $468 to your travel fund annually. These small, consistent sacrifices directly fund your on-trail experiences.
[PRO-TIP] Proactively contact your service providers to reduce fixed monthly costs. If a car will be sitting idle, your insurance policy can often be reduced to a minimal storage-only plan. Likewise, downgrade your mobile phone from an unlimited data plan to a limited or pay-as-you-go option. Service in remote trekking areas like the Khumbu or Manaslu region is often nonexistent, and this simple change can cut your bill by 50%.
What are the essential pre-departure capital outlays?
Before you even pack your bag, several large, non-negotiable expenses must be settled. International airfare is often the single largest pre-trek expenditure. A flight from North America to Kathmandu (KTM), the gateway to trekking in Nepal, typically ranges from $740 to $1,500. Booking at least six months in advance is the best strategy for securing a reasonable price.
A Nepal Tourist Visa is a mandatory, fixed cost based on your planned duration. It’s crucial to check the official Nepal tourist visa fee structure for the most current rates before you travel.
| Duration | Fee (USD) |
|---|---|
| 15 Days | $30 |
| 30 Days | $50 |
| 90 Days | $125 |
Finally, high-altitude travel insurance is a critical, non-negotiable purchase. Your policy must explicitly cover helicopter emergency medical evacuation and trekking up to 6,000 meters. Standard travel policies often contain altitude exclusion clauses that render them useless in a real emergency. The out-of-pocket cost for a helicopter rescue can easily exceed $4,000-$6,000. An appropriate insurance policy to cover this risk is a small price to pay—typically $100-$300—for absolute peace of mind. This is a core part of The Ten Essentials system for high-altitude safety.
The Core Cost Nexus: What Are the Key On-Trail Expenditures?
Once your boots are on the ground, a unique set of economic principles governs your daily spending. Understanding the drivers behind costs for accommodation, food, gear, and support staff is essential for managing your personal budget effectively on the trail.
How does the teahouse economy influence accommodation and food costs?
The teahouse business model in Nepal is built on an unwritten “social contract.” Lodging is extremely cheap—often just $2-$5 per night and sometimes even free—because the owners make their profit from your mandatory purchase of dinner and breakfast. Consequently, trekkers should not budget for “accommodation” and “food” separately, but for a combined daily “teahouse cost.”
Costs for both food and lodging are directly correlated with altitude. A plate of fried rice that costs $7 at the start of a trek can easily cost $15 at its highest point. This is not price gouging; it is a direct reflection of the immense human and animal labor required to transport all supplies up the mountain.
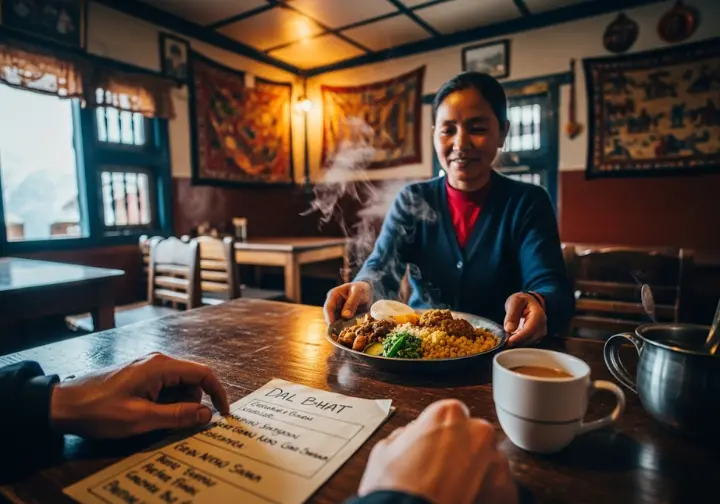
[PRO-TIP] The most economically savvy strategy is to eat local. A meal of Dal Bhat (lentil soup, rice, and vegetables) is calorically efficient and almost always comes with free refills, offering the best value. This is a far better choice than premium-priced Western meals like pizza or pasta.
Carrying a water filter is one of the most impactful money-saving tactics. A liter of bottled water can increase from $1 to as much as $5 with elevation gain. Purifying your own water is safe, environmentally responsible, and will save you a significant amount of money. Our guide to water filters and purifiers can help you choose the right system.
| Item | Low Altitude Price | High Altitude Price |
|---|---|---|
| Dal Bhat | $5 – $7 | $8 – $10 |
| Pizza / Pasta | $8 – $10 | $12 – $15+ |
| Breakfast Set (e.g., eggs, toast, potatoes) | $8 – $12 | $10 – $15 |
| Bottled Water (1 Liter) | $1 – $2 | $2 – $5 |
| Tea / Coffee | $2.50 – $4 | $3 – $5 |
| Beer | $5 – $6 | $6 – $8+ |
How should you decide whether to buy, rent, or bring trekking gear?
An intelligent gear strategy can save you hundreds of dollars. Employ a three-tier acquisition model: Buy critical personal fit items like hiking boots and your backpack at home after careful testing. Rent expensive, bulky items like a down jacket or a -20°C sleeping bag in a trekking hub like Kathmandu or Pokhara. Buy cheap, non-performance items like fleece pants, hats, or gloves locally.
Renting specialty gear offers massive savings. An expedition-grade down jacket can cost over $200 to purchase, but renting one in the Thamel district of Kathmandu for a 14-day trek costs about $21—a saving of nearly 90%. While much of the branded gear sold in these hubs is counterfeit, generic items like t-shirts are perfectly adequate. Using a simple trash bag as a pack liner is a classic budget-hiker trick that works just as well as an expensive brand-name cover.
The financial breakeven point for renting versus buying items like trekking poles or a high-quality sleeping bag is often over 100 days of use, making renting the clear choice for a typical two or three-week trek. If you do decide to purchase, consult our guide to the best trekking poles to make an informed choice.
| Item | Estimated New Purchase Cost | Daily Rental Cost | Breakeven Point (Days of Use) |
|---|---|---|---|
| Down Jacket (Expedition Grade) | $150 – $300 | ~$1.50 | ~100 – 200 days |
| Sleeping Bag (-10°C / 14°F) | $150 – $400 | ~$1.50 | ~100 – 267 days |
| Trekking Poles (Pair) | $80 – $150 | ~$1.00 | ~80 – 150 days |
What are the new mandatory costs for guides and permits in Nepal?
Recent regulatory changes in Nepal have fundamentally altered the cost structure for international visitors. Hiring a licensed guide is now legally mandatory for foreign trekkers on most popular routes in regions like Everest and Annapurna. Fully independent solo trekking by foreigners is no longer permitted, a significant shift from past policies.
This means that guide fees are now a fixed cost. The daily rate for guides and porters varies by region and experience, typically ranging from $30-$50 per day for the Everest/Annapurna regions to $40-$60 for more restricted areas like Manaslu. This fee includes the guide’s food, accommodation, and insurance.
Tipping is a vital and expected component of a guide’s income. This is not an optional bonus but a cultural norm that reflects gratitude for their hard work and expertise. You should factor a tip of 10-15% of the total trek cost into your budget from the very beginning. Permit requirements are also region-specific. For example, the old TIMS card is no longer required for the Everest region (it has been replaced by a local Khumbu Pasang Lhamu Rural Municipality permit), but it is still mandatory for treks in the Annapurna and Langtang regions.
| Permit Name | Applicable Region(s) | Cost (NPR) | Cost (USD Approx.) |
|---|---|---|---|
| Annapurna Conservation Area Permit (ACAP) | Annapurna Region | NPR 3,000 | $30 – $40 |
| Manaslu Conservation Area Permit (MCAP) | Manaslu Region | NPR 3,000 | $25 – $30 |
| Sagarmatha National Park Permit | Everest (Khumbu) Region | NPR 3,000 | $23 – $30 |
| Khumbu Pasang Lhamu Rural Municipality Permit | Everest (Khumbu) Region | NPR 2,000 | $16 – $20 |
| TIMS Card | Annapurna, Langtang, etc. (NOT Everest) | NPR 2,000 | ~$20 |
| Manaslu Restricted Area Permit (RAP) | Manaslu Region | $100/week (Peak Season) | $100 |
| Manaslu Restricted Area Permit (RAP) | Manaslu Region | $75/week (Off-Season) | $75 |
Data in Action: What Do Real-World Trek Budgets Look Like?
Abstract numbers are useful, but seeing them synthesized into a holistic plan for a specific trek is where the strategy becomes real. These budget models transform granular data into actionable financial roadmaps for some of the world’s most iconic hikes.
How do you budget for an American thru-hike like the AT or PCT?
Budgeting for a major American thru-hike like the Appalachian Trail (AT) or Pacific Crest Trail (PCT) is best framed as a monthly budget. This monthly spend typically falls between $1,000 and $2,000 per month on the trail, and your final budget varies depending on your style and comfort level.
- The “$1,000/month Ramen Noodle Budget”: This is the most frugal style. It requires strict discipline, minimizing expensive “zero days” in town, relying heavily on hiker boxes for free food, and sticking to the cheapest possible resupply options.
- The “$1,500/month Knorr Rice Sides Budget”: This offers a more balanced and sustainable approach. It allows for more frequent resupply stops, occasional restaurant meals, and the occasional shared motel room to escape the elements.
- The “$2,000/month Mountain House Budget”: This buys convenience and comfort. It accommodates frequent motel stays, premium dehydrated meals, and the flexibility to replace or upgrade gear on the trail.
Knowing how long it takes to hike the Appalachian Trail—typically 5 to 7 months—allows you to multiply your chosen monthly spending rate to arrive at a total estimated cost.
What is a realistic line-item budget for the Everest Base Camp (EBC) Trek?
A detailed budget sheet for a classic 14-day EBC trek reveals a total cost for an independent trekker (who must still hire their own guide/porter) of approximately $2,785 – $3,830. This figure excludes initial international airfare and major gear purchases but includes domestic flights, permits, guide fees, food, and lodging.
A major cost driver for any trek in the Everest region is the round-trip flight from Kathmandu to Lukla, which ranges from $400 – $435. This is a significant fixed cost that is typically included in package tours. Interestingly, a budget package from a reputable local Nepali operator can be highly cost-competitive, often falling in the $1,200 – $1,800 range (excluding international flights).
The analysis reveals a new reality for trekking in Nepal: the perceived cost savings of a fully independent trek have largely evaporated. Due to the mandatory guide laws and the economies of scale that benefit local tour operators, booking a package is often a financially comparable—and logistically simpler—option. Placing EBC among some of the world’s best thru-hikes underscores its bucket-list status, and budgeting for it correctly is the first step to success.
Detailed EBC Trek Budget (14 Days, Per Person, USD)
A comprehensive breakdown of estimated costs for the Everest Base Camp trek, by package type.
Description
Cost varies significantly based on departure location, time of year, and how far in advance you book.
Tips
- Book 4-6 months in advance for better deals.
- Consider flying into Kathmandu during the shoulder seasons.
Description
Visa on arrival is available at Kathmandu’s Tribhuvan International Airport. Price depends on duration (15, 30, or 90 days).
Tips
- Bring exact USD cash and passport-sized photos.
- Fill out the online application before arrival to save time.
Description
Essential for high-altitude trekking. Must cover emergency medical care, helicopter rescue, and trip cancellation.
Tips
- Confirm your policy covers trekking up to 6,000 meters (approx. 19,685 ft).
- Read the fine print regarding exclusions.
Description
Includes permits, experienced guide, porters, accommodation (teahouses), and meals during the trek. Prices vary greatly by company and inclusions (e.g., luxury vs. budget).
Tips
- Research reputable local and international operators.
- Ensure the package clearly lists what’s included and excluded.
Description
This is for trekkers who manage their own permits, food, and accommodation. Requires significant planning and self-sufficiency.
Tips
- You’ll need TIMS and Sagarmatha National Park permits.
- Budget for teahouse stays ($5-10/night) and meals ($30-50/day).
Description
Includes trekking boots, warm clothing, sleeping bag, backpack, and other essentials. Can be minimized by renting some items in Kathmandu.
Tips
- Borrow or rent what you can to save money.
- Invest in good quality boots and a warm sleeping bag.
Description
Covers tips for guides/porters, snacks, hot showers, charging devices, souvenirs, and unforeseen expenses.
Tips
- Always carry extra cash for emergencies.
- Prices for goods increase significantly with altitude.
Strategic Synthesis: How Can You Optimize Your Trekking Budget?

With a firm grasp of the individual cost components, we can synthesize this data into a high-level framework for decision-making. This universal equation and set of strategies will empower you to optimize the budget for any trek, anywhere in the world.
What is the Universal Trek Budgeting Equation?
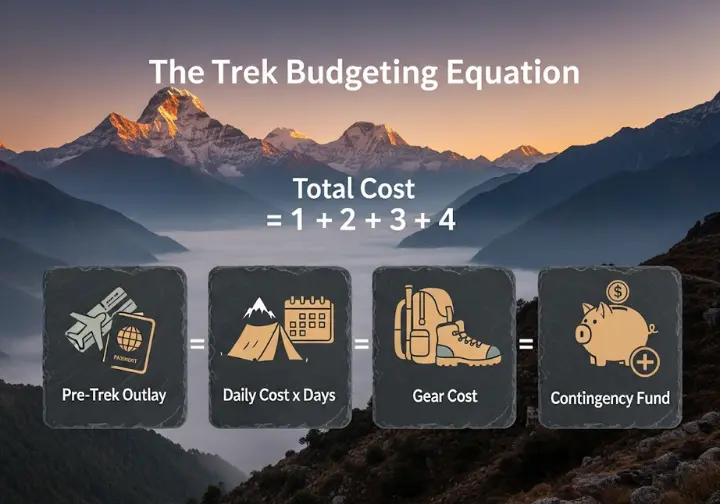
The cost of any major trek can be distilled into a universal mental model, a foundational part of any sound financial strategy. By understanding these fundamental components, any aspiring trekker can create a data-backed financial plan.
Total Trek Cost = (Pre-Trek Capital Outlay) + (Daily On-Trail Cost × Number of Days) + (Gear Cost) + (Contingency & Resettlement Fund)
The single most powerful multiplier of your total cost is trek duration. Every additional day on the trail, and especially every “zero day” spent in a town, directly increases the total expenditure. This is why accurate digital route planning for hiking is not just a logistical exercise, but a financial one. Key variables that modify the inputs to this equation include trek location (Everest is more expensive than Annapurna), altitude profile (higher altitude means higher daily costs), and trekking style (frugal vs. comfort).
Conclusion
A successful international trek is a testament to foresight and planning. The financial journey is as important as the physical one, and mastering your personal budgeting puts the world’s greatest trails within your reach.
- Successful international trek budgeting begins months in advance by creating a master budget that includes a crucial 2-3 month post-trek resettlement fund.
- On the trail, the most effective cost-control measures are eating local cuisine like Dal Bhat, purifying your own water, and renting expensive specialty gear like down jackets and sleeping bags.
- Recent regulations in Nepal making guides mandatory have largely eliminated the cost advantage of independent trekking; local package tours are now highly cost-competitive and offer a significant safety advantage.
- A universal budgeting formula provides a reliable framework for planning any trek, with trek duration being the single most significant factor driving total cost.
Download our free, comprehensive Trek Budgeting Spreadsheet to start planning your adventure, and explore our full library of advanced trekking guides to build your skills.
Frequently Asked Questions about Budgeting for a Major Trek
What is the single biggest expense for an international trek?
For most people traveling from North America or Europe, the international airfare to the destination country is the single largest upfront cost. Once in-country for a trek like EBC, the domestic flight to the trailhead (e.g., the Kathmandu to Lukla flight) can be the next most significant expenditure.
Is it cheaper to trek independently in Nepal now?
No, due to new laws making guides mandatory, the cost savings of trekking independently have mostly disappeared. When you add up all the mandatory costs an individual must now pay (guide, permits, flights), a budget package from a local agency is often the same price or even cheaper, while adding a significant layer of safety and logistical support.
How much should I budget for tips for my guide and porter?
You should plan to tip approximately 10-15% of the total trek cost. This is not an optional bonus but an expected and vital part of your guide and porter’s income, so it must be included in your budget from the start.
What is the most effective way to save money on food and water on the trail?
The most effective strategy is to consistently eat local food like Dal Bhat, which often comes with free refills, and to carry your own water filter or purification tablets to avoid buying expensive bottled water. A single hiker can save $50-$150 on water alone over a multi-week trek by purifying their own.
Risk Disclaimer: Hiking, trekking, backpacking, and all related outdoor activities involve inherent risks which may result in serious injury, illness, or death. The information provided on The Hiking Tribe is for educational and informational purposes only. While we strive for accuracy, information on trails, gear, techniques, and safety is not a substitute for your own best judgment and thorough preparation. Trail conditions, weather, and other environmental factors change rapidly and may differ from what is described on this site. Always check with official sources like park services for the most current alerts and conditions. Never undertake a hike beyond your abilities and always be prepared for the unexpected. By using this website, you agree that you are solely responsible for your own safety. Any reliance you place on our content is strictly at your own risk, and you assume all liability for your actions and decisions in the outdoors. The Hiking Tribe and its authors will not be held liable for any injury, damage, or loss sustained in connection with the use of the information herein.
Affiliate Disclosure: We are a participant in the Amazon Services LLC Associates Program, an affiliate advertising program designed to provide a means for us to earn advertising fees by advertising and linking to Amazon.com. As an Amazon Associate, we earn from qualifying purchases. We also participate in other affiliate programs and may receive a commission on products purchased through our links, at no extra cost to you. Additional terms are found in the terms of service.


